Some applications on your computer can get in your way from time to time, especially if you don’t use them, or you use an alternative. So you may be wondering how to uninstall Skype in Windows 10 if you never use the application.
There are a few applications that are probably on your Windows 10 computer that you didn’t install yourself. These apps are either included with the Windows 10 installation, or they are added by your computer’s manufacturer.
One of these applications is probably Skype, which is a popular tool for communicating with people. It has voice chat and video chat, and you may know a lot of people that use it all the time. But if you aren’t one of those people, then you might prefer not to have it installed on your laptop or desktop. Our tutorial below will show you how to uninstall Skype in Windows 10.
How to Uninstall Skype in Windows 10
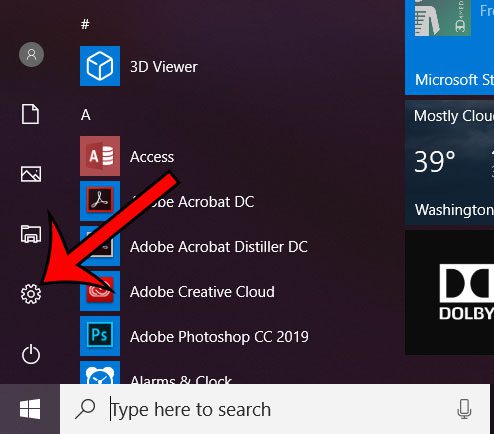
- Click Start.
- Choose Settings.
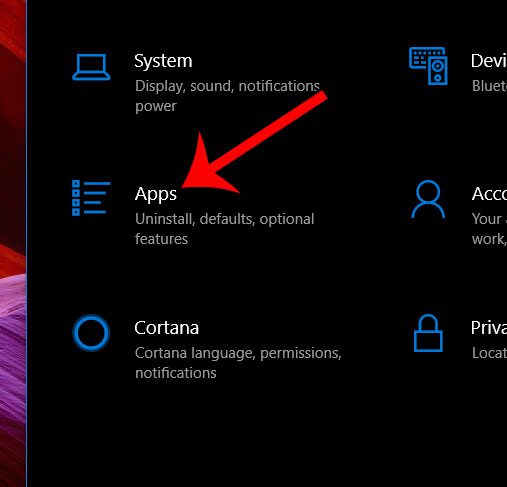
- Select Apps.
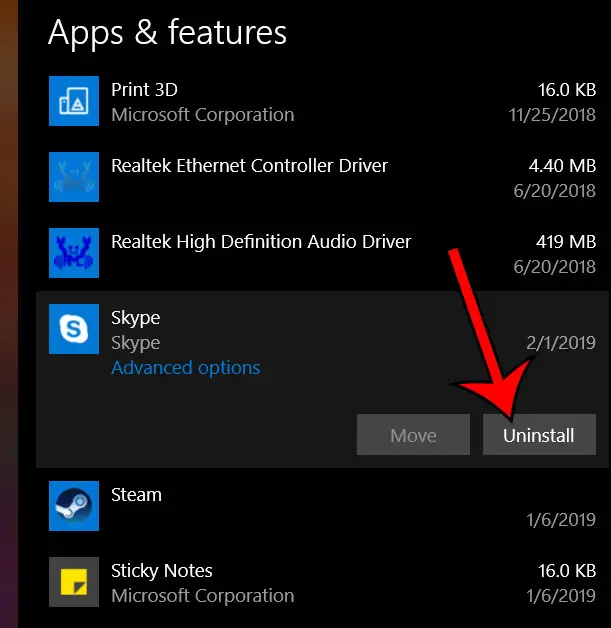
- Click Skype, then Uninstall.
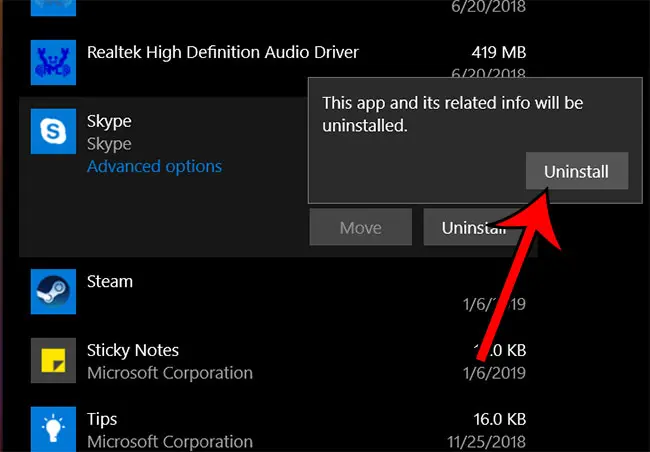
- Click Uninstall again to confirm.
Our article continues below with additional information on uninstalling Skype in Windows 10, including pictures for these steps.
Removing Skype from a Windows 10 Computer (Guide with Pictures)
The steps in this article were performed on a Windows 10 laptop. We are going to be removing the Skype app from your computer in the steps below. You can always re-download Skype from the Microsoft Store later on if you wish.
Step 1: Click the Start button at the bottom-left corner of the screen.

Step 2: Select the Settings icon at the bottom-left of the Start menu.
Step 3: Choose the Apps option from the Settings menu.
Step 4: Scroll down to find the Skype app, click it once, then click the Uninstall option.
Step 5: Select Uninstall again to complete removal of the application.
Would you like your Windows 10 menus to be a little less harsh on your eyes when viewing them in the dark? Find out how to switch to dark mode in Windows 10 and use a color scheme that’s better for low-light environments.
Additional Sources

Matthew Burleigh has been writing tech tutorials since 2008. His writing has appeared on dozens of different websites and been read over 50 million times.
After receiving his Bachelor’s and Master’s degrees in Computer Science he spent several years working in IT management for small businesses. However, he now works full time writing content online and creating websites.
His main writing topics include iPhones, Microsoft Office, Google Apps, Android, and Photoshop, but he has also written about many other tech topics as well.