You have a dozen photos from the weekend and want them in one Facebook post instead of twelve separate ones. On a computer, click Photo/video at the top of your Feed, select all the photos at once, add more or edit them if you like, pick your audience and click Post.
The computer steps below use the labels in Meta’s Help Center. The phone app follows the same idea, but its buttons can differ by version.
A Facebook Account and Your Photos
You only need a Facebook account and the photos saved somewhere your device can reach them, such as a folder on your computer or your phone’s photo library. Two terms come up often:
- Post: a single update in your Feed and on your profile. A post with several photos shows them together, and friends can open each one.
- Album: a named collection of photos on your profile. It can grow over time and has its own privacy setting.
If you just want people to see the weekend at a glance, a post is enough. If you plan to keep adding pictures from the same event, an album is the better home (more on that below).
It also helps to sort the photos before you upload. Put them in one folder and delete blurry shots or near duplicates first. Choosing from a tidy folder is far quicker than picking through a whole camera roll inside a small upload window.
Post Several Photos in One Post on a Computer
These steps follow Meta’s Share photos on Facebook instructions for a web browser.
- Go to Facebook in your browser and sign in. Stay on your Feed (the home page).
- At the top of your Feed, click Photo/video.
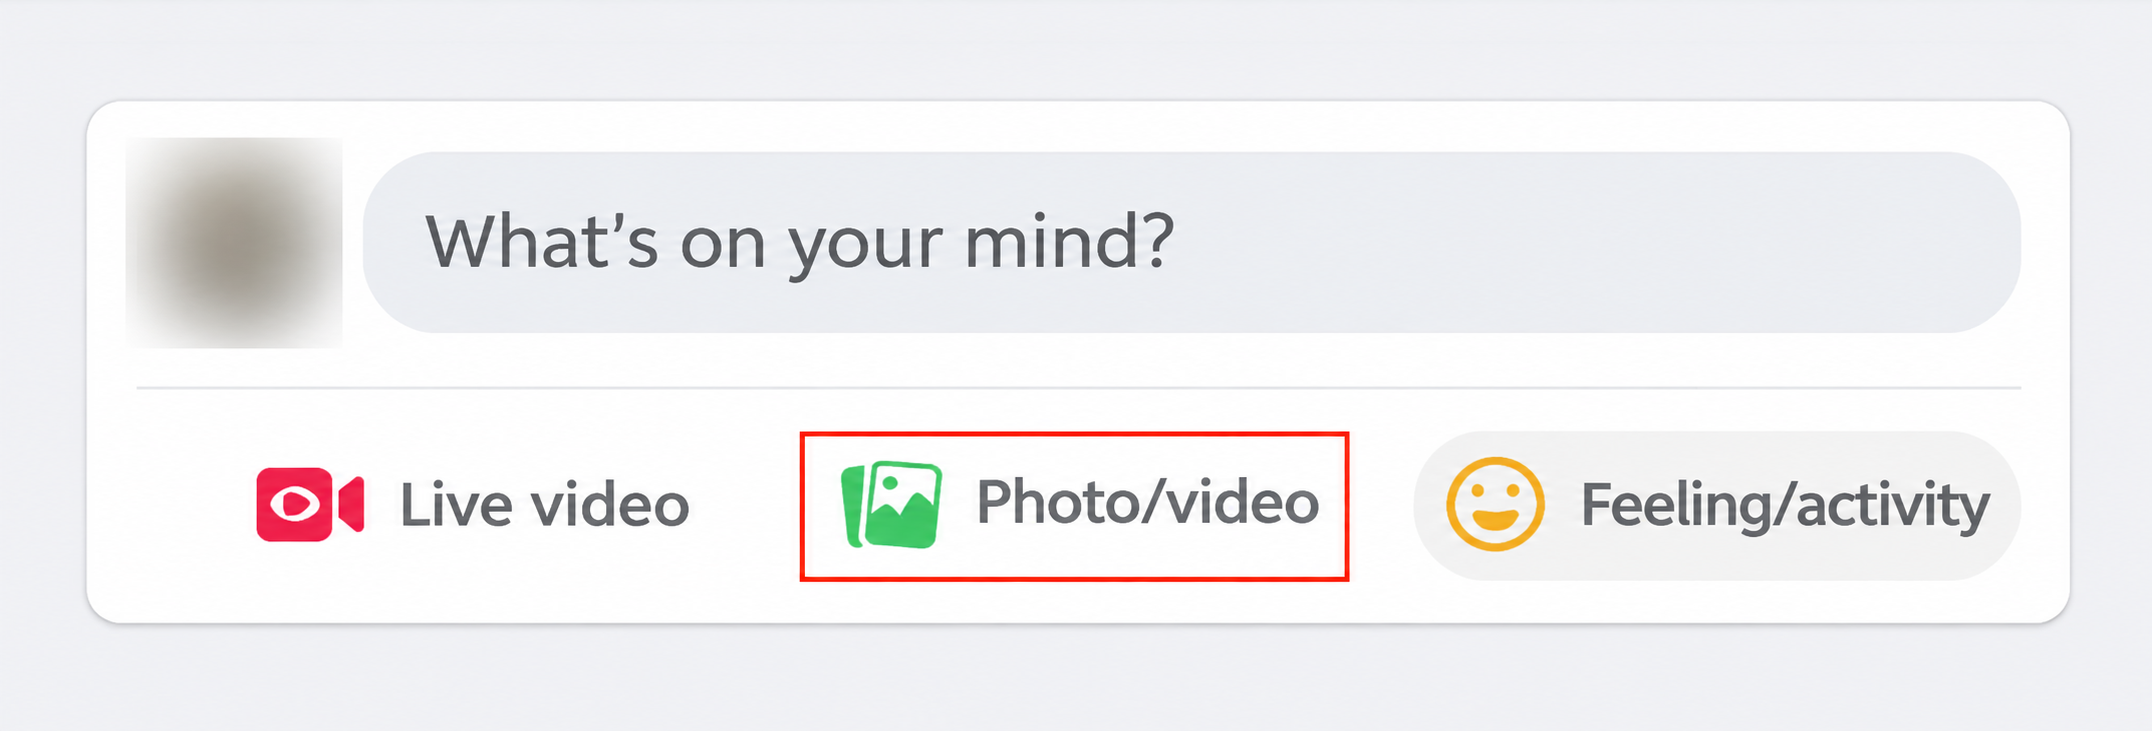
- When your computer’s file window opens, select the photos you want. To pick several at once, hold Ctrl (Windows) or Command (Mac) and click each photo, or click the first photo, hold Shift and click the last one to select everything in between.
- Click Open (or the matching button in your file window). Facebook loads the photos into the post you are creating.
- Type a caption in the text box if you want one.
- Select your audience, then click Post.
That is the whole process. The selecting step is where most people get stuck: the Ctrl, Command and Shift shortcuts belong to Windows and macOS, not Facebook, so they work the same way in any file window.
Example: Priya has 14 photos from a lake trip in one folder. She clicks Photo/video, clicks the first file, holds Shift and clicks the last, then clicks Open. All 14 appear in the post draft, and she writes one caption for the whole set.
Add More Photos or Edit Them Before You Post
You do not have to get every photo in the first selection. Before you click Post, Meta lists these options in the post window:
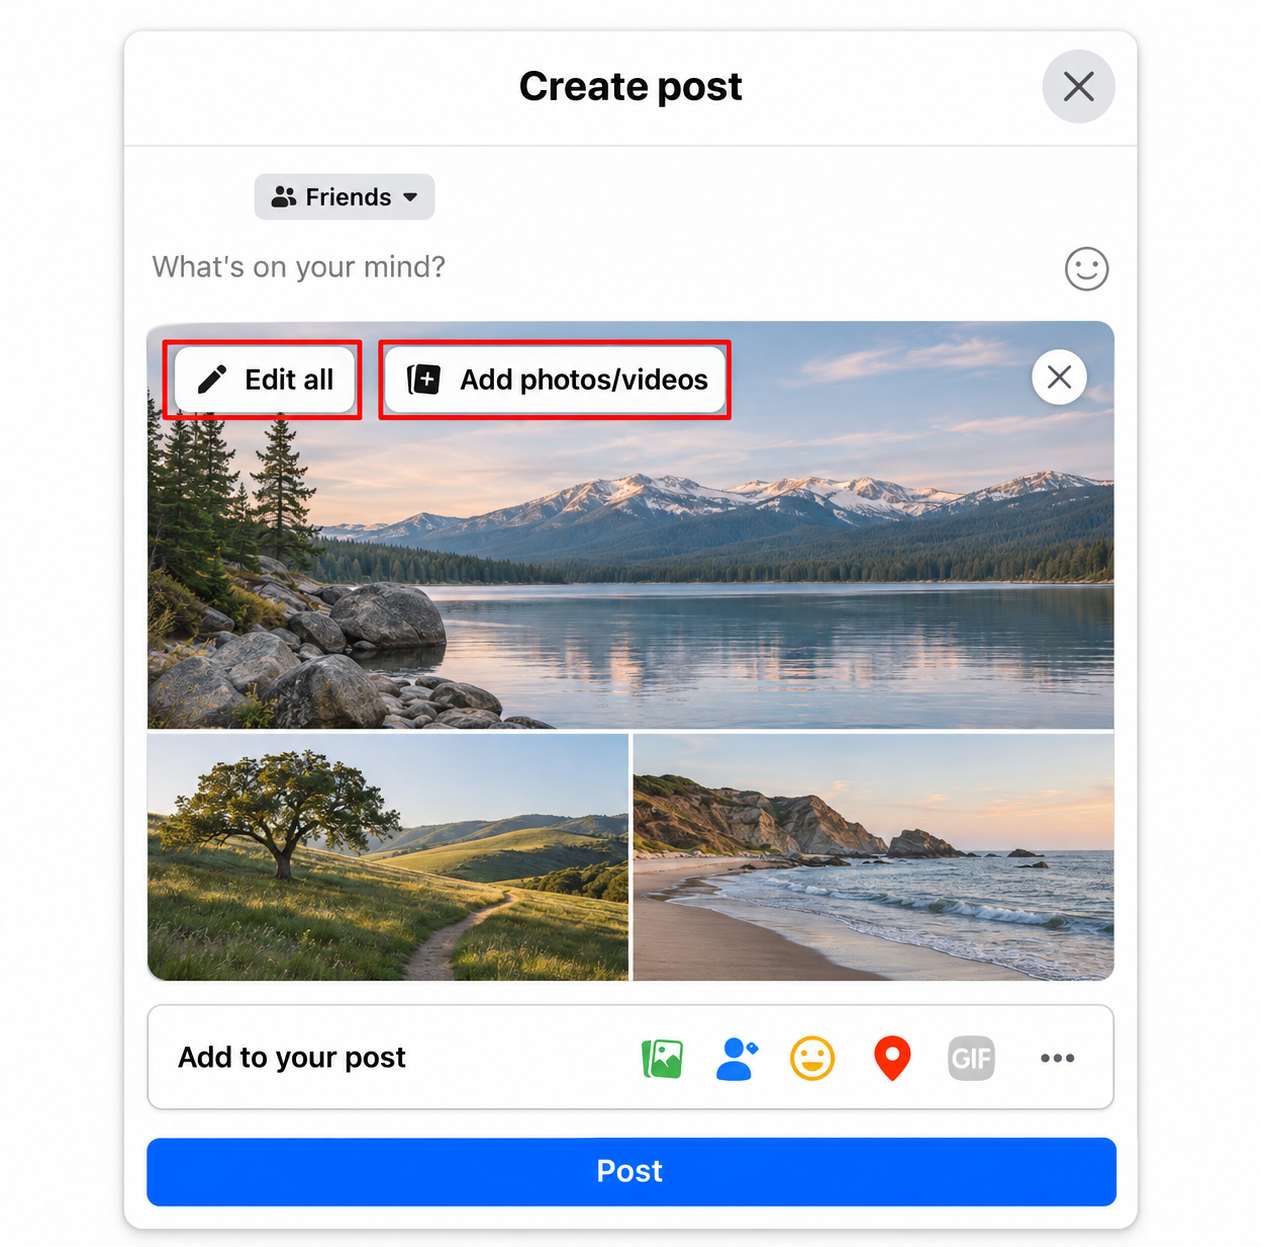
- Click Photos to add more photos to the same post.
- Click Edit All to work on the photos you have added.
- Click Add photos/videos to bring in more photos or a video clip.
Use these if you remember a shot from another folder after the first upload. The new photos join the same post rather than starting a second one.
Exactly which editing tools appear inside Edit All (captions per photo, reordering, cropping) is not spelled out in Meta’s steps, so look for them in that view rather than expecting a particular layout. If a tool you want is missing, finish the post and check what can be changed afterward (see the questions section).
Tag People, Check In or Add a Feeling
Meta’s steps list three optional extras before you post:
- Tag friends: name the people who appear in the photos.
- Check in: add a location, such as the park or restaurant. The Facebook check-in feature works the same way here as on a text post.
- Feeling/activity: add a short status like celebrating or traveling.
There is also an Options button for further choices. All of these are optional, and you can skip them and post the photos with only a caption.
Be thoughtful with tags. How a tag shows up for the tagged person depends on their own settings, so a tag does not guarantee that a photo appears on their profile.
Choose Who Sees the Post
The audience selector decides who can see the post and its photos. Check it every time, because Facebook may start from the audience you used last.
The exact list of choices is set by Facebook and can change, so read the options shown in the selector rather than assuming a default. If you mostly share with family, set the audience before you click Post rather than changing it later. For a broader look at limiting what strangers see, read how to make a Facebook account private.
One exception: photos added to an album follow the album’s privacy setting, covered in the album section below.
Post Several Photos From the Phone App
The idea is the same on an iPhone, iPad or Android phone: start a new post, choose photos from your device’s gallery and select more than one before you continue.
- Open the Facebook app and go to your Feed.
- Start a post and look for a photo or Photo/video option.
- In the gallery that opens, look for a way to select several photos, then tap each photo you want.
- Continue to the post screen, add a caption, check the audience and tap Post.
Meta’s Help Center has separate iPhone and Android versions of these instructions, and the button names in the app can change between updates. If what you see does not match, switch the Help Center article to your device type and follow its current wording. The app also needs permission to see your photos; if the gallery looks empty or shows only a few pictures, check the photo access setting for Facebook in your phone’s settings.
Photo Post or Album: Which Should You Use?
| Multi-photo post | Album | |
|---|---|---|
| Best for | A one-time batch from a day or event | A collection you will keep adding to |
| Where it lives | Your Feed and profile | The Albums section of your profile Photos |
| Who sees it | The audience you pick for the post | The album’s privacy setting |
| Size | A set of photos in one update | Up to 1,000 photos per album, per Meta |
| Adding later | Check Meta’s Edit your post help | Add to Album at any time |
Example: for a single birthday party, a post is enough. For a home renovation you photograph every week, an album keeps every stage together and lets you add new photos without starting a new post each time. To start a new collection instead, Meta has a separate help article called Create a photo or video album on Facebook.
Add Photos to an Existing Album
Meta’s Add photos or videos to an existing album page gives these steps on a computer:
- Click your profile picture, then click your name.
- Click Photos, then click Albums.
- Click the album you want to add to.
- Click + Add to Album.
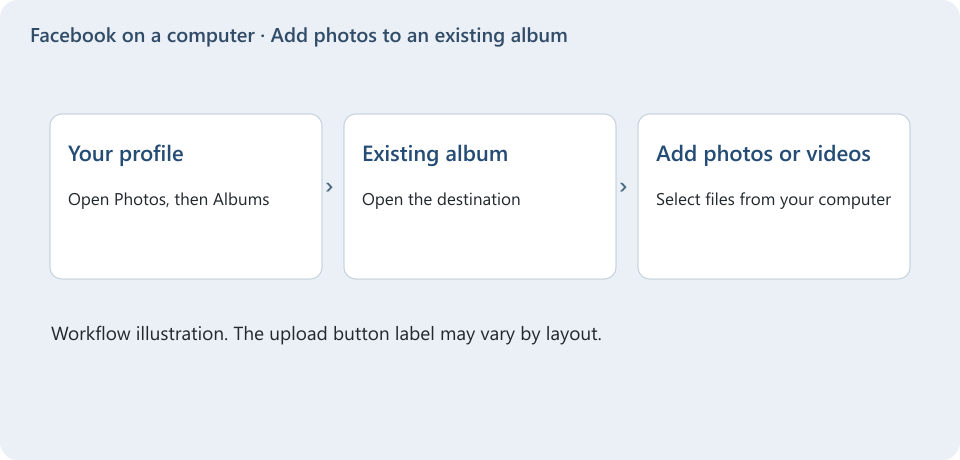
- Click Upload Photos or Videos.
- Choose the photos (the same Ctrl, Command or Shift tricks apply), then click Open.
- Click + Add to Album again, then click Go to Album to see the result.
A few limits from the same Meta page:
- You can add photos only to albums you created, or to shared albums you are a contributor to.
- Live videos cannot be added to an album.
- An album can hold up to 1,000 photos.
- When you add photos to an album, the album’s privacy setting decides who can see the post about them, and you cannot change that post’s privacy without changing the album’s.
If you do not see an Add Photos button in an album, Meta has a separate help article on that exact problem, which you can find from its Help Center search.
Posting From a Page, Group or Story
Meta keeps separate help articles for sharing photos from a Facebook Page and for sharing photos to your story. The basic pattern of choosing several photos at once is similar, but the screens and options differ, so open the matching Help Center article before you start. In a group, start the post from inside the group itself.
When the Photos Will Not Upload
If the upload stalls or some photos never appear, try these general checks one at a time:
- Check your internet connection. A weak signal can upload a few photos and then stall on the rest.
- Try a smaller batch, such as five photos, to see whether one particular file is the problem.
- On a phone, update the Facebook app and make sure it has permission to access your photos.
- On a computer, refresh the page or try another browser.
- Make sure the files are ordinary photo files that open normally on your device.
Meta also has an “I can’t upload photos on Facebook” help article linked from its photo sharing page. Use it if these checks do not solve the problem.
If you close the post window by accident, the text you typed may be saved as a draft in some cases; see how to find draft posts on Facebook for where to look.
Common Questions About Posting Several Photos
How many photos can I put in one album?
Meta says you can upload up to 1,000 photos to an album. Meta’s sharing steps do not give a limit for a single post, so if you have a very large set, an album is the safer choice.
Can I add photos to a post after I publish it?
Meta has an “Edit your post on Facebook” help article that covers changes after posting. What you can change may depend on the post type and app version, so check that article rather than deleting and reposting.
Why can I only select one photo at a time?
On a computer, the file window needs a modifier key (see step 3 above). On a phone, if the gallery only lets you pick one, Facebook may have limited photo access; allow access to all photos for Facebook in your phone settings, then try again.
Can I change who sees photos I added to an album?
Change the album’s privacy setting. Meta says the album’s setting controls who sees the post about those photos.
How do I download the photos again later?
Uploading and downloading are separate tasks. To get copies back, see how to save all photos from Facebook.
Next step: put the photos you want in one folder, then start a post with Photo/video and select them all in a single pass.

Matthew Burleigh is the founder, head writer, and editor of Solve Your Tech, which he launched in 2012. He has written technology tutorials since 2008 and worked in IT since 2003, including small-business support, IT management, and consulting. He holds Bachelor’s and Master’s degrees in Computer Science from Arizona State University.
Matthew writes practical guides for Windows, iPhone and iPad, Microsoft Office, Outlook, Google apps, and Android. Solve Your Tech’s guides are checked step by step against the device or app maker’s own documentation and tested on his own devices whenever he has the hardware or software, with clear steps, sources, and update dates.
Read more about Matthew and how Solve Your Tech writes and updates its guides, or report a correction.