To erase a person from a picture on iPhone, open the photo in Photos, tap Edit, tap Tools, choose Clean Up, then tap, brush or circle the person and tap Done. Clean Up needs an iPhone that supports Apple Intelligence. On other iPhones, use a free editor such as Google Photos or Snapseed, or crop the person out.
These steps are for Photos in iOS 27; in iOS 18.1 and iOS 26, Clean Up sits in the editing tools row instead of under Tools. It runs on the iPhone 15 Pro and Pro Max, every iPhone 16 and 17 model and iPhone Air. The standard iPhone 15 and iPhone 15 Plus can’t use Clean Up, even after an update.
Which Method Should You Use?
| Your situation | Best method | Why |
|---|---|---|
| iPhone 15 Pro or newer with Apple Intelligence on | Clean Up in Photos | Built in, free and fills the background for you |
| iPhone 15, 15 Plus or older | Google Photos Magic Eraser or Snapseed Healing | Free apps that don’t need Apple Intelligence |
| Person is at the edge of the frame | Crop in Photos | No invented background, so the result is always clean |
| Person overlaps your main subject | Try Clean Up or an app, then judge the result | Every tool struggles when bodies overlap |
Turn On Apple Intelligence
Check that Apple Intelligence is on. Open Settings, tap Apple Intelligence & Siri and turn on Apple Intelligence. Apple’s Apple Intelligence requirements say your iPhone language and Siri language must match a supported language, and the models need up to 8 GB of free storage (up to 14 GB on iPhone 17 Pro, iPhone 17 Pro Max and iPhone Air). Apple’s Clean Up availability page adds that Clean Up needs iOS 18.4 or later in the European Union and doesn’t work on iPhones bought in mainland China.
Make a copy of the photo. Photos keeps your original and lets you revert later, but a copy lets you compare both versions side by side. Open the photo, tap the More button (three dots), then tap Duplicate. Apple explains this in Duplicate and copy photos and videos. Edit the copy.
How to Remove a Person With Clean Up in Photos
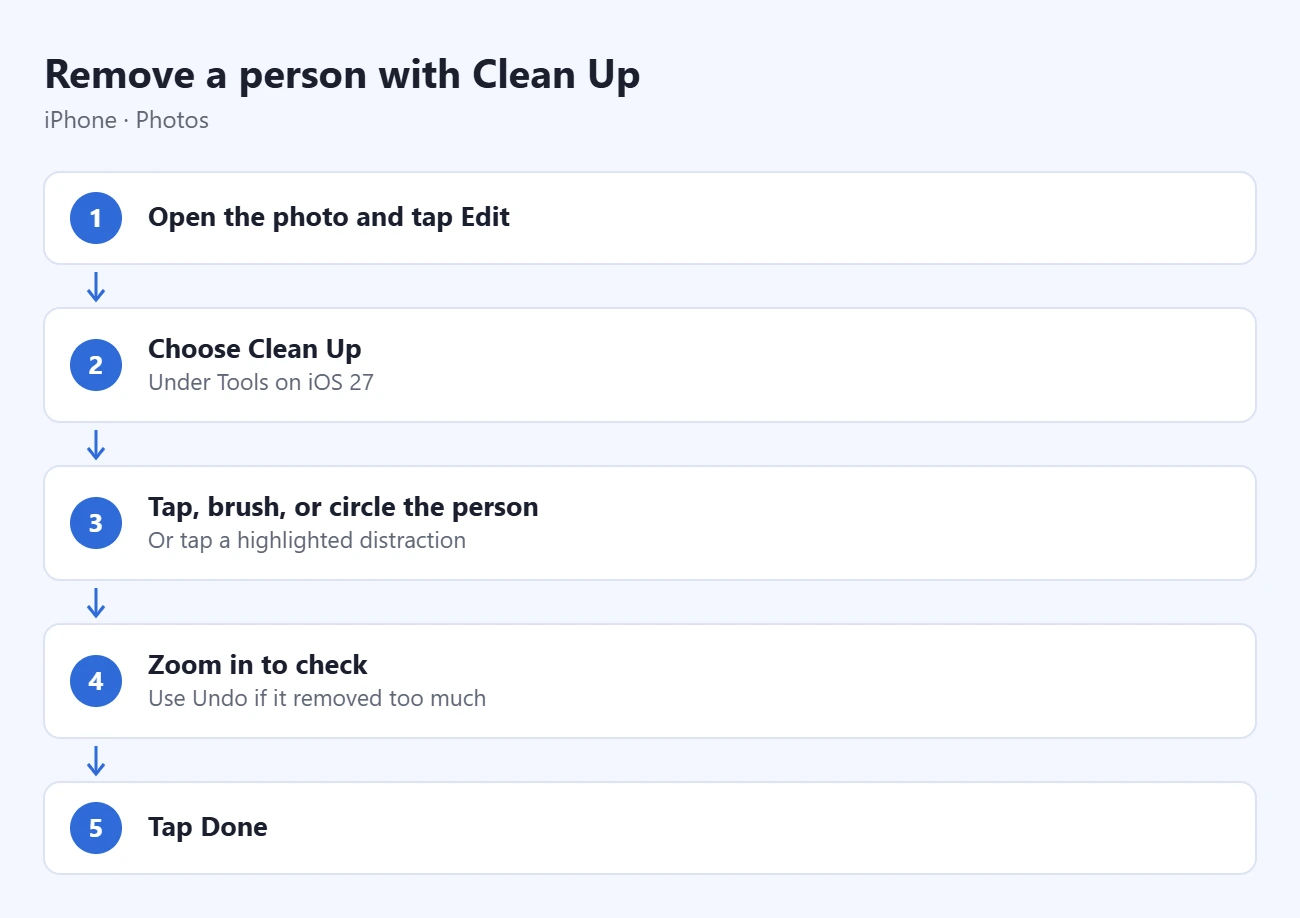
- Open the photo in Photos and tap Edit (the icon with three sliders). The editing tools appear below the photo.
- Tap Tools, then tap Clean Up. In iOS 18 and iOS 26, tap Clean Up in the tool row. The first time you use it, your iPhone may need a minute to download Clean Up before you can start.
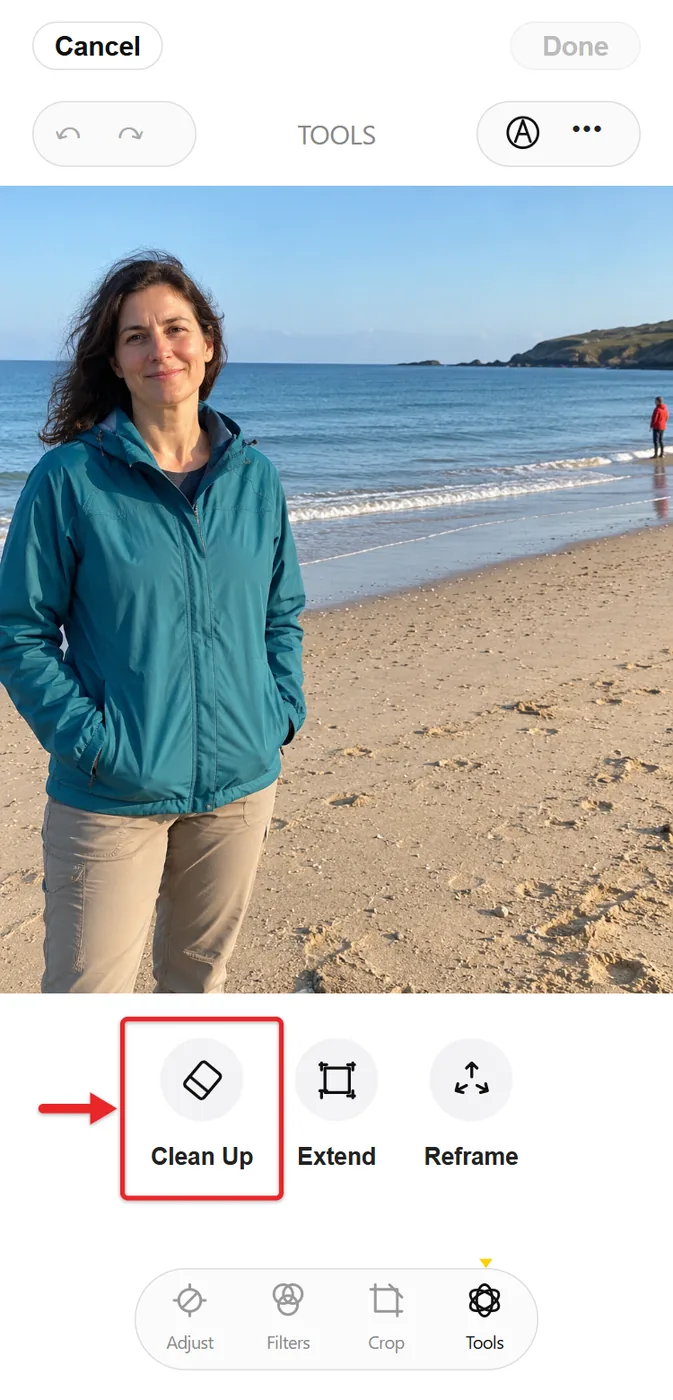
- Look at the photo. Clean Up may highlight people or objects it thinks you want gone. Tap a highlighted person to remove them.
- If the person isn’t highlighted, brush over them or draw a circle around them with your finger. Include their shadow and any reflection, or those stay behind.
- In iOS 27, choose a processing mode with the button at the top of the screen. Auto picks for you, Fast works quickly on small objects against plain backgrounds, and High Quality takes longer but handles harder removals, such as several people in the background. If you pick High Quality, tap Clean Up to process the change.
- Pinch to zoom in and check the edges. Tap Undo if the selection took something you wanted to keep, then try a tighter selection.
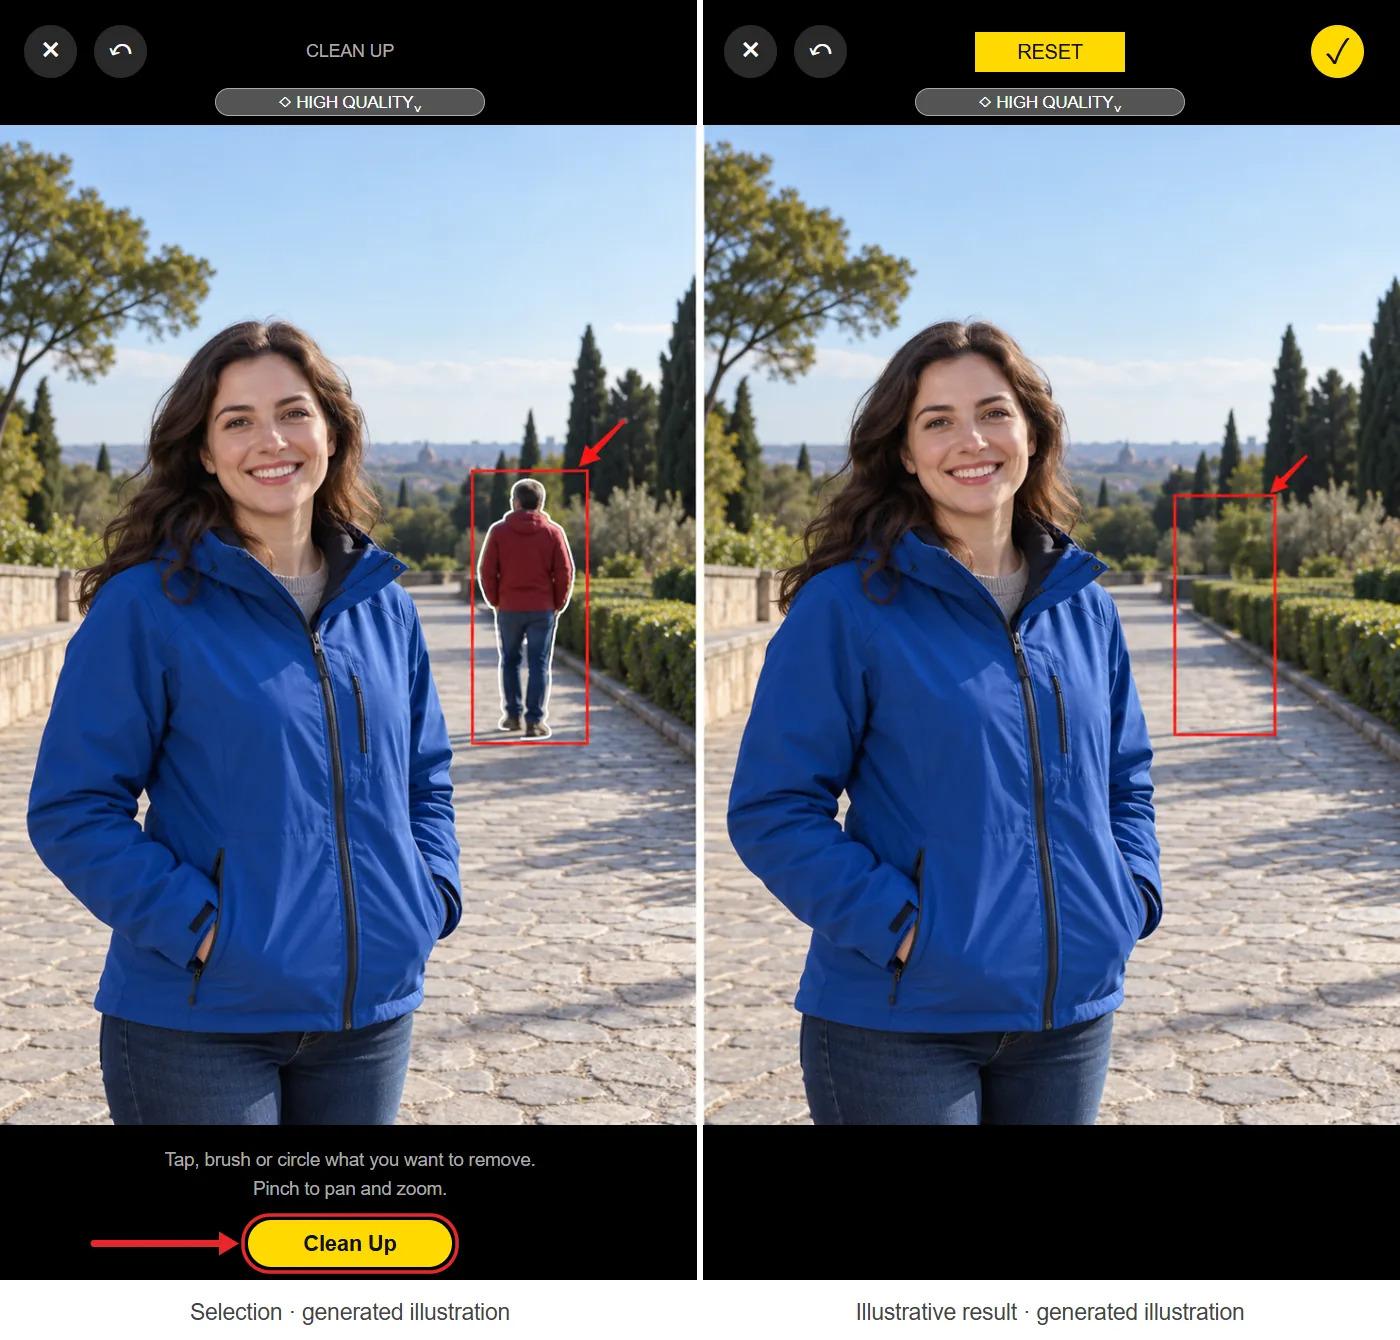
- Tap Done to save the edit. The edited photo replaces the copy in your library.
Apple’s guide to cleaning up, extending and reframing photos covers the same tool. Apple’s server-based photo editing tools have daily usage limits, so you may occasionally have to wait before running High Quality again.
Tips for a cleaner Clean Up
- Select the whole person, not only the face. If you brush over just a face, Photos may blur or pixelate it and show Safety Filter Applied instead of removing it. Users on the Apple Support Community report there’s no setting to turn this off, so select the full body.
- Work in passes. For a large person, remove one part, check the result, then remove the rest. For a group, remove one person at a time.
- Expect the best results on simple backgrounds. A small person in front of sky, sand, grass or a plain wall usually disappears cleanly. A person standing in front of other people, text or a detailed building is much harder.
- Remember the fill is invented. Clean Up creates new pixels that match the area around the person. It can’t show what was really behind them.
Use Google Photos or Snapseed on Other iPhones
If your iPhone can’t run Clean Up, a free app can do a similar job.
Google Photos Magic Eraser. Google made Magic Eraser free for all Google Photos users on iOS 15 or later, with no Google One subscription. Install Google Photos, allow it to access your photos, open the picture, tap Edit, tap Tools, then tap Magic Eraser. Tap a suggested person or circle the one you want gone, then tap Done and save a copy.
Snapseed Healing. Google’s free Snapseed app has a Healing tool that suits small or medium areas.
- Open your photo in Snapseed.
- Tap Tools, then tap Healing.
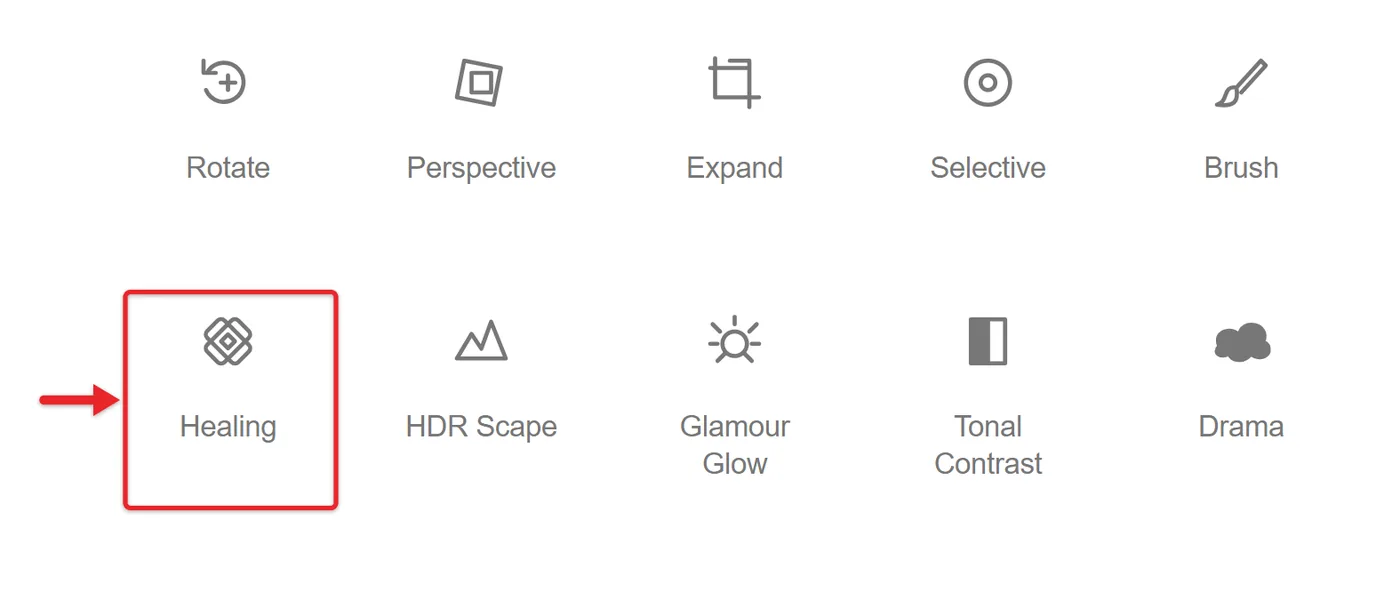
- Zoom in and brush over the person. Google’s Healing guide explains the brush and tap behavior. Undo a poor result and try a smaller stroke.
- Tap the check mark to apply the change, then review the whole image.
- Tap Export, then Save a copy, so the original stays untouched. Open Photos and confirm the new copy is there.
Google’s help pages also cover zooming and choosing tools and saving, copying and exporting on iOS. Healing blends nearby pixels rather than generating a new scene, so a large person in the foreground rarely vanishes cleanly.
Crop Someone Out Instead
If the person is near an edge, cropping is often the best choice because nothing is invented.
- Open the photo in Photos and tap Edit.
- Tap Crop. A frame appears around the photo.
- Drag the corners of the frame inward until the person is outside it.
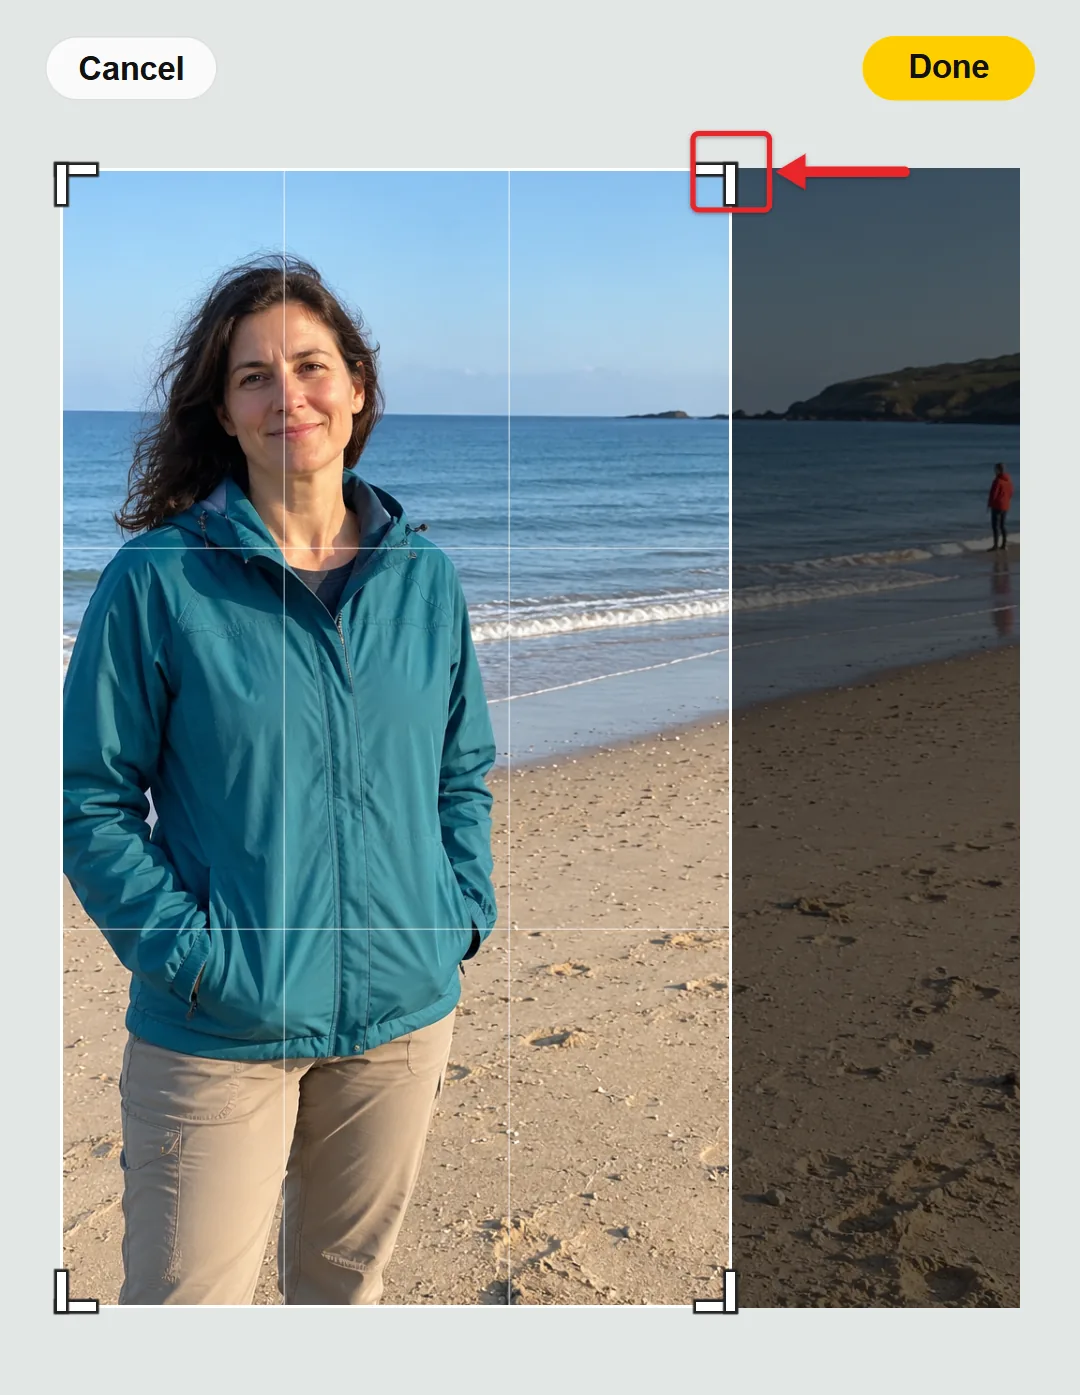
- Tap Done.
Cropping changes the shape of the picture and removes everything outside the frame. For more of the crop, filter and undo controls, read about editing a photo on iPhone.
To add a person or object to a photo instead of removing one, learn how to paste a picture on another picture on iPhone.
If Clean Up Is Missing or Not Working
- No Clean Up option at all. Check your model in Settings > General > About. The iPhone 15 and 15 Plus don’t support it. On a supported model, make sure Apple Intelligence is on and your device and Siri languages match.
- Clean Up appears but won’t start. Connect to Wi-Fi and wait for the download to finish. Free up storage if your iPhone is close to full.
- You only see the old tool row. In iOS 27, Clean Up is inside Tools. In iOS 26 and earlier, it’s in the main row of editing tools.
- The person comes back blurred, not removed. You likely selected only the face. Undo and select the whole person.
- A shadow or outline is left behind. Zoom in and brush over what remains.
Undo or Revert the Edit
While you’re still editing, tap Undo to step back one change. After you tap Done, you can return to the untouched photo: open it, tap the More button (three dots) and choose Revert to Original, or tap Edit and then Revert on versions that show it there. Apple’s Undo and revert photo edits page covers both options. Reverting removes every edit on that photo, including crops and filters.
If a blurred background is the real problem, you can remove the Portrait effect from an iPhone photo without reverting your other edits.
Clean Up Tool Questions
Why is there no Clean Up button on my iPhone 15?
The standard iPhone 15 and iPhone 15 Plus don’t support Apple Intelligence, so Photos doesn’t offer Clean Up on them. The iPhone 15 Pro and Pro Max do. Use Google Photos Magic Eraser or Snapseed instead.
Is Clean Up free?
Yes. It’s part of the Photos app on supported iPhones and needs no subscription. Apple applies daily usage limits to some server-based photo editing, so heavy use of High Quality may need a short wait.
Can I remove more than one person?
Yes. Remove one person at a time and check each result before moving on. Crowds and overlapping people are the hardest cases for any tool.
Does removing someone show the real background behind them?
No. Clean Up, Magic Eraser and Healing all create or blend replacement pixels. Keep your original when the real scene matters.
Will the edit sync to my other devices?
If iCloud Photos is on, the edited photo syncs to your other Apple devices, and you can still revert it to the original on any of them.

Matthew Burleigh is the founder, head writer, and editor of Solve Your Tech, which he launched in 2012. He has written technology tutorials since 2008 and worked in IT since 2003, including small-business support, IT management, and consulting. He holds Bachelor’s and Master’s degrees in Computer Science from Arizona State University.
Matthew writes practical guides for Windows, iPhone and iPad, Microsoft Office, Outlook, Google apps, and Android. Solve Your Tech’s guides are checked step by step against the device or app maker’s own documentation and tested on his own devices whenever he has the hardware or software, with clear steps, sources, and update dates.
Read more about Matthew and how Solve Your Tech writes and updates its guides, or report a correction.