You can create a table in a Microsoft Publisher document by opening the document, choosing the Home tab, clicking the Table button, and then specifying the number of rows and columns.
A Publisher document can take a lot of different shapes, but one thing that many Publisher files will have in common is the use of some multimedia elements.
One helpful option is a table, so it can be beneficial to know how to create tables in Publisher.
Our tutorial will explore this process below so you can start adding tables to your documents and using them to organize and display data.
Summary – How to Add a Table in Publisher 2013
- Open the document.
- Select the Home tab.
- Click the Table button.
- Choose the desired number of rows and columns.
Our guide continues below with additional information on how to make tables in Publisher, including pictures of these steps.
Microsoft Excel is often the first choice when you need to create a table or grid of data, but you may find that you also need a table when creating another type of document, such as one that you are working on in Publisher 2013.
Fortunately, Microsoft’s other products often allow for the creation of a table, and Publisher is no exception. Our tutorial below will show you how to insert a table into Publisher 2013. You are even able to specify the number of rows and columns in the table, and you can manually size it to your liking.
You should also check out our guide on creating tables in Excel if you’ve been looking for an easier way to sort and filter data in that application.
How to Insert a Table in a Publisher 2013 Document (Guide with Pictures)
The steps in this article will show you how to add a table to your Publisher document. You will be able to specify the number of columns and rows in the table before you add it.
Step 1: Open your document in Publisher 2013.
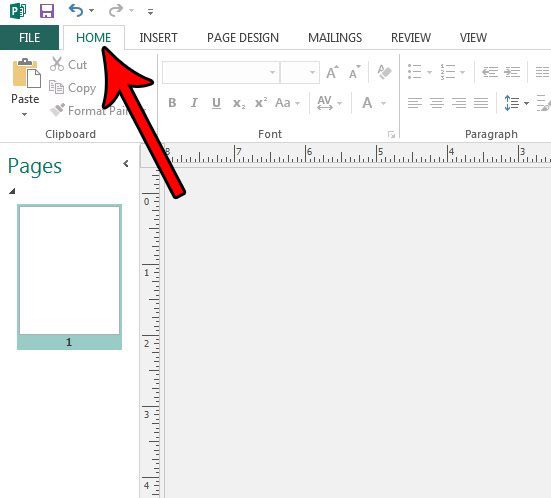
Step 2: Click the Home tab at the top of the window.

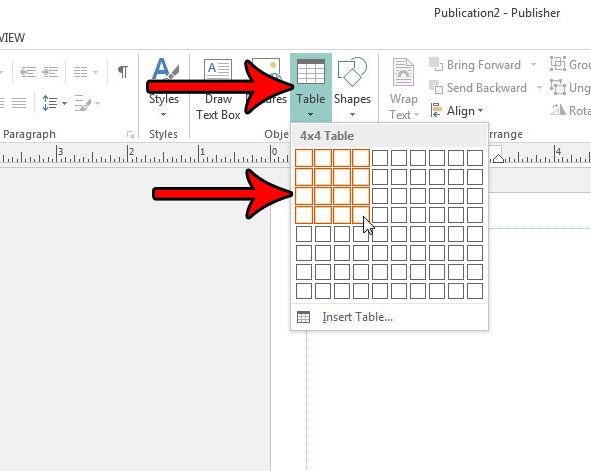
Step 3: Select the Table button in the Objects section of the ribbon, then choose the desired number of rows and columns.
I have selected a 4 x 4 table in the picture below, which means that my table will have 4 rows and 4 columns.

Now that you know how to create tables in Publisher 2013, you can start learning more about how to customize them.
We will discuss this more in-depth in the next section.
More Information on Working with Microsoft Publisher Tables
You are able to move the table around in the document by clicking on it and dragging it. You can also expand the height or width of the table by positioning your mouse over one of the borders and then clicking and expanding that border.
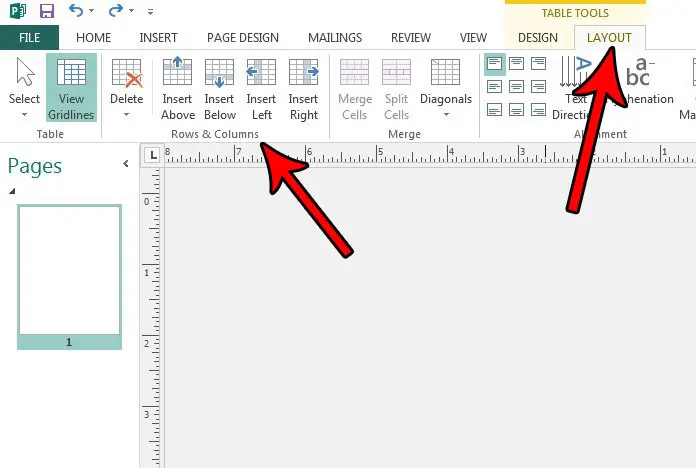
Additionally you can add another row or column by clicking the Layout tab under Table Tools, then clicking the appropriate row or column inserting button in the Rows & Columns section of the ribbon.

Do you need your document to be in a different orientation? Find out how to switch between portrait and landscape orientation in Publisher 2013 if you find that the current setting doesn’t meet your needs for the document.
What Are Some Reasons That You Might Want to Create Tables in Publisher?
Creating a table in Microsoft Publisher can be a beneficial feature for a variety of reasons, including data organization, improving document structure, and increasing visual appeal. Here are a few strong reasons why you should make a table in Microsoft Publisher:
Tables are helpful for organizing data in a structured and systematic manner. A table can help you present information elegantly, making it easier for readers to understand and digest whether you’re working on a report, brochure, or flyer.
Tables are excellent for comparing different sets of data. You can use them to contrast numbers, statistics, or other information to help your audience notice trends, discrepancies, or parallels.
Improved Readability: Tables have a grid-based layout that makes them easier to read. When displaying data, using a table helps to avoid clutter and ensures that the information is presented in a clear and organized manner.
Alignment management: The table generation features in Publisher enable you to accurately manage the alignment of text and numbers. This guarantees that your data is formatted consistently, which adds to the overall professionalism of your paper.
Tables can help you maintain layout consistency while building multi-page documents or templates. Tables may be simply duplicated on different pages, ensuring that your content seems cohesive and well-structured.
Tables can be visually appealing by using several formatting options such as borders, shading, and cell colors. These design features can enhance your document’s aesthetic appeal and make it more interesting for your readers.
Tables in Publisher are quite easy to alter. You may easily add and delete rows and columns, resize cells, and change the formatting. This adaptability enables you to modify your tables to meet changing content requirements.
Tables are essential when dealing with tabular data such as timetables, price lists, or product specs. They allow you to convey this info clearly and readily update it as needed without impacting the overall structure of the article.
Tables in Publisher can be adjusted to match your project’s style and branding. You can select fonts, colors, and line styles that complement the aesthetics of your work, ensuring a unified design.
Accessibility: Creating tables can help your content be more accessible. Screen readers and assistive technology can better analyze tabular data, making your information more accessible to people with impairments.
Cross-Reference: You may need to cross-reference material in longer publications such as reports or manuals. Tables give an orderly and structured approach to accomplish this, allowing readers to rapidly discover related facts.
Tables can act as a central repository for numerous data sets, making it easier to organize and reference information if you have scattered information that has to be aggregated into a single document.
In conclusion, establishing tables in Microsoft Publisher is a useful tool for improving data organization, improving visual appeal, and ensuring document consistency. Tables can help you present information efficiently and professionally, ensuring that your content is both relevant and visually appealing, whether you’re working on business reports, marketing materials, or any other type of publication.

Matthew Burleigh has been writing tech tutorials since 2008. His writing has appeared on dozens of different websites and been read over 50 million times.
After receiving his Bachelor’s and Master’s degrees in Computer Science he spent several years working in IT management for small businesses. However, he now works full time writing content online and creating websites.
His main writing topics include iPhones, Microsoft Office, Google Apps, Android, and Photoshop, but he has also written about many other tech topics as well.