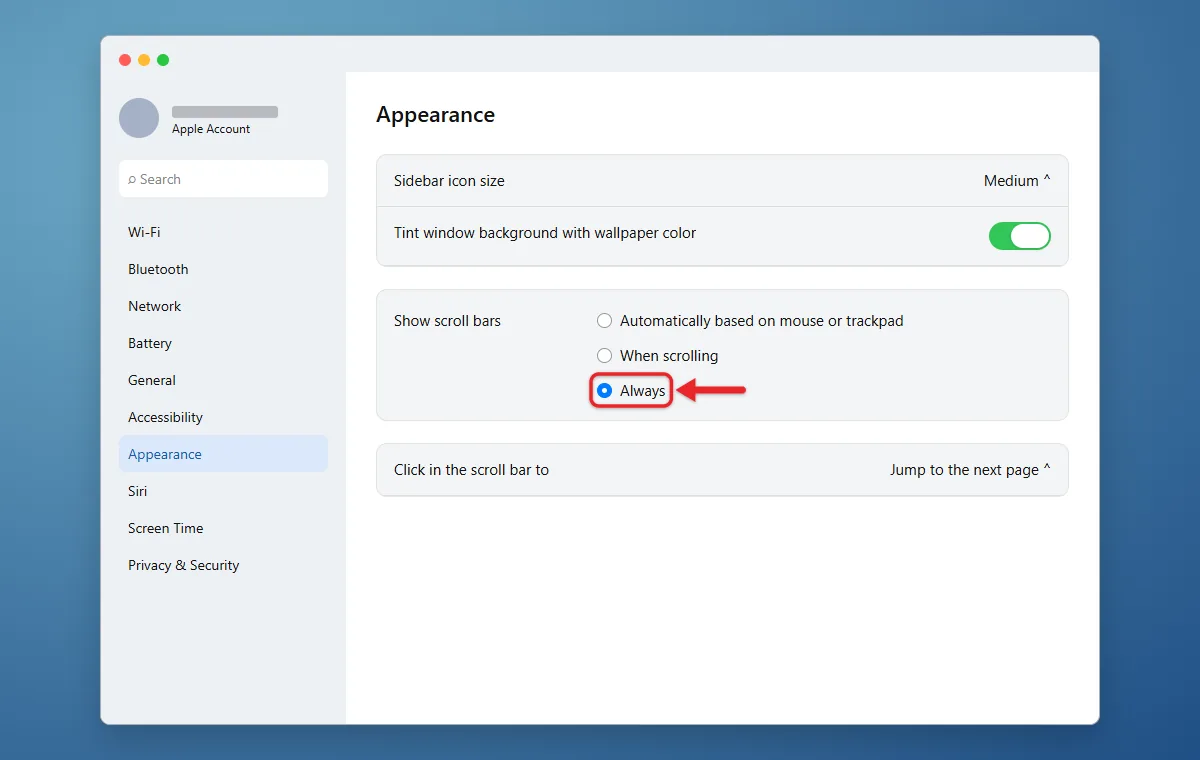
To keep scroll bars visible on your Mac, choose Apple menu > System Settings > Appearance, then set Show scroll bars to Always. The change takes effect right away, and scroll bars stay on screen in any window that has more content than fits.
These steps are for macOS Ventura 13 and later, including macOS Tahoe 26 and macOS Golden Gate 27, and match Apple’s guide to Appearance settings on Mac. On macOS Monterey 12 and earlier, the same setting is in System Preferences > General, with steps further down. The setting applies to your user account across the Mac, though some apps and websites draw their own scroll bars.
Why Scroll Bars Disappear on a Mac
A scroll bar only appears when a window holds more than it can show, such as a long web page or a folder with many files. With the default setting, Automatically based on mouse or trackpad, a Mac that uses a trackpad or a Magic Mouse hides scroll bars until you start scrolling, then fades them out a moment after you stop. That keeps the screen clean, but it also makes it hard to tell whether a window has more content below, or how far through a long document you are.
How to Always Show Scroll Bars
- Click the Apple menu in the upper-left corner of the screen and choose System Settings. The settings window opens.
- Click Appearance in the sidebar. If you don’t see it, type scroll bars in the search field at the top of the sidebar and click the result.
- Find Show scroll bars and choose Always.
- Open a long web page or a Finder folder with lots of files. A scroll bar now stays visible along the right edge of the window, even when you aren’t scrolling.
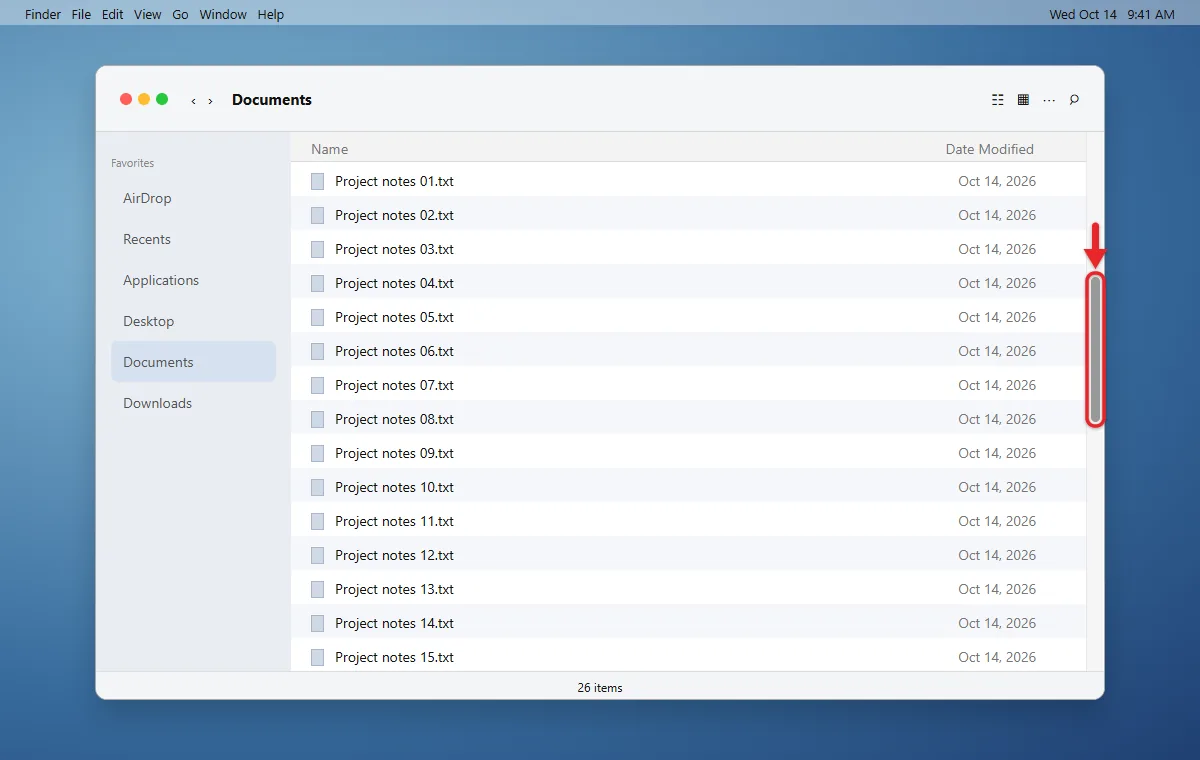
There’s no Save button and no restart. If an app that was already open still hides its scroll bar, quit it and open it again.
What Each Show Scroll Bars Option Does
| Option | What happens | Good choice if |
|---|---|---|
| Automatically based on mouse or trackpad | Apple says scroll bars stay hidden until you scroll if your device supports gestures, and stay visible if it doesn’t | You’re happy with the default and use one input device |
| When scrolling | Scroll bars are hidden until you start scrolling | You want the most room for content |
| Always | Scroll bars are always shown in windows that can scroll | You want a constant position marker or like to drag the bar |
The automatic option is why scroll bars can seem to come and go. A MacBook trackpad or Magic Mouse supports gestures, so the bars hide. Plug in an ordinary wheel mouse and they may start showing again. Always removes that guesswork.
Change What Happens When You Click the Scroll Bar
Right below Show scroll bars on the same Appearance screen is Click in the scroll bar to. It controls what happens when you click the empty track above or below the bar’s thumb (the darker, movable part):
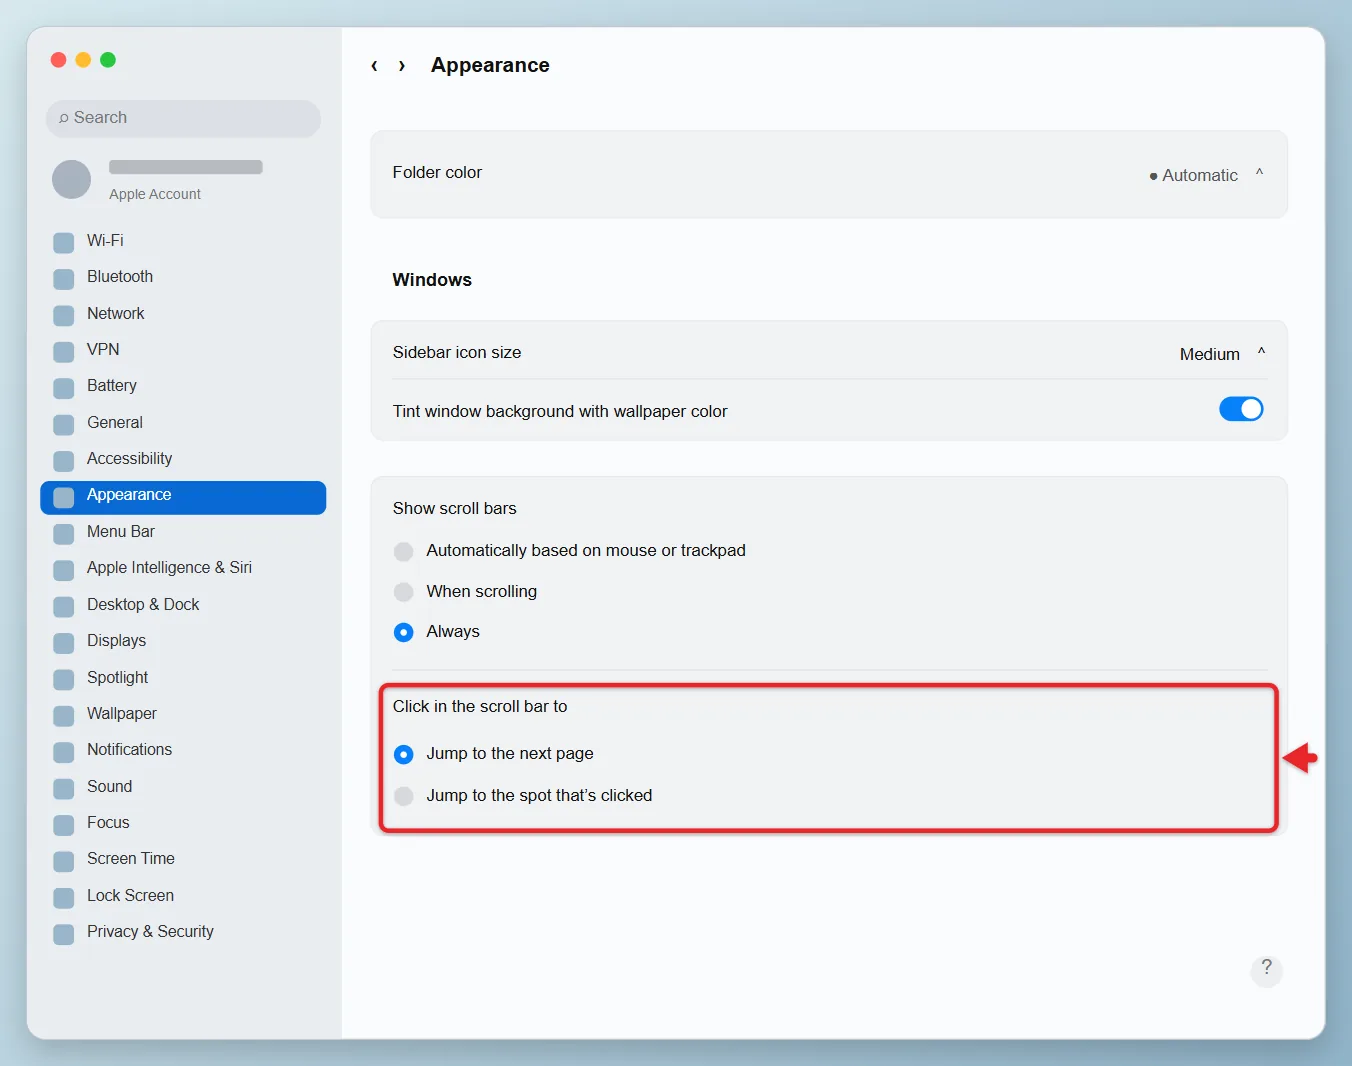
- Jump to the next page moves the content one page at a time toward the spot you clicked. This is the default.
- Jump to the spot that’s clicked moves straight to that point. Click near the bottom of the track and you go to the end of the document.
Hold Option while clicking the track to use the other behavior just for that click. You can also drag the thumb itself to move anywhere in the document. Its size is a clue to length: a small thumb means a long document.
Steps for macOS Monterey 12 and Earlier
- Choose Apple menu > System Preferences.
- Click General.
- Next to Show scroll bars, select Always.
- Close the window. The change applies right away.
Use Terminal Instead (Optional)
If you manage several Macs or prefer commands, the same preference can be set in Terminal. Apple doesn’t document this command, so use System Settings unless you have a reason not to.
- Open Terminal from Applications > Utilities.
- Type
defaults write -g AppleShowScrollBars -string Alwaysand press Return. - Quit and reopen your apps, or log out and back in, so every app picks up the change.
To check the current value, run defaults read -g AppleShowScrollBars. It returns Always, WhenScrolling, or Automatic. A message saying the setting doesn’t exist only means it has never been changed from the default. To go back to the default, run defaults delete -g AppleShowScrollBars and log out. The command changes the setting for your user account only.
Other Ways to Move Through a Long Page
A visible scroll bar is one way to get around. These keyboard shortcuts from Apple’s Mac keyboard shortcuts list work in most apps:
| Shortcut | What it does |
|---|---|
| Fn-Up Arrow | Page up |
| Fn-Down Arrow | Page down |
| Fn-Left Arrow | Scroll to the beginning of the document |
| Fn-Right Arrow | Scroll to the end of the document |
| Command-Up Arrow | Move the insertion point to the beginning of the document |
| Command-Down Arrow | Move the insertion point to the end of the document |
With a regular wheel mouse, hold Shift while turning the wheel to scroll sideways in most apps.
If pages move too fast or too slow when you scroll, choose Apple menu > System Settings > Accessibility > Pointer Control, click Mouse Options or Trackpad Options, and drag the Scroll speed slider. Apple covers this in its mouse settings guide.
If You Still Can’t See a Scroll Bar
- The window may not need one. A short page, a large window, or a folder with only a few items has nothing to scroll. Make the window smaller or open a long article to test.
- Check the setting again. Go back to Appearance and confirm Show scroll bars says Always, not one of the other two options.
- Restart the app. Quit the app with Command-Q and reopen it. Save your work first.
- Compare with Finder. If Finder or Safari shows the bar but another app doesn’t, that app or website draws its own scroll bar and doesn’t follow the macOS setting. Look in that app’s own settings for a scroll bar option.
- Full-screen apps and players may hide scroll bars along with other controls. Exit full screen to check.
- A different user account has its own setting. If someone else uses the Mac with their own login, they need to change it too.
If the bar is there but hard to use because everything on screen looks small, changing display resolution or text size can help. A visible scroll bar shows you where you are; it doesn’t make the content bigger. Shrinking the Dock also frees up room: you can make Dock icons smaller on a MacBook Air.
If the screen looks too dark when you work unplugged, you can stop the MacBook display from dimming on battery.
When an Always-On Scroll Bar Gets in the Way
A permanent scroll bar takes a thin strip of space along the edge of the window. Now and then it sits on top of something you want to grab, such as a column divider in Finder’s column view or the edge of a table in an app. If that happens, drag from a spot just above the bar, or switch Show scroll bars to When scrolling for a while.
How to Undo the Change
Open System Settings > Appearance and set Show scroll bars back to Automatically based on mouse or trackpad, the default, or to When scrolling. The scroll bars start hiding again right away.
Frequently Asked Questions
Do Safari and Chrome follow this setting?
Yes, on most pages. Both browsers use the standard macOS scroll bar, so Always keeps it visible. Some websites draw their own custom scroll bars, and those can look different or stay hidden.
Does this change my scrolling direction?
No. Scrolling direction is a separate setting. For a trackpad, go to System Settings > Trackpad > Scroll & Zoom and turn Natural scrolling on or off. A mouse has its own Natural scrolling switch in System Settings > Mouse.
Why did my scroll bars disappear after I connected a mouse or trackpad?
The default option, Automatically based on mouse or trackpad, hides scroll bars when you use a device that supports gestures, like a trackpad or Magic Mouse. Choose Always to stop that.
Can I make the scroll bars wider?
macOS doesn’t include a scroll bar width setting in Appearance or Accessibility. Setting Show scroll bars to Always and choosing Jump to the spot that’s clicked makes the bar easier to use without changing its size.
Will this slow down my Mac?
No. It only changes whether the scroll bar is drawn while you’re not scrolling.
If you use a trackpad, you may also want to set up two-finger right-clicking on a Mac, or choose which folder a new Finder window opens to.

Matthew Burleigh is the founder, head writer, and editor of Solve Your Tech, which he launched in 2012. He has written technology tutorials since 2008 and worked in IT since 2003, including small-business support, IT management, and consulting. He holds Bachelor’s and Master’s degrees in Computer Science from Arizona State University.
Matthew writes practical guides for Windows, iPhone and iPad, Microsoft Office, Outlook, Google apps, and Android. Solve Your Tech’s guides are checked step by step against the device or app maker’s own documentation and tested on his own devices whenever he has the hardware or software, with clear steps, sources, and update dates.
Read more about Matthew and how Solve Your Tech writes and updates its guides, or report a correction.