While much of the data that you add to a spreadsheet in Microsoft Excel will probably go inside the cells, you may find that you need to add information to a text box as well.
Whether this is information that is supplementary to your data, or you are highlighting something found in a row or column, text boxes can be useful.
But you may not like the styling of the text box, which can lead you to wonder how to remove a text box border in Excel.
Using borders and gridlines in your spreadsheet can provide a clean and simple way to separate information in different cells. But adding borders to your cells is not the same as adding a border to a text box, as Excel treats those two objects a little differently.
A text box in Excel 2013 is its own entity in your spreadsheet and, as such, it has its own formatting and styles.
By default, this will include a border around the text box. But that border may not fit in with the styling of the rest of your data, and you might be looking for a way to delete that border.
Our guide below will show you how to find the text box border settings in excel 2013 so that you can remove a border from a selected text box.
How to Get Rid of a Text Box Border in Excel 2013
- Open your spreadsheet.
- Click the text box.
- Select the Format tab.
- Click Shape Outline, then No Outline.
Our article continues below with more information on removing a text box border in Excel, including pictures of these steps.
How to Remove a Border from a Text Box in Excel 2013 (Guide with Pictures)
The steps in this article were performed in Microsoft Excel 2013. You can also remove a text box border in other versions of Excel, though the steps are slightly different.
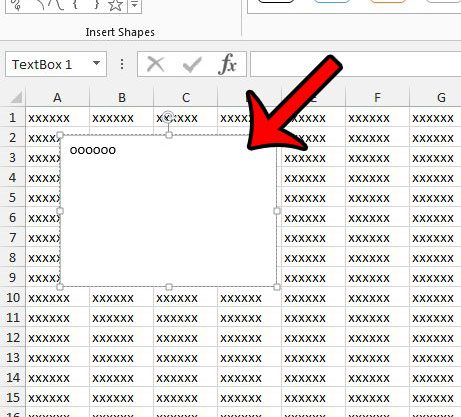
Step 1: Open the Excel 2013 worksheet containing the text box from which you wish to remove the border.
Step 2: Click on the text box to select it.

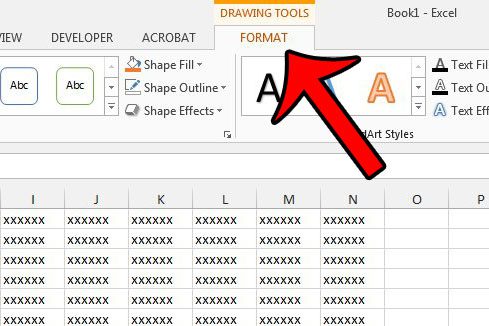
Step 3: Click the Format tab at the top of the window, under Drawing Tools.

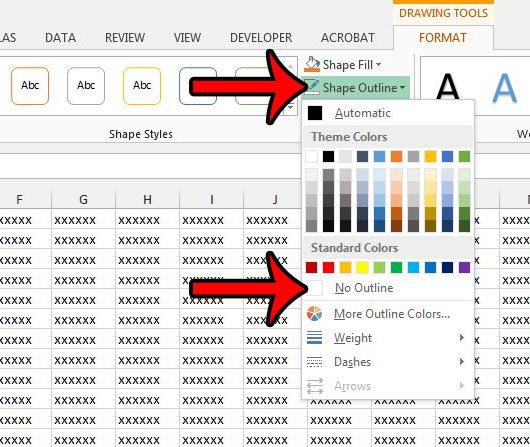
Step 4: Click the Shape Outline button, then click the No Outline option.

Note that some text boxes can be difficult to see once you have removed the border. If you don’t like the way it looks then you can press Ctrl + Z on your keyboard to undo the change. You can also come back here later and add a border again if you decide that you want it.
Using the Shape Format Tab in Excel for Office 365
While inserting a textbox in Microsoft Excel for Office 365 is accomplished the same way – via the Insert tab – there is a slight difference in the way that you customize a text box.
When you add a text box in the Office 365 version of Microsoft Excel there is a Shape Format tab that appears at the top of the window. If you select that tab you will be presented with a series of formatting options that let you change the way the text box looks.
So you would simply need to click the Shape Outline button in the Shape Styles group of the ribbon, then select the No Outline option from there.
The Lines tab that appears at the right side of the window on the Format Shape dialog box contains a number of options to customize the shape border of your text box. You can define your border style with line style options that include things like color, transparency, width, styles, types, and much more.
More Information on How to Remove Text Box Border in Excel
The steps in this article are only going to remove the border from a text box in Microsoft Excel. It is not going to delete the text box or the content inside the text box. If you want to delete a text box you can do so by clicking on the box’s border, then pressing the Backspace or Delete key on your keyboard.
If you want to change multiple text boxes in Excel then you can select one text box first, then hold down the Ctrl key on your keyboard to select additional ones. You can then proceed to select the No Outline option from the Shape Outline dropdown menu as we did in the steps above.
You will note that you can also change the weight or add dashes to the border when you open the Shape Outline dropdown menu. There is also a Shape Fill button above it that lets you add color to the background of the text box.
Are you working with a large spreadsheet in Excel 2013 that is a nightmare to print? Learn how to set a print area in Excel 2013 so that you only print the part of the spreadsheet that you actually need.
There is a small button at the bottom-right section of the Shape Styles group that will open a Format Shape dialog box when you click it. This presents many of the options that you could use to format a shape or text box, such as line weight, outline colors, and more. If you wanted to add a custom line style, for example, then you could accomplish that with all of the options that you find on that menu.
If you want to use a different color for your text box border, then you can simply choose the desired color from the color drop down list that appears after opening the Shape Outline menu. If you want to choose your own color then you could click the More Colors button to find additional color options.
Microsoft Word displays its shape format menu in a very similar manner to Microsoft Excel. To remove the border from a text box in Word you will need to open the Word document, select the text box, then click the Shape Format menu at the top of the window and choose the No Outline option from the Shape Outline menu as well.

Matthew Burleigh has been writing tech tutorials since 2008. His writing has appeared on dozens of different websites and been read over 50 million times.
After receiving his Bachelor’s and Master’s degrees in Computer Science he spent several years working in IT management for small businesses. However, he now works full time writing content online and creating websites.
His main writing topics include iPhones, Microsoft Office, Google Apps, Android, and Photoshop, but he has also written about many other tech topics as well.