If you’ve increased the size of your font, or if you have placed an object like an image in one of your cells, then you might not be seeing all of your content.
Luckily the rows and columns in Exel are adjustable, and you are able to learn how to expand one row in Excel so that all of the content in that row is able to be seen by anyone that is viewing the worksheet.
How to Make a Row Bigger in Excel 2013
- Open the spreadsheet.
- Click the row number to select it.
- Click and drag the bottom column border to increase its size.
Our guide continues below with additional information on how to expand one row in Excel, including pictures of these steps.
The cells in an Excel spreadsheet are a certain size by default. While this can be useful in some situations, you may find that you need to make a cell bigger in order to fit all of the data contained in that cell. You accomplish this by increasing the width of a column, or by expanding the height of a row.
The method that we describe below can also be used to contract the size of a row, but this tutorial will be focused on expanding a row in Excel. If you decide that you want to contract the size of a row in your spreadsheet, then you can do so by dragging the row border in the opposite direction to make it smaller.
You might also want to know how to expand all rows in Excel if you have more than one under-sized row and you don’t want to have to manually adjust the size of every row in your spreadsheet.
How to Expand Row Height in Excel 2013 (Guide with Pictures)
This tutorial focuses specifically on expanding rows in Microsoft Excel 2013, and the images are from that version of the program.
However, this is a feature that is applicable to all versions of Excel so, for example, if you have an earlier version of the program on your computer or at work (such as Excel 2003, 2007 or 2010) then you can follow the same steps below to expand a single row in Excel 2013.
Step 1: Open your spreadsheet in Excel 2013.
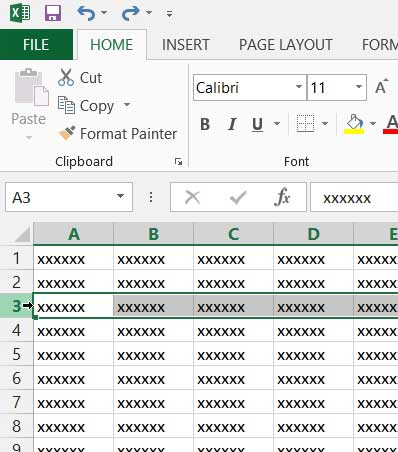
Step 2: Locate and select the row that you want to expand by clicking the number of the row at the left side of the spreadsheet.
In the example image below, we want to expand row 3.

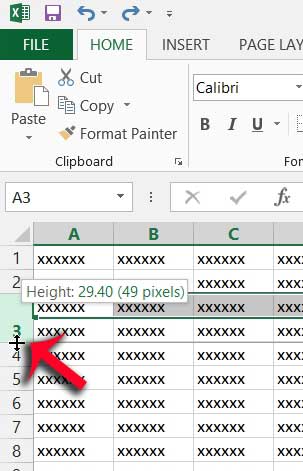
Step 3: Click the bottom border of the row heading, then drag it down until the row is at the desired size.
Note that the size of the row is displayed as you are expanding the size of the row.

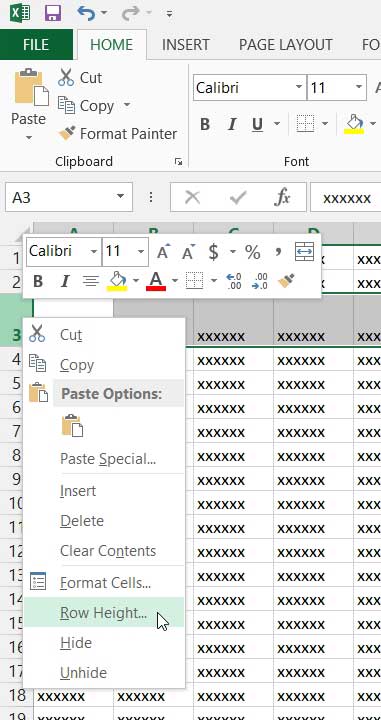
You can also numerically specify the size of a row by right-clicking the row number, then clicking the Row Height option.

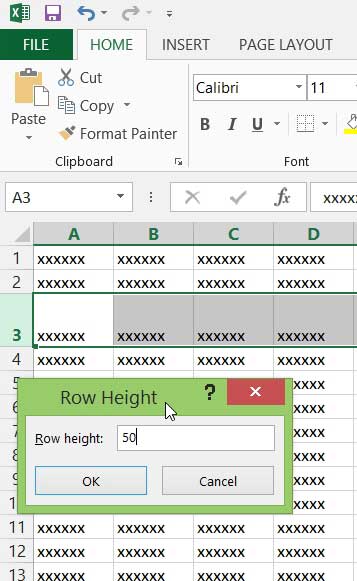
Type the desired row height into the Row height field, then click the OK button.

Now that you know how to expand one row in Exccel you will be able to make rows larger (or even smaller) if you need to make that sort of change to a future spreadsheet.
Do you want to make your spreadsheet easier to read? Learn how to change the color of your cells to help distinguish different rows or columns from the data in neighboring cells.

Matthew Burleigh has been writing tech tutorials since 2008. His writing has appeared on dozens of different websites and been read over 50 million times.
After receiving his Bachelor’s and Master’s degrees in Computer Science he spent several years working in IT management for small businesses. However, he now works full time writing content online and creating websites.
His main writing topics include iPhones, Microsoft Office, Google Apps, Android, and Photoshop, but he has also written about many other tech topics as well.