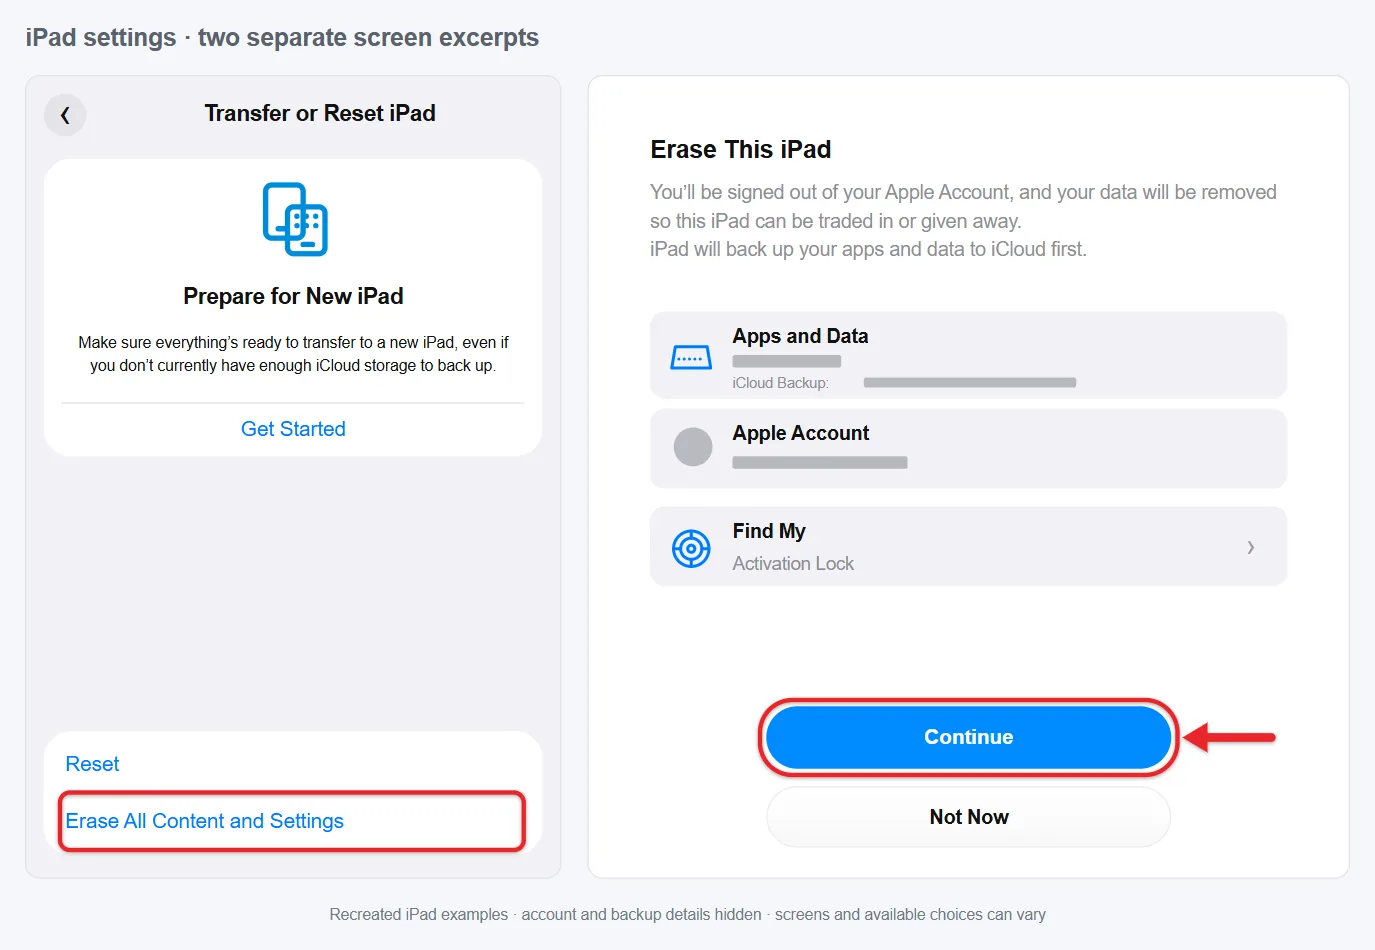
To wipe an iPad clean without a computer, back it up, unlock it, and open Settings > General > Transfer or Reset iPad > Erase All Content and Settings. Enter the requested passcode or Apple Account password and confirm only when you are ready to delete its data. Physical buttons alone do not factory-reset an iPad.
If you can’t unlock the iPad, an eligible iPad can erase itself from the lock screen, or you can restore it with a computer in recovery mode. A force restart only fixes a frozen screen and keeps your data.
Before You Erase
Erasing deletes the iPad’s local data and settings. Stop if you need information that has not been backed up or saved elsewhere. Check your existing backup before choosing an erase method; a locked iPad may not be able to make a new backup.
Apple’s backup-methods guide explains iCloud and computer backups. Content already synced to iCloud can be separate from the backup. Make sure important photos, documents, and other data are where you expect them, since not everything is included in a backup.
Your unlock passcode and Apple Account password are different. Have the Apple Account password ready: the iPad asks for it to turn off Find My and Activation Lock, and no reset method skips that check. For a school or business iPad, contact its administrator.
Back Up the iPad First
On any iPad you can unlock, open Settings > your name > iCloud > iCloud Backup, turn on Back Up This iPad and tap Back Up Now. Stay on Wi-Fi until the “Last successful backup” time updates to today; a switch that’s turned on doesn’t prove the latest backup finished. For storage limits and computer backups, read the full iPad backup steps.
If the backup will not fit in your storage, these steps to make an iCloud backup smaller work the same way on iPad.
How to Erase an Unlocked iPad in Settings
Use this route when you can unlock the iPad and use its screen. Apple’s current Erase iPad guide documents the following path:
- Open Settings. Tap General, then Transfer or Reset iPad.
- Choose Erase All Content and Settings. Read the erase summary. The separate Reset options are not the same as deleting all content.
- Enter the credentials requested. Supply the iPad passcode or Apple Account password when asked.
- Review the cellular-plan choice if shown. An eSIM-capable iPad can offer keeping or erasing the eSIM. Keep the plan if you will continue using it; for a sale, follow the transfer guidance below. Erasing an eSIM can require your carrier to reactivate service.
- Confirm the erase. Tap Continue and confirm. The iPad erases and restarts at the setup screen.
Erase an Older iPad With the Reset Menu
On iPadOS 14 and earlier, open Settings > General > Reset > Erase All Content and Settings. Apple documents this older route in its backup-transfer instructions. Reset All Settings is a different option that keeps your data.
If you only want to fix a problem and keep your data, you can reset all settings on your iPad instead.
Can Buttons Factory-Reset an iPad Without a Computer?
No. Holding buttons can turn the iPad off, force it to restart, or put a connected iPad into recovery mode. Recovery mode does not present an on-device Erase All Content and Settings menu. That menu belongs to Settings.
If you only need to recover from a frozen screen, try a force restart:
- Without a Home button: quickly press and release the volume button nearest the top button, then the farther volume button. Hold the top button and release it when the Apple logo appears.
- With a Home button: hold the Home and top buttons together, then release both when the Apple logo appears.
These are Apple’s force-restart instructions. A restart does not delete the passcode or return the iPad to factory settings. If the touchscreen works again, unlock it before using the Settings erase route.
Erase a Locked iPad Without a Computer When Eligible
Apple’s on-device reset instructions require iPadOS 15.2 or later, Find My previously enabled, an active Wi-Fi or cellular connection, and the linked Apple Account password. First consider the previous-passcode option: on iPadOS 17 or later, a passcode changed within the last 72 hours may be recoverable without erasing. The steps for resetting an iPad without its passcode cover that option and both erase methods.
The steps below delete data. On an eligible iPad running iPadOS 17 or later:
- On the Unavailable lock screen, tap Forgot Passcode? when offered.
- Select Start iPad Reset.
- Enter the linked Apple Account password to sign out.
- Review the confirmation and choose Erase iPad only when ready to delete the data and settings.
- After the iPad restarts, follow setup and restore an existing backup if you have one.
iPadOS 15.2 and 16 use an eligible Erase iPad lock-screen option instead. If no erase option appears or its requirements are unmet, the button sequence does not create one. Use the computer route or ask Apple for help.
Use Recovery Mode With a Computer
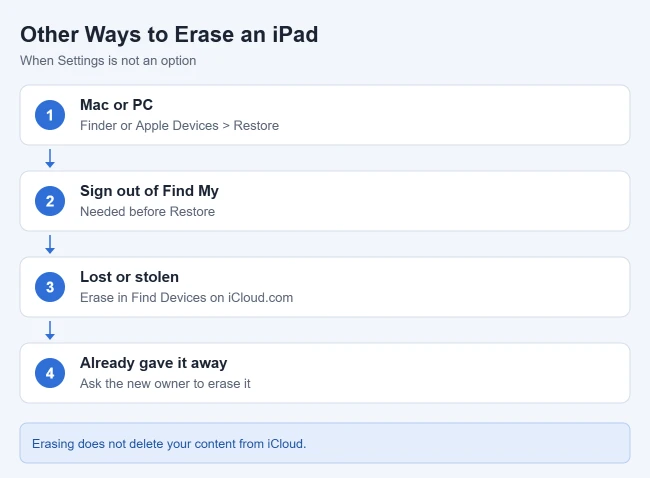
Apple’s iPad recovery-mode guide uses Finder on a Mac or Apple Devices on Windows. Have a cable and internet connection ready.
- Disconnect the iPad and power it off. With a Home button, hold the top button; without one, hold the top button and either volume button. Drag the power slider and wait a minute.
- Connect the iPad to the computer. Without a Home button, quickly press the nearer volume button, then the farther one, then hold the top button. With a Home button, hold Home and the top or side button together.
- Hold through the Apple logo until the computer-and-cable screen appears, then release.
- Select the iPad in Finder or Apple Devices and choose Restore when offered Restore or Update. This erases its data, settings, and passcode.
- Wait for completion and the Hello setup screen. If downloading takes over 15 minutes and the iPad exits recovery mode, let downloading finish, then repeat the recovery sequence.
If you cannot borrow a computer or complete the buttons, ask an Apple Store or authorized service provider for help.
Prepare an iPad for Its Next Owner
Back up and transfer what you need first. Apple’s sale and trade-in checklist includes signing out, checking for an unfinished repair before trade-in, and canceling or transferring an applicable AppleCare plan.
If the replacement is another iPad, finish moving your data to the new iPad and check it before you erase this one.
If the erase asks about an eSIM, choose to erase it and ask your carrier to move your service. When the erase finishes, leave the iPad on the Hello screen for the new owner.
- Verify your backup or completed transfer. Open important files on your replacement device or in their saved location before erasing the old iPad.
- Open Settings > [your name] > Sign Out. Enter your Apple Account password. Then erase the iPad with the steps above.
- Complete the erase and check activation. Leave the iPad at Hello. Have the recipient begin setup and confirm that it does not request your Apple Account credentials.
- Let the recipient use their own account. Do not sign back in with yours or give them your account password. Review the agreed accessories and any AppleCare transfer separately.
Apple’s Activation Lock checks for a used iPad explain how a buyer can confirm the iPad was erased properly.
If the iPad Is Lost or Already Given Away
If the iPad is lost or stolen, sign in at iCloud.com/find, select the correct iPad, choose Erase This Device, and follow the prompts. Apple’s Find Devices erase instructions note that Find My must have been turned on beforehand. If the iPad is offline, the erase starts the next time it connects. Until then, you can cancel it with Stop Erase Request.
For an iPad you sold or gave away, erase it from iCloud.com/find if needed, wait for the erase to finish, then select Remove This Device. This releases Activation Lock, as Apple’s Find My transfer instructions explain. Keep a lost or stolen iPad on your account so no one else can activate it.
Frequently Asked Questions
Does erasing delete my photos from iCloud?
Erasing the device does not delete its content from iCloud. Manually deleting synced photos, contacts, or documents while signed in can delete them from iCloud and other connected devices. Use the erase procedure rather than individually deleting synced content to prepare an iPad for sale.
Will a factory reset remove Activation Lock?
Erasing from Settings with your Apple Account password turns off Find My and Activation Lock. A remote erase keeps the lock on, and a recovery-mode restore doesn’t remove it. If setup asks for the previous owner’s account, use that owner’s password or Apple’s Activation Lock help, which can require proof of purchase.
Can I undo an erase or restore my saved data?
There is no ordinary undo that returns erased local data. Recovery depends on what was backed up or synced beforehand. During setup, select From iCloud Backup on the apps-and-data transfer screen, or use Restore Backup in Finder or Apple Devices for a computer backup. An encrypted backup needs its password. Apple’s backup restoration guide explains both routes.

Matthew Burleigh is the founder, head writer, and editor of Solve Your Tech, which he launched in 2012. He has written technology tutorials since 2008 and worked in IT since 2003, including small-business support, IT management, and consulting. He holds Bachelor’s and Master’s degrees in Computer Science from Arizona State University.
Matthew writes practical guides for Windows, iPhone and iPad, Microsoft Office, Outlook, Google apps, and Android. Solve Your Tech’s guides are checked step by step against the device or app maker’s own documentation and tested on his own devices whenever he has the hardware or software, with clear steps, sources, and update dates.
Read more about Matthew and how Solve Your Tech writes and updates its guides, or report a correction.