As Apple has continued to update the iOS software as well as iTunes, they have added some exciting new features meant to improve user experience with their devices.
One such feature is the ability to sync content from your iTunes library to your iPad without needing to physically connect the device to your computer.
The setup works very well, and prevents you from needing to locate an iPad cable whenever you want to transfer a song, movie or picture from your computer to your iPad.
Therefore, if you want to learn how to wireless sync your iPad 2 with iTunes, you can continue reading to see exactly what steps you will need to set up this connection.
How Does iPad Wifi Sync Work?
The WiFi sync feature is something that was included after the iOS software was updated to version 5. Any iPad that is able to update to this version of the software will have access to the wireless sync feature.
Before you begin the setup procedure, confirm that the computer with iTunes installed is on the same wireless network as your iPad.
The first thing to do is connect your iPad to your computer and wait to see if iTunes prompts you to update the software version on your device. If there is a software update available for your iPad, you should install the update. Once your iPad is updated past iOS version 5, you are ready to configure the WiFi sync.
To begin, if the iPad is not already connected to your computer, connect the iPad to your computer with the iPad’s USB cable, then wait for iTunes to launch. Once the iPad has been configured for the WiFi sync, you will no longer need to use this cable to get files from your computer to your iPad.
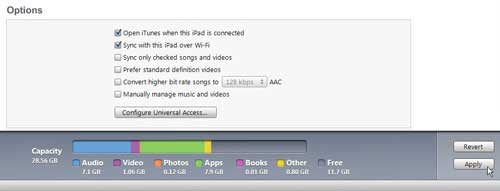
Click your iPad under the Devices section of the column at the left side of the window. This will display your iPad’s summary screen in the center panel of the window.
Scroll to the bottom of the summary screen, check the box to the left of Sync with this iPad over Wi-Fi, then click the Apply button at the bottom-right corner of the window.
Disconnect the iPad from your computer once any syncing has been completed.
Connect your iPad to a wall charger, then ensure that it is connected to your wireless network.
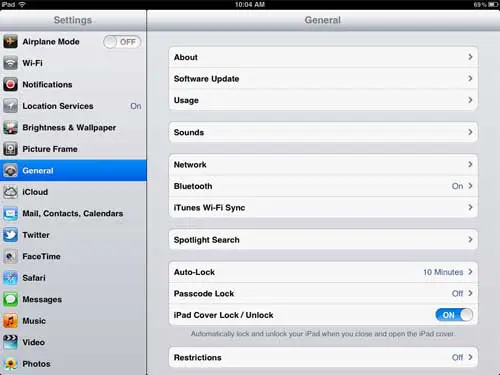
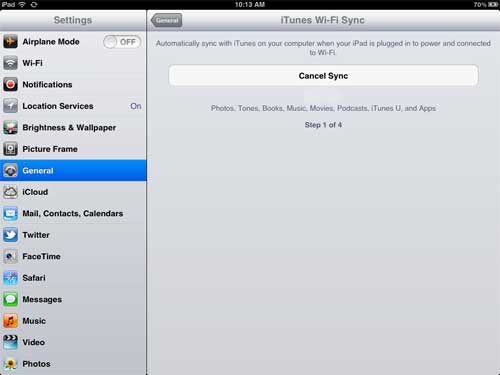
Tap the Settings icon on your iPad’s home screen, touch the General option at the left side of the screen, then touch iTunes Wi-Fi Sync at the center of the screen.
Once your iPad is wirelessly connected to your iTunes library, it will begin the wireless sync process.
You can cancel the sync at any time by pressing the large Cancel Sync button.
Now that you know how to set up iPad wireless sync, you will be able to use this as an option for syncing files between your tablet and your computer.

Matthew Burleigh has been writing tech tutorials since 2008. His writing has appeared on dozens of different websites and been read over 50 million times.
After receiving his Bachelor’s and Master’s degrees in Computer Science he spent several years working in IT management for small businesses. However, he now works full time writing content online and creating websites.
His main writing topics include iPhones, Microsoft Office, Google Apps, Android, and Photoshop, but he has also written about many other tech topics as well.


