Excel has a combination of default settings that are meant to appeal to a large number of users. One of these settings is the view, which is how new spreadsheets look when you create one. But if you prefer a different view and always change it, then you may be wondering how to change Excel’s default view to Page Layout.
Excel 2010 has a handful of different views that you can select between when viewing the data in a spreadsheet. We have previously shown you how to switch to the “Page Layout” view in the program, but that method will only allow you to change the view for the current sheet. If you create a new workbook, or a new sheet, in the future, then it will use the default “Normal” view.
But this is not a setting that you need to live with, as it is possible to change to a different default view. Our guide below will walk you through the steps necessary to switch to the Page Layout view as the default option in Excel 2010.
How to Make Page Layout the Default View in Excel 2010
- Open Excel.
- Click File.
- Choose Options.
- Select the General tab.
- Click Default view for new sheets, then choose Page Layout.
- Click OK.
Our article continues below with additional information on changing the default view in Excel 2010, including pictures of these steps.
Set “Page Layout” as the Default View in Excel 2010 (Guide with Pictures)
The steps in our article below will change the default view for new worksheets only. This means any new workbook that you create, or new worksheet that you add to an existing workbook, will use the Page Layout view by default. Existing worksheets will use whichever view was active when the file was last saved.
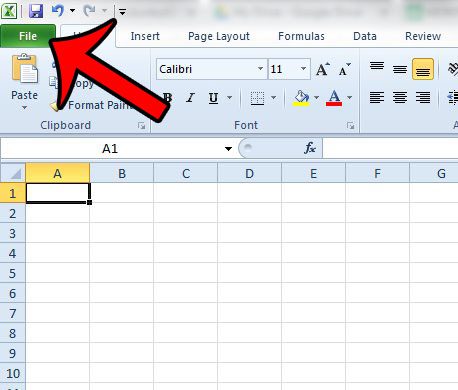
Step 1: Click the File tab at the top-left corner of the window.

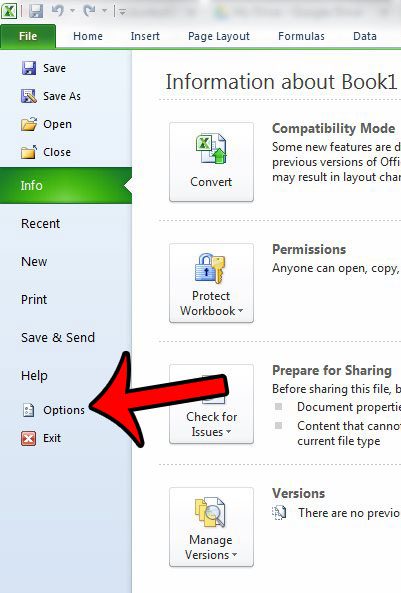
Step 2: Click the Options button in the column at the left side of the window.

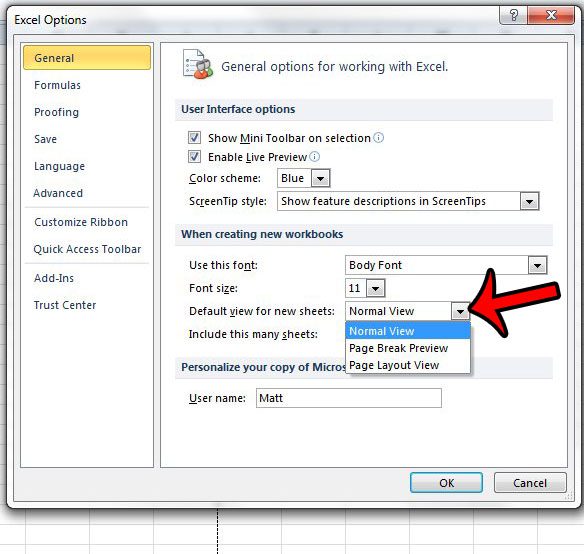
Step 3: Confirm that the General tab is selected at the left side of the window, then click the drop-down menu to the right of Default view for new sheets and click the Page Layout View option. You can then click the OK button at the bottom of the window to save your changes and close the window.

Any future new worksheets will use this view by default.
While this article focuses specifically on changing the default view in Excel 2010, it will work in most other versions of Excel, too. For example, this is still the way to change the default view for new worksheets in Excel for Office 365.
Do you only need to print part of your worksheet, but are having difficulty accomplishing what you need to do? Learn about setting print areas in Excel 2010 to see one of the more effective changes you can make to your worksheet that will improve the quality of your printed sheets.

Matthew Burleigh has been writing tech tutorials since 2008. His writing has appeared on dozens of different websites and been read over 50 million times.
After receiving his Bachelor’s and Master’s degrees in Computer Science he spent several years working in IT management for small businesses. However, he now works full time writing content online and creating websites.
His main writing topics include iPhones, Microsoft Office, Google Apps, Android, and Photoshop, but he has also written about many other tech topics as well.