You can’t install an IPA by tapping it. Apple only installs an IPA that is signed for your device and delivered through a route it supports: TestFlight for betas, Apple Configurator or Xcode on a Mac for a build made for your registered device, or your employer’s device management for work apps. If the app is in the App Store, install it from there instead.
This guide covers iOS 27 and iPadOS 27. The same steps work on iOS 16 and later, with small differences noted where they apply. It sticks to methods Apple documents.
What an IPA File Is
An IPA (iOS Package Archive) is the file a developer exports when building an iPhone or iPad app. It holds the app and a signature. The signature says who built the app and, for test builds, which devices may run it. That device list lives in a provisioning profile, a small file inside the app that names the app, the developer’s signing identity and the allowed devices.
Because of that signature, an IPA is not like a document you open. Copying it to Files, iCloud Drive or AirDrop moves the file but installs nothing. An IPA you download from a random website is either signed for someone else’s devices or re-signed by an unknown party, and neither is safe or supported.
Choose the Right Installation Route
Ask whoever gave you the app how it is meant to be installed. Then match your situation to a route.
| Your situation | Use this route | Needs a Mac? |
|---|---|---|
| The app is public | App Store | No |
| A developer invited you to test a beta | TestFlight | No |
| A developer sent you an .ipa built for your registered device | Apple Configurator or Xcode Device Hub | Yes |
| Your employer or school provides the app | Their device management system or install link | No |
| You are in the EU, Japan or Brazil and the app is offered outside the App Store | Apple’s alternative app distribution | No |
If you only have a Windows PC, ask the developer for a TestFlight invitation. Current iTunes and Apple’s Windows apps don’t install IPA files, and the old iTunes builds that did are outdated and unsupported.
Before Installing a Developer-Provided IPA
Ask the developer to confirm three things: the build supports your device and iOS version, its signing certificate is current, and the provisioning profile includes your device. Apple’s registered-device distribution guide explains that the developer registers the device first and then exports the build. Testers can run the app only on devices added to that profile. A device registered after the build was exported needs a new build.
Back up the iPhone first if you are replacing a working version of the app, because a test build can change stored data. Follow the steps for backing up an iPhone to iCloud.
Install the IPA With Apple Configurator on a Mac
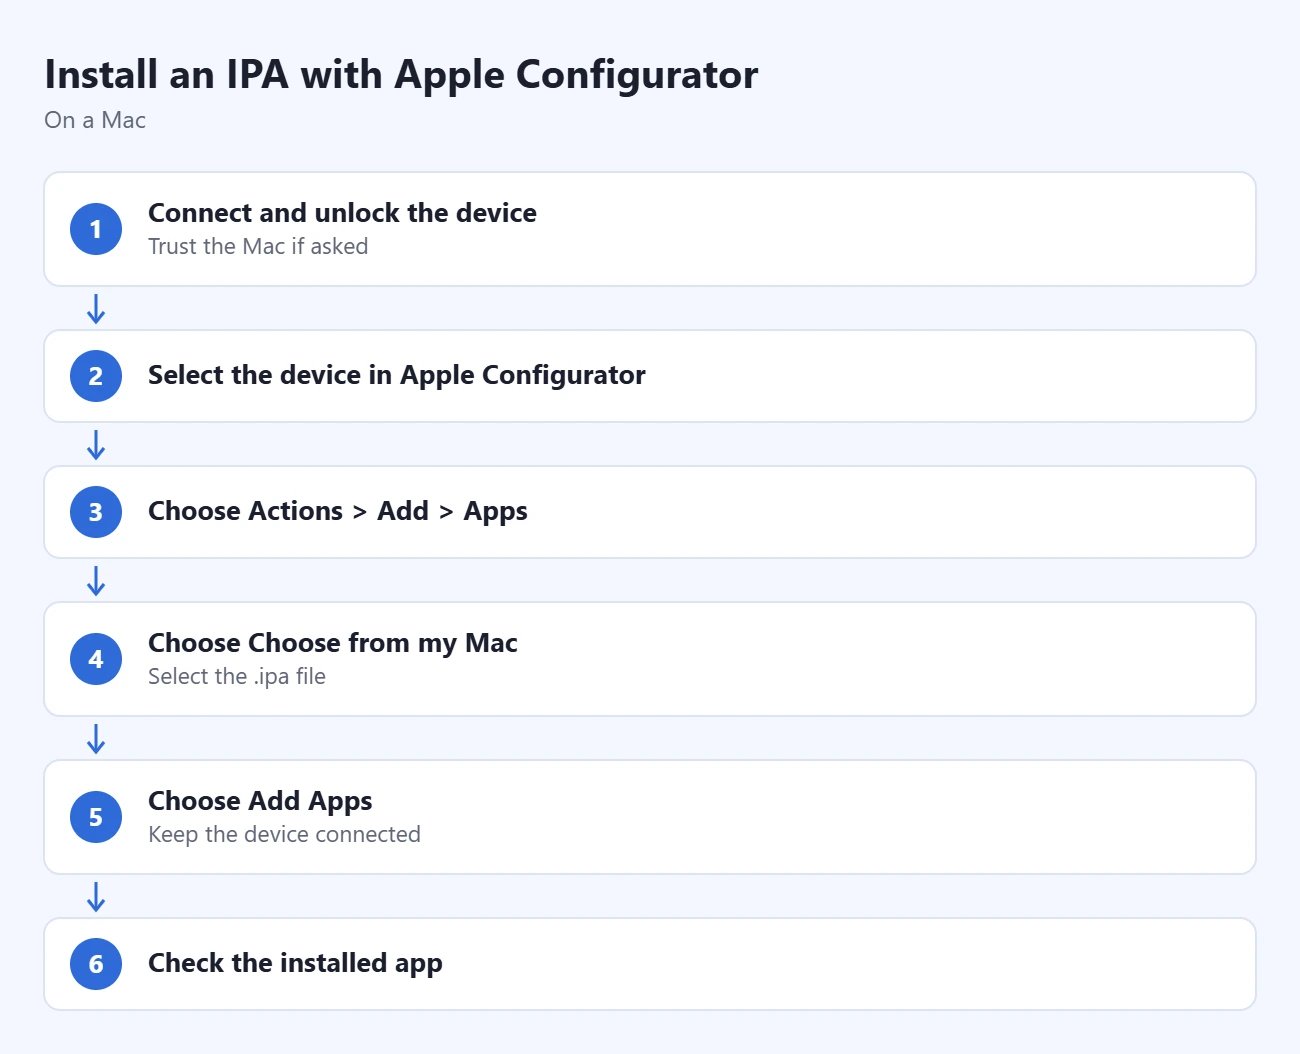
Apple Configurator is a free Mac app from Apple. Get it from the Mac App Store. Apple’s Configurator app-installation guide lists in-house .ipa files as one of the app types it can add.
- Connect and unlock the device. Use a cable that carries data to connect the iPhone or iPad to your Mac. If the device asks whether to trust this computer, approve only your own or another trusted computer and enter the device passcode.
- Select the device in Apple Configurator. Check its name so the app goes to the right iPhone or iPad.
- Choose Actions > Add > Apps. You can also click the Add button in the toolbar and choose Apps, or drag the .ipa onto the device.
- Click Choose from my Mac. Find the developer-provided file ending in .ipa and select it.
- Click Add Apps. Keep the device connected while the app installs. If Configurator reports a signing or provisioning error, save the message for the developer. Trying again won’t fix an invalid build.
- Check the installed app. Find it on the Home Screen or in App Library and open it. If a Developer Mode or enterprise trust prompt appears, follow the matching section below.
Install an IPA With Xcode Device Hub
Developers and testers who already have Xcode can install the same file without Configurator. Apple’s Managing apps on devices page describes it.
- Connect and pair the device with your Mac in Xcode’s Device Hub. Older Xcode versions call this the Devices and Simulators window.
- Select the device in the sidebar.
- Click Apps in the inspector’s toolbar.
- Click the Add button (+) below the list of apps.
- Select the .ipa file and click Open.
The app appears in the list and on the device. To remove it later, select it in the same list and click the Remove button (–).
When Developer Mode Is Required
Developer Mode is a switch that lets development-signed apps run. Apple’s Developer Mode instructions say it applies to running apps from Xcode and to installing an .ipa with Apple Configurator. It does not affect App Store or TestFlight apps. Turning it on reduces the device’s security, so do it only for a build you trust and intend to test.
- Open Settings > Privacy & Security.
- Under Security, turn on Developer Mode.
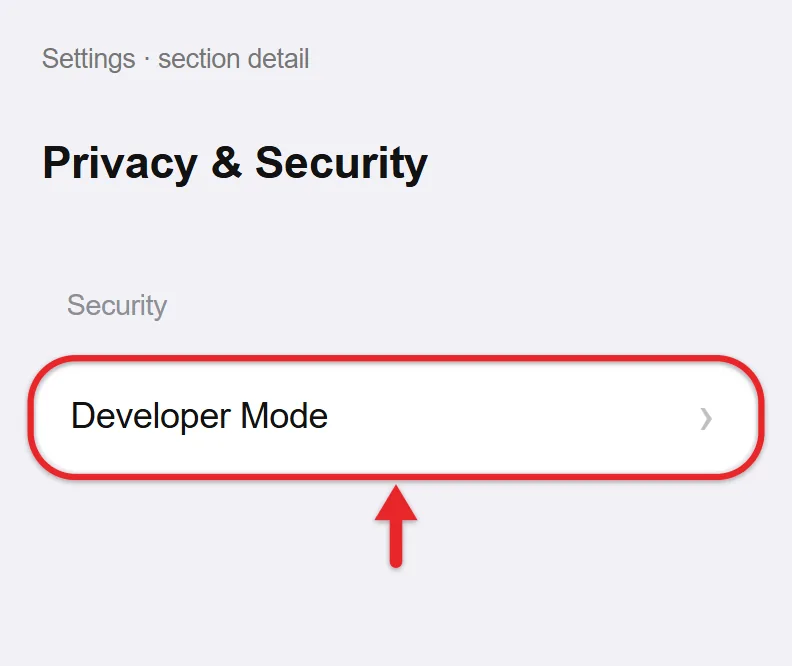
- Read the warning and tap Restart.
- After the restart, swipe up, tap Enable, and enter your passcode.
The switch only appears after you start pairing the device with a Mac or have paired it before. If you don’t see it, pair the device first. A missing switch is never a reason to install a configuration profile from a website.
To turn it off when testing is done, switch off Developer Mode in the same place and restart. Development-signed apps won’t run until you turn it on again.
For an Employer or School App
Use the installation link or device management system your organization provides. Mobile device management (MDM) is Apple’s preferred route for in-house apps. MDM is the system an organization uses to manage its devices, and apps installed that way are trusted automatically.
An app installed manually from your organization’s secure website needs one extra step. Apple’s enterprise-app trust guide gives these steps:
- Open the app. A message says the developer isn’t trusted. Tap Cancel.
- Open Settings > General > VPN & Device Management.
- Under Enterprise App, tap the developer’s name.
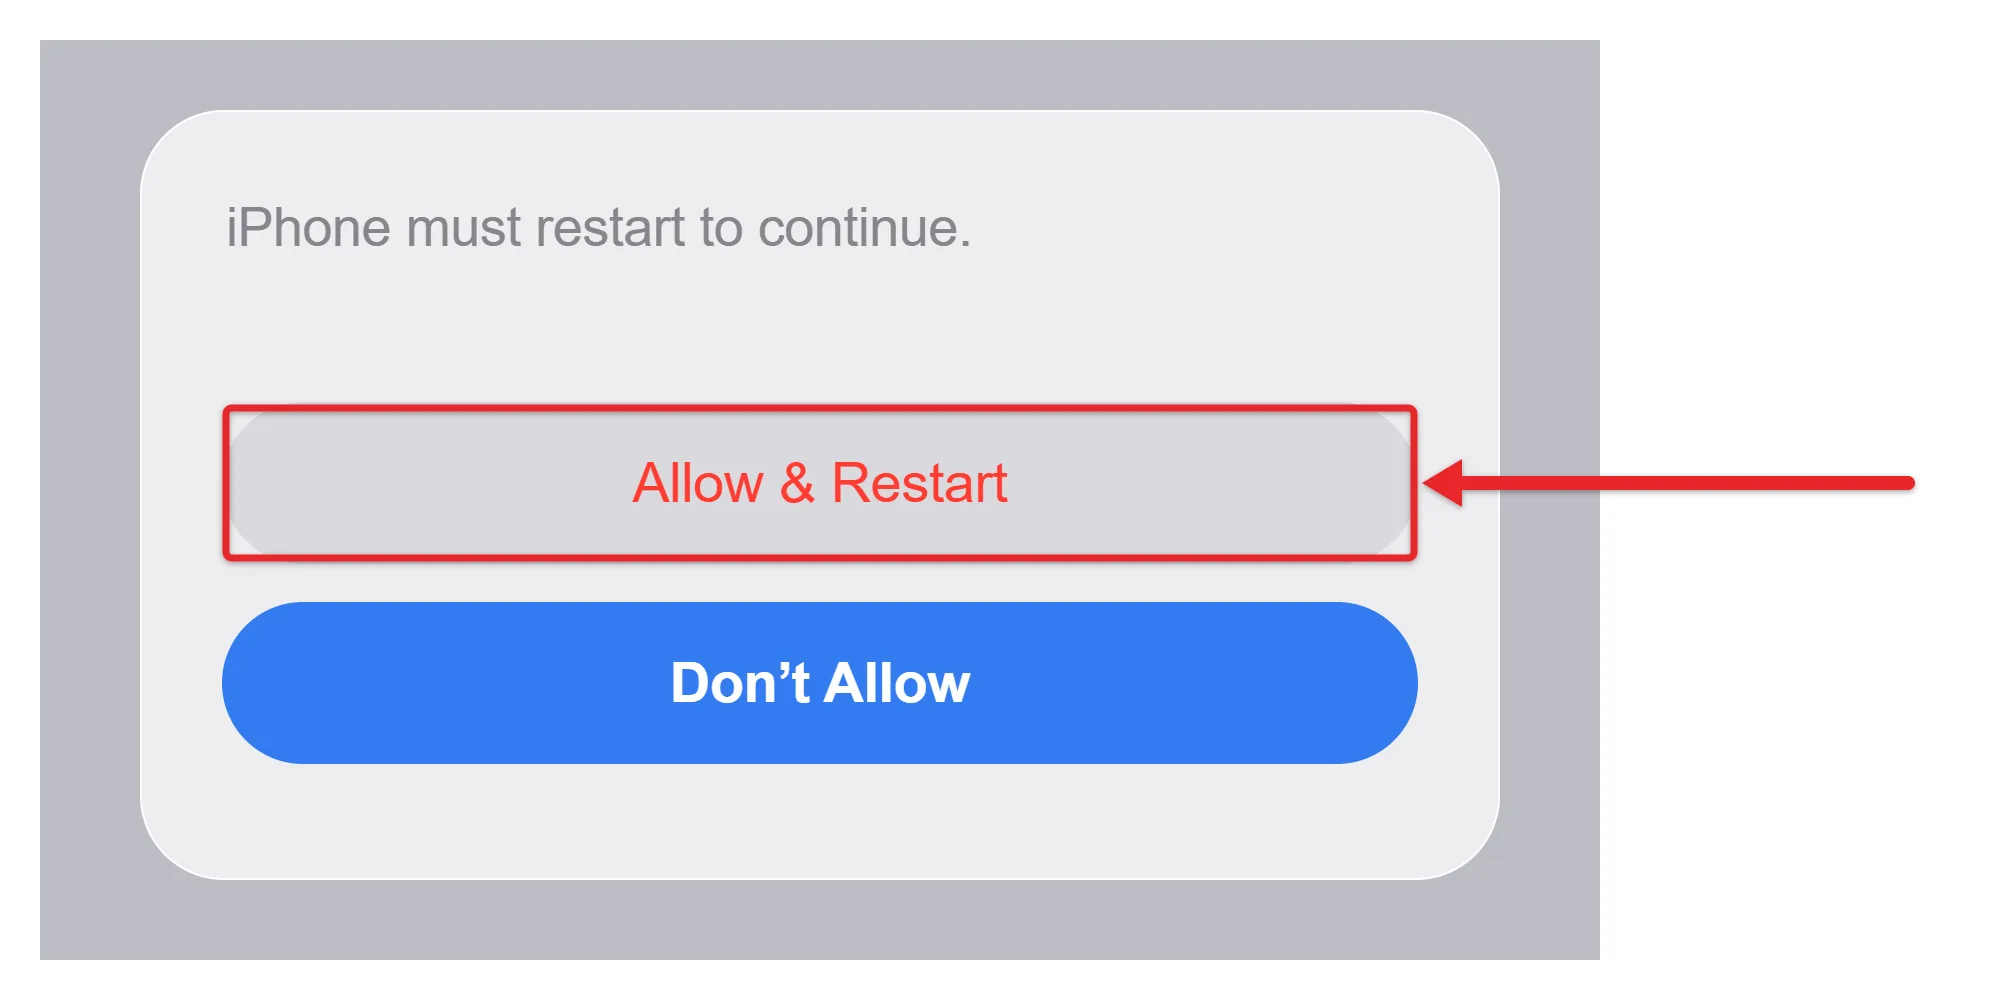
- On iOS 18, iPadOS 18 and later, tap Allow & Restart, then follow the prompts after the restart. Earlier versions show Trust instead.
The device must be online to verify the developer’s certificate, and it checks again from time to time. Trust the developer only after your administrator confirms the name. Deleting every app from that developer removes the trust.
Use TestFlight for a Beta Invitation
TestFlight is Apple’s app for testing beta builds, and it is the easiest route for anyone without a Mac. Under Apple’s TestFlight instructions, testing on iPhone or iPad needs iOS 16 or iPadOS 16 or later.
- Install TestFlight from the App Store on the device you will use.
- Open the invitation on that device. Tap View in TestFlight in the email, or open the public link.
- Tap Accept, then Install. Returning testers see Update or Open.
Each build works for 90 days from the day the developer uploaded it, and TestFlight shows the days remaining under the app’s name. A beta can replace the App Store version of the same app, so back up important data first. When you are done, open the app’s page in TestFlight and tap Stop Testing. TestFlight does not import a local IPA from Files.
Alternative App Distribution in the EU, Japan and Brazil
Apple supports app marketplaces outside the App Store in some regions. Its availability guide lists:
- European Union: marketplaces on iPhone and iPad, plus apps installed directly from a developer’s website.
- Japan: marketplaces on iPhone.
- Brazil: marketplaces on iPhone.
Your Apple Account must be set to that region and you must be there. Apple’s installation steps start from the marketplace’s or developer’s install link in a web browser. The iPhone then asks you to allow the source in Settings before anything installs. This is not a way to open a loose IPA file.
About Unofficial Sideloading Tools
Some third-party tools re-sign an IPA with a personal Apple Account, and some websites sell enterprise certificates for the same purpose. Apple does not support them. They ask for your Apple Account credentials or a certificate you can’t check, and the apps they install have not gone through Apple’s review. Apps signed with borrowed enterprise certificates can stop working without warning when Apple revokes the certificate. Jailbreaking removes iOS security protections entirely. This guide doesn’t cover any of these.
If Installation or Launch Fails
Device not detected: unlock it, try another data cable or port, and look for the trust prompt. If a school or employer manages the device, ask the administrator whether installing apps is allowed.
Unable to install, or a provisioning error: the device is usually missing from the profile, or the certificate expired. Send the error, your device model and iOS version to the developer and ask for a new build. Renaming the file or retrying won’t fix it.
App needs a newer iOS version: check for an update in Settings > General > Software Update, or ask the developer for a build that supports your version.
Not enough storage: check Settings > General > iPhone Storage, free space, and try again.
App installed but won’t open: tell a Developer Mode prompt apart from an enterprise trust message and follow only the matching section. If an enterprise app shows Not Verified, connect to the internet and tap Verify App. A firewall must allow connections to ppq.apple.com.
App installs are blocked: Screen Time can stop app installs on a child’s device. Apple’s parental controls guide says the parent changes it on their own iPhone under Settings > Family > the child’s name > Apps & Websites > App Store > Installing Apps.
App stopped working later: a TestFlight build may have expired, or the developer’s certificate may have changed. Get an updated build from the developer instead of removing protections.
If someone sent you an IPA without instructions, reply and ask for a TestFlight invitation. It is the simplest route on any iPhone and needs no computer.
IPA File Questions
Can I install an IPA by transferring it through Files, iCloud or AirDrop?
No. Those tools copy the file but don’t install it. The iPhone-to-PC file-transfer guide covers moving documents; installing still takes one of the routes above.
Does this require a jailbreak?
No. The App Store, TestFlight, Configurator, Xcode, organization and regional routes here work on a standard iPhone. They still need an app signed for the right distribution method.
Can I install an old version of an App Store app from an IPA?
Not through a supported route. App Store downloads are tied to the account that bought them and can’t be moved to another device as an IPA. If a developer runs a TestFlight beta, TestFlight may offer Previous Builds for that beta.
Can an iPhone IPA run on an iPad?
Only if the developer built it to support iPad and the profile includes your iPad. To move App Store apps between your own devices, redownload them on the iPad instead.
How do I remove an installed IPA app?
Save any data you need first. Touch and hold the app, tap Remove App, then Delete App. Other ways to remove it are in the steps for deleting apps on iPhone. Removing a test app doesn’t bring back the earlier version or its data.

Matthew Burleigh is the founder, head writer, and editor of Solve Your Tech, which he launched in 2012. He has written technology tutorials since 2008 and worked in IT since 2003, including small-business support, IT management, and consulting. He holds Bachelor’s and Master’s degrees in Computer Science from Arizona State University.
Matthew writes practical guides for Windows, iPhone and iPad, Microsoft Office, Outlook, Google apps, and Android. Solve Your Tech’s guides are checked step by step against the device or app maker’s own documentation and tested on his own devices whenever he has the hardware or software, with clear steps, sources, and update dates.
Read more about Matthew and how Solve Your Tech writes and updates its guides, or report a correction.