The default behavior for page numbering in Excel 2013 is to number the first page of the spreadsheet as “1”, then continue increasing that number for each successive page of the spreadsheet.
But you might be working on a spreadsheet with a team of people or including it in a document that already has a few pages before the spreadsheet appears. In these situations, starting with page number “1” could be confusing to your readers.
Fortunately, you have the ability to change the starting page number in Excel 2013 to any number that you need. Our guide below will show you where to find and use this setting.
Changing the Starting Page Number in Excel 2013
The steps in this article will assume that you have already added page numbers to a worksheet that you are printing in Excel 2013, and that you want the first numbered page to start with a number other than “1”.
Step 1: Open your worksheet in Excel 2013.
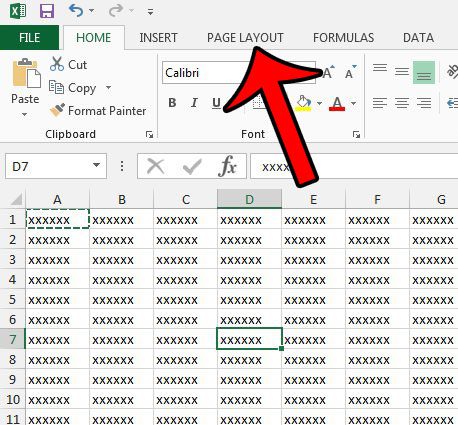
Step 2: Click the Page Layout tab at the top of the window.

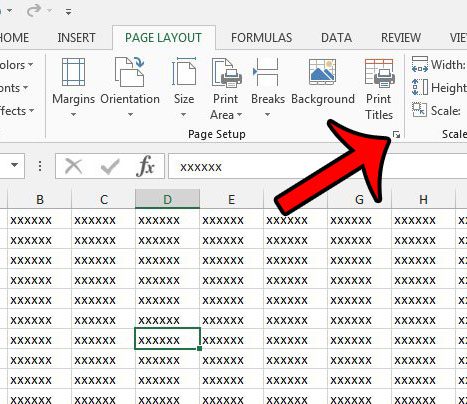
Step 3: Click the small Page Setup button at the bottom-right corner of the Page Setup section of the ribbon.

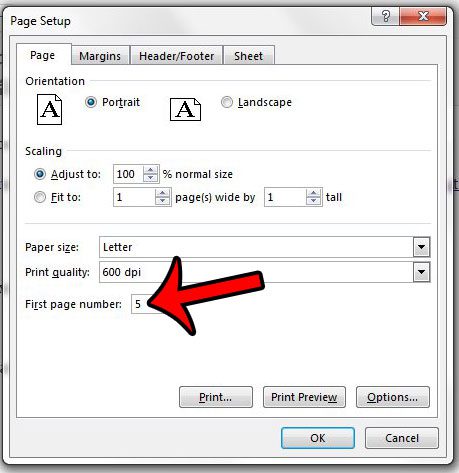
Step 4: Click inside the First page number field at the bottom of the window, then enter the number that you want to appear as the page number on the first page of your printed spreadsheet. You can then click the OK button at the bottom of the window to apply your changes.

Now when you print your spreadsheet, the first page will include the page number that you just entered, regardless of which page it actually is in your worksheet.
Each following page will increase based on the number that you entered. For example, I entered “5” in the image above, so the second page of my spreadsheet would be “6” and so on.
Now that you know how to change the starting page number in Excel 2013, you can fix issues that might occur due to incorrect numbering on your printed spreadsheets.
Is there a header or footer in your spreadsheet that you don’t need? Learn how to delete a header or footer in Excel 2013 to remove any information that is appearing on each page of that printed spreadsheet.

Matthew Burleigh has been writing tech tutorials since 2008. His writing has appeared on dozens of different websites and been read over 50 million times.
After receiving his Bachelor’s and Master’s degrees in Computer Science he spent several years working in IT management for small businesses. However, he now works full time writing content online and creating websites.
His main writing topics include iPhones, Microsoft Office, Google Apps, Android, and Photoshop, but he has also written about many other tech topics as well.