To boot into recovery mode in Windows 11, open Settings > System > Recovery, then select Restart now beside Advanced startup. Save your work before confirming. After the restart, choose Troubleshoot > Advanced options to see the available repair tools. You can also hold Shift while choosing Power > Restart from Start or the sign-in screen.
This opens Windows Recovery Environment, often shortened to Windows RE or WinRE. Entering its menu is separate from starting a reset, restore or reinstall. The Settings path above is for Windows 11; Update & Security > Recovery belongs to Windows 10.
Prepare Before Restarting
Save open documents and connect a laptop to power. If Windows is still usable, back up important files before trying repairs. Merely opening recovery choices does not erase files, but the operation you select afterward may change or remove data.
Have the BitLocker recovery key ready if your Windows drive is encrypted, since some recovery tools ask for it. Microsoft’s recovery-key guide explains how to match the key ID on screen to a saved 48-digit key in your personal or work account, a printout or a USB backup. Your sign-in PIN is not that key. On a work PC, contact IT instead of changing recovery or firmware settings yourself.
Open Recovery Mode From Windows 11 Settings
- Press Windows + I to open Settings, then select System.
- Choose Recovery. Locate Advanced startup under Recovery options; it is separate from Reset this PC.
- Select the Restart now button beside Advanced startup. Save outstanding work and confirm any restart prompt.
- Wait for the Choose an option recovery screen. Select Troubleshoot, then Advanced options.
- Read the list of tools before picking one. If you only wanted to see the menu, go back to Choose an option and select Continue to start Windows normally.
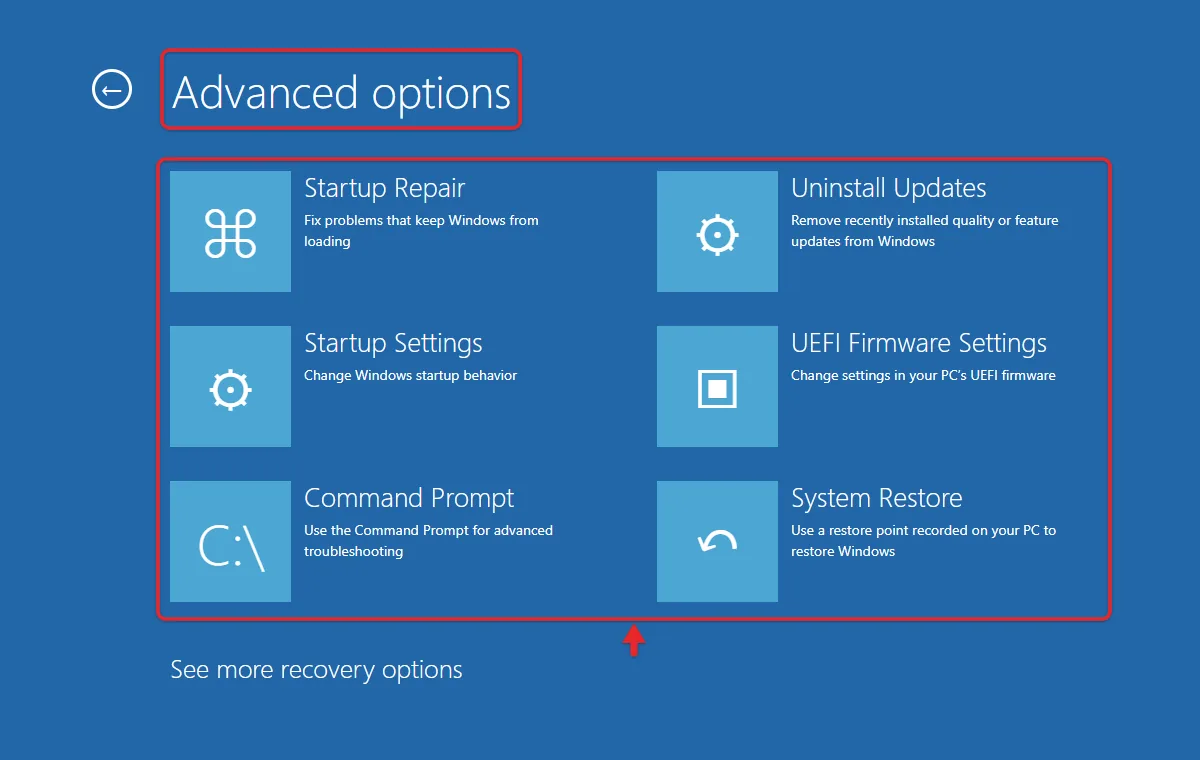
Microsoft’s Windows recovery documentation confirms this entry point. A recovery menu is not the same as the blue crash screen that reports a stop code. Its choices let you navigate to troubleshooting tools.
Use Shift + Restart From Start or the Sign-in Screen
This route helps when Settings will not open or you can reach the sign-in screen but cannot reach the desktop. It requires a working Power menu; it is not a solution for a completely unresponsive screen.
- If you are signed in, save your work and open Start > Power. At the sign-in screen, use its Power button instead.
- Press and hold Shift, select Restart, then let the PC restart into the recovery choices.
- Choose Troubleshoot > Advanced options. Supply the recovery key or account credentials if the selected tool requests them.
When Windows Will Not Start
Windows can enter Automatic Repair after repeated startup failures. If you reach its repair screen, choose Advanced options to access recovery choices. If repair repeatedly returns to the same screen, record the message and the original symptom before choosing another tool.
If your PC keeps restarting into Automatic Repair and never reaches the desktop, see how to fix an automatic repair loop in Windows 11.
If recovery does not load, use compatible recovery or installation media. For the startup-key and external-device procedure, see our Windows 11 boot-menu guide. A USB containing ordinary files is not automatically bootable.
- If you already made a recovery USB for this PC, connect it and follow the manufacturer’s boot-device instructions to start from it. It opens Windows RE.
- If you have no recovery drive, use a working PC and Microsoft’s official media-creation process to prepare compatible Windows installation media. Back up the USB first because preparation can erase it.
- Boot the affected PC from that media. In Microsoft’s current Windows 11 setup, choose language and other preferences, select Next, then Repair my PC and Next to enter Windows RE. Older setup screens may say Repair your computer.
- Stop at the recovery tools if your purpose is diagnosis. Choosing an installation or Recover from a drive process is a separate, potentially destructive action.
Microsoft also documents forcing Automatic Repair by interrupting normal startup twice and allowing the third startup to proceed. Forced shutdown can lose unsaved work or interrupt disk writes, so use normal restart or recovery media when possible. Do not interrupt an installation, update or firmware update to try this method. If you are unsure what the PC is doing, get device-specific support before forcing it off.
Start Safe Mode From Recovery (Windows 11 and 10)
Safe Mode is one of the options inside recovery mode. The steps are the same in Windows 11 and Windows 10, except where you start.
- Save your work. In Windows 11, open Settings > System > Recovery and select Restart now next to Advanced startup. In Windows 10, use Settings > Update & Security > Recovery. You can also hold Shift and select Restart.
- Select Troubleshoot > Advanced options > Startup Settings > Restart.
- After the PC restarts, press 4 or F4 for Safe Mode, or 5 or F5 for Safe Mode with Networking. Use 6 or F6 only if you need Safe Mode with Command Prompt.
- Enter the BitLocker recovery key if asked, then sign in with your account password. Windows Hello PIN sign-in can be unavailable in Safe Mode.
Safe Mode loads only basic drivers and services, which helps you find what is causing a problem. It doesn’t repair anything by itself. Restart normally to leave it. Microsoft lists every option in its Startup Settings instructions.
For every way to reach it on an older PC, including one that won’t load, see how to start Windows 10 in Safe Mode while booting.
Leave Safe Mode and Start Windows Normally
Save work and restart normally first. A one-time Startup Settings choice generally ends after that restart. If Windows keeps starting in Safe Mode, press Windows + R, enter msconfig, open the Boot tab, and clear Safe boot for the current Windows entry. Select Apply > OK, then restart and confirm normal startup.
Remove a Persistent Safe Mode Setting With Command Prompt
Try the restart and System Configuration method above first. If you set Safe boot yourself for the Windows installation you’re signed into, an administrator can turn it off with Command Prompt. Search Start for Command Prompt, choose Run as administrator and accept the prompt. Opening cmd from Run doesn’t always give you admin rights. In the admin Command Prompt, enter bcdedit /enum {current} and look at the current entry. If it shows the safeboot setting, enter bcdedit /deletevalue {current} safeboot. Use Command Prompt for this, since PowerShell handles braces differently.
Then restart with Start > Power > Restart and check that Windows starts normally. Microsoft documents the bcdedit /deletevalue command. If the safeboot value isn’t listed or you see “access denied,” make sure Command Prompt is running as administrator.
Understand the Tools Before Choosing One
Startup Repair targets problems that prevent Windows from starting. Uninstall Updates removes an applicable recent update. System Restore uses an existing restore point to roll back system changes; it is different from restoring personal documents from a backup.
If a recent patch is the problem, see how to remove failed updates in Windows 11 before choosing a tool.
For the full walkthrough of choosing a restore point, see how to do a System Restore on Windows 11.
UEFI Firmware Settings opens firmware setup, and Use a device, when present, starts another bootable device. Neither automatically repairs Windows. Tools vary with the PC, Windows build and available backups; newer recovery features may add other choices.
Reset this PC reinstalls Windows. Its keep-files option still removes apps and resets settings, so it is not a substitute for a backup. Recovery-drive reinstallation can remove personal data. Don’t run them just to test recovery mode.
To reset the PC, go to Settings > System > Recovery and select Reset PC (in Windows 10, Settings > Update & Security > Recovery > Reset this PC > Get started). Choose Keep my files or Remove everything, then Cloud download or Local reinstall, and review the summary before you select Reset. Keep the PC plugged in and let it restart on its own. Microsoft’s reset guide explains each choice.
Fix Missing or Unexpected Recovery Choices
No Update & Security section: that is expected in Windows 11. Use System > Recovery, or Shift + Restart if Settings is unavailable. Check that you used the Advanced startup restart button rather than the neighboring reset button.
A recovery-key prompt appears: match its key ID with the saved key using Microsoft’s instructions above. Do not share the key in a public support post. If a work or school account holds it, contact the organization.
The PC returns to Windows immediately: try the other normal entry point. If neither works, follow the documented recovery-media route or seek support for missing or damaged recovery components. Repeated power interruptions are not the first troubleshooting step.
A tool you expected is missing: the available features depend on the recovery environment. You can’t create a restore point after the fact. Describe the menu and error to your PC maker or IT team instead of trying a more destructive option at random.
Frequently Asked Questions
Can I create a recovery drive in advance?
Yes. Search Start for Recovery Drive on the working PC. Follow Microsoft’s Recovery Drive instructions, using an empty USB and backing up its contents first. Include system files when requested. This media is for that device and does not include your personal-file backup.
Does opening recovery mode fix the problem?
No. The menu provides access to tools. Choose one that matches the symptom, read its prompts and keep a backup before an operation that changes the system. You can leave without starting a repair.
How do I exit recovery mode?
Return to Choose an option and select Continue when available to start Windows 11. If you booted external media, leave its setup or recovery screen, remove the media when it is safe to do so and start the internal Windows drive. Confirm Windows loads normally before considering the recovery attempt finished.

Matthew Burleigh is the founder, head writer, and editor of Solve Your Tech, which he launched in 2012. He has written technology tutorials since 2008 and worked in IT since 2003, including small-business support, IT management, and consulting. He holds Bachelor’s and Master’s degrees in Computer Science from Arizona State University.
Matthew writes practical guides for Windows, iPhone and iPad, Microsoft Office, Outlook, Google apps, and Android. Solve Your Tech’s guides are checked step by step against the device or app maker’s own documentation and tested on his own devices whenever he has the hardware or software, with clear steps, sources, and update dates.
Read more about Matthew and how Solve Your Tech writes and updates its guides, or report a correction.