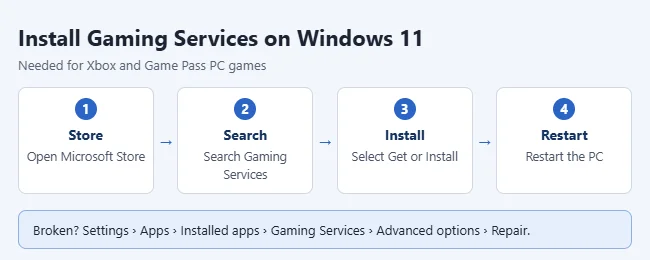
To install Gaming Services on Windows 11, open the Microsoft Store, search for Gaming Services, open the listing published by Microsoft Corporation, and select Get or Install. Gaming Services is a free Microsoft component that the Xbox app and many Microsoft Store and Game Pass games on PC rely on. The Xbox app normally installs it for you and shows an Install prompt when it’s missing.
This guide covers Windows 11 Home and Pro. It explains what you need first, two ways to install Gaming Services, how to confirm that it installed, how to repair or reinstall it when the install fails, and how to remove it. The repair steps follow Xbox Support’s Gaming Services Repair Tool for PC page and Microsoft Support’s Repair apps and programs in Windows page.
What Gaming Services Is
Gaming Services is a background component from Microsoft, not a game or a launcher. You don’t open it and it has no window of its own. The Xbox app and games from the Microsoft Store use it to install, update and start games, so when it’s missing or damaged you usually notice in one of these ways:
- The Xbox app shows a banner saying it needs an extra component, with an Install button.
- A game sends you to the Gaming Services page in the Microsoft Store instead of starting.
- Games in the Xbox app won’t install, update or launch, or the Xbox app opens with missing content.
If you don’t play games from the Xbox app or the Microsoft Store, you don’t need to install it. Games from other launchers use their own components. For example, Rockstar games install through the Rockstar Games Launcher, as shown in how to download GTA Vice City on a Windows 11 laptop.
Before You Start
- An administrator account. Microsoft’s install prompt says administrator approval is required. On a shared or work PC, you may need the owner or IT department to approve it.
- A working Microsoft Store. Gaming Services is delivered through the Store. If the Store itself is missing or won’t open, fix that first with our guide on how to get the Microsoft Store on Windows 11.
- The same Microsoft account in both apps. Xbox Support says to sign in to the Microsoft Store and the Xbox app with the same Microsoft account that owns your games.
- An up-to-date PC. Xbox Support notes that some Xbox app features need Windows 10 version 22H2 or newer, and that the repair tool can fail on Windows version 22H2 or older unless you’re signed in as the local administrator. Every supported release of Windows 11 can be updated past that point. To see your version, go to Settings > System > About and look at Version under Windows specifications.
- An internet connection. The component downloads from the Store.
Install Gaming Services From the Microsoft Store
This is the shortest reliable route. It installs the same component the Xbox app would install for you.
- Select Start, type Microsoft Store, and open it.
- Select the search box at the top, type Gaming Services, and press Enter.
- Open the result named Gaming Services. Check that the publisher is Microsoft Corporation. The Store lists it as a free utility.
- Select Get or Install. If Windows asks for permission to make changes, select Yes.
- Wait for the download to finish. The button changes once the component is installed.
- Restart your PC, then open the Xbox app or your game again.
If searching the Store doesn’t show it, you can go straight to Microsoft’s Gaming Services listing on the web and select View in Store. That opens the same page in the Microsoft Store app on your PC.
Install It From the Xbox App Prompt
If you already use the Xbox app, you may not need the Store search at all. When the component is missing, the Xbox app displays a banner near the top of the window. Microsoft’s documentation quotes it as saying that the app needs an extra component, that Gaming Services is needed for playing some games, and that administrator approval is required.
- Open the Xbox app.
- Look for the banner about an extra component and select Install.
- Approve the Windows permission prompt if one appears.
- When the banner disappears, restart the Xbox app and try your game.
Microsoft describes this banner in a Windows 10 support article, so the wording on your Windows 11 PC may differ slightly. If you don’t see a banner, Gaming Services is probably already installed, and the steps in the next section will confirm it.
Confirm That Gaming Services Is Installed
Because Gaming Services has no window, check for it in one of these places:
- Settings: open Settings > Apps > Installed apps and type Gaming Services in the search box. It should appear in the list.
- Microsoft Store: open the Gaming Services page again. An installed component no longer shows Get or Install.
- Xbox app: the extra component banner is gone and games offer Install or Play as normal.
- Terminal: right-click Start, select Terminal, type
Get-AppxPackage Microsoft.GamingServices, and press Enter. Package details, including a version number, mean it’s installed. No output means it isn’t.
If Gaming Services Won’t Install
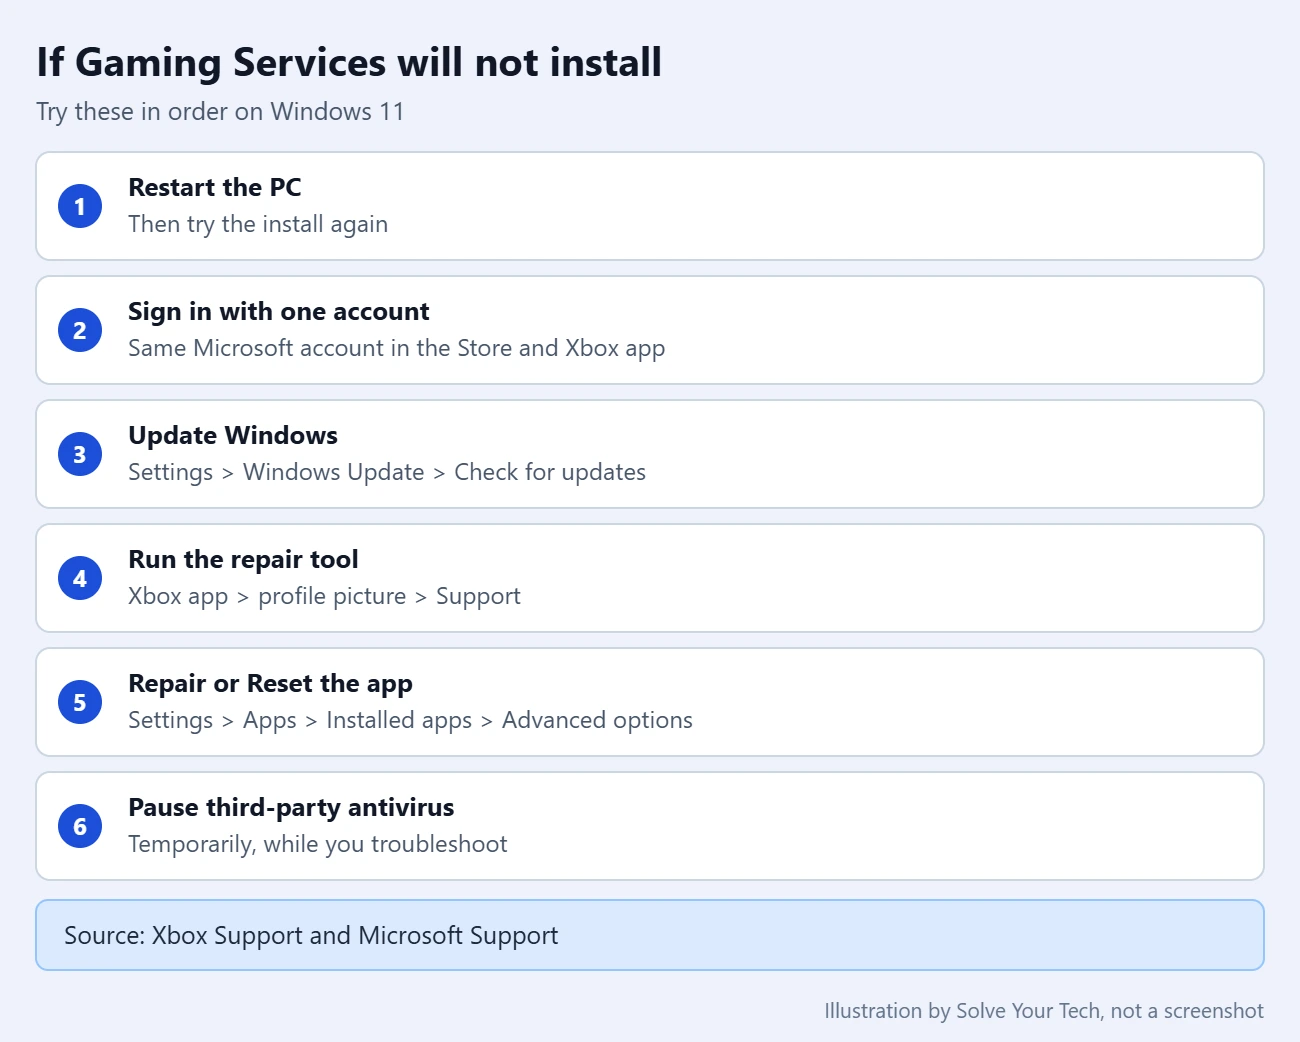
Work through these in order. They start with the quickest and least disruptive fixes that Xbox Support and Microsoft Support list.
Restart and Check Your Sign-In
Restart the PC and try the install again. Xbox Support points out that a simple restart sets many things right. Then confirm that the Microsoft Store and the Xbox app are both signed in to the same Microsoft account. In the Store, select your profile picture at the top to see which account is in use.
Update Windows and the Store
- Open Settings > Windows Update.
- Select Check for updates, then Install now if updates are found.
- Restart the PC when the updates finish.
- Open the Microsoft Store and check for app updates. Depending on your Store version, the button is under Library or Downloads and is labeled Get updates or Check for updates.
Run the Gaming Services Repair Tool
Xbox Support says this tool can often resolve install, update and launch problems for both games and the Xbox app. It’s built into the Xbox app:
- Open the Xbox app.
- Select your profile picture.
- Select Support.
- Select Gaming Services Repair Tool.
- Select Start Troubleshooting and wait for it to finish.
If the Xbox app won’t open, use the downloadable version instead. Go to the Gaming Services Repair Tool page on Xbox Support, expand Downloadable version, download the tool, and open the file. A Command Prompt window opens, runs its checks, and installs any needed updates to Gaming Services. At the end it asks whether the repair worked. Type Y or N and press Enter. Xbox Support recommends downloading a fresh copy each time, because the tool is updated.
Repair or Reset the App in Settings
- Open Settings > Apps > Installed apps.
- Find Gaming Services and select the More button (three dots) next to it.
- Select Advanced options. Microsoft notes that some apps don’t have this option.
- Select Repair. If Repair isn’t available or doesn’t fix the problem, select Reset.
You can run the same Repair and Reset steps on the Xbox and Microsoft Store entries. Resetting an app clears its data, so expect to sign in again afterward.
Reset the Microsoft Store Cache
If the Store shows an error or the Get button does nothing, Microsoft’s Store troubleshooting page suggests resetting its cache. Press Windows key + R, type wsreset.exe, and select OK. A blank Command Prompt window opens, and after about ten seconds it closes and the Store opens by itself. Microsoft also says to check that your time, language and region settings are correct.
Pause Third-Party Antivirus
Xbox Support says third-party antivirus software can cause installation errors. If you use one, suspend it temporarily, try the install, and turn it back on right away, whether or not the install worked. Don’t browse or download other files while it’s paused.
Remove and Reinstall Gaming Services
Try this only after the repair tool and the Settings repair have failed. It removes the component completely so the Store can install a clean copy.
Warning: until you reinstall Gaming Services and restart, Xbox app and Microsoft Store games won’t start. The command needs an administrator account and removes the component for every user on the PC. Copy and paste it instead of typing it.
- Close the Xbox app and any running games.
- Right-click Start and select Terminal (Admin). Select Yes at the permission prompt.
- Paste this command and press Enter:
Get-AppxPackage *gamingservices* -allusers | Remove-AppxPackage -allusers - Restart your PC.
- Open the Xbox app and select Install on the extra component banner, or install Gaming Services from the Microsoft Store using the steps at the top of this guide.
- Restart once more, then try your game.
The removal command comes from Microsoft’s own workaround in KB5004327, which covers errors 0x80073D26 and 0x8007139F. That article was written for Windows 10, and its full workaround also deletes two registry keys. Microsoft hasn’t published a Windows 11 version of it, so on Windows 11 treat the repair tool as the first choice and this command as a fallback.
If none of this works, Xbox Support says a persistent error after running the repair tool can point to a critical system problem that needs a Windows upgrade or a PC reset. Back up your files before you consider either one, and read Xbox Support’s Fix gaming issues with the Xbox app page first for other causes.
How to Uninstall Gaming Services
If you’ve stopped using the Xbox app, open Settings > Apps > Installed apps, select the three dots next to Gaming Services, and choose Uninstall if it’s offered. If the option is missing or grayed out, the Terminal command in the previous section removes it. The Xbox app will ask you to install it again the next time a game needs it. For other apps, see how to uninstall a program on Windows 11.
Frequently Asked Questions
Do I need Gaming Services?
Only if you play games from the Xbox app or the Microsoft Store. It’s safe to leave installed, and it updates through the Store like other apps. For better performance while you play, also see how to turn on Game Mode in Windows 11.
Is Gaming Services free?
Yes. The Microsoft Store lists Gaming Services as a free download from Microsoft Corporation. It isn’t a subscription. Games in the Game Pass library are separate: Xbox Support says you need an active Game Pass subscription that includes PC games to install those, and that Game Pass for Console isn’t supported on PC.
Why does the Xbox app keep asking me to install it?
The earlier install probably failed or the component is damaged. Run the Gaming Services Repair Tool from the Xbox app’s Support page, install pending Windows and Store updates, and restart. If a Store game such as Roblox still won’t open, see how to fix Roblox not launching on Windows 11.
Does it work on Windows 11 Home?
Yes. Gaming Services installs the same way on Windows 11 Home and Pro. You need an administrator account on either edition.
What do errors 0x80073D26 and 0x8007139F mean?
Microsoft documents both codes as errors that appear when you install or start Gaming Services, often after a game redirects you to its Store page. Microsoft’s published fix was a Windows 10 update plus the remove and reinstall workaround described above. On Windows 11, install the latest Windows updates, run the repair tool, and then try the reinstall.
Why is there no Get or Install button in the Store?
A missing button usually means the Store believes the component is already installed, even if that copy is broken. Run the repair tool, or remove Gaming Services with the Terminal command and open the Store page again. Also confirm that you’re signed in to the Store.
Next Steps
Once the Xbox app opens without the banner, install or launch your game. Getting a PC ready for games? See how to update Minecraft Bedrock on Windows 11 and how to enable hardware acceleration in Windows 11.

Matthew Burleigh is the founder, head writer, and editor of Solve Your Tech, which he launched in 2012. He has written technology tutorials since 2008 and worked in IT since 2003, including small-business support, IT management, and consulting. He holds Bachelor’s and Master’s degrees in Computer Science from Arizona State University.
Matthew writes practical guides for Windows, iPhone and iPad, Microsoft Office, Outlook, Google apps, and Android. Solve Your Tech’s guides are tested on current devices or checked against official product documentation, with clear steps, sources, and update dates.
Read more about Matthew and how Solve Your Tech writes and updates its guides, or report a correction.