This post contains affiliate links. As an Amazon Associate, solveyourtech.com earns from qualifying purchases, at no extra cost to you.
To format a USB drive as FAT32 on Windows 11, open File Explorer, right-click the drive, select Format, choose FAT32 as the file system, and select Start. Formatting erases everything on the drive, so copy your files off first.
The Format window only offers FAT32 for drives up to 32 GB. For larger drives, the format command handles FAT32 up to 2 TB on updated Windows 11 PCs (versions 24H2 and 25H2), according to Microsoft’s KB5083631 release notes.
These steps are for Windows 11 versions 24H2 and 25H2. File Explorer, Disk Management and the format command work the same way in Windows 10, but the 2 TB command-line change only came to Windows 11, and Windows 10 reached end of support on October 14, 2025.
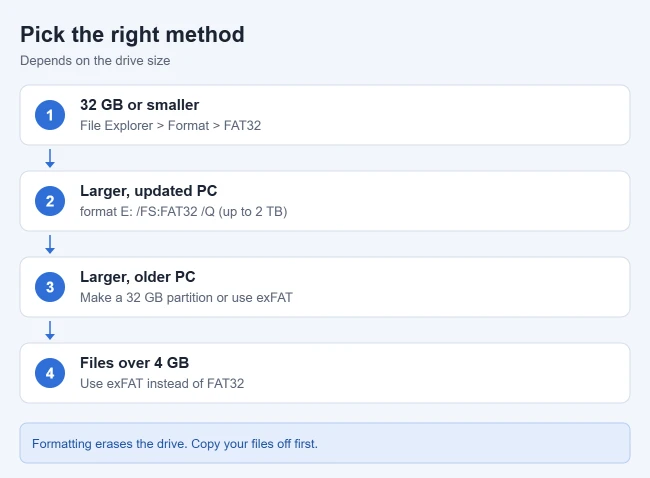
Before You Start
- Back up the drive. Every method below erases all files on the selected volume. If you only want to clear files and keep the current format, you can delete files or erase everything on a flash drive instead.
- Close anything using the drive. Windows can’t format a drive while a file on it is open.
- Know the drive’s size. Check it under This PC in File Explorer. It decides which method you can use.
- Check whether you need FAT32 at all. FAT32 can’t store a single file larger than 4 GB, per Microsoft’s file system comparison. See the exFAT section below if you’re not sure.
Format as FAT32 in File Explorer (32 GB or Smaller)
- Back up any files on the drive.
- Open File Explorer and select This PC. Your drives are listed under Devices and drives.
- Right-click the USB drive and select Format. The Format window opens. If the drive isn’t listed, try the fixes for a USB drive not showing up.
- Set File system to FAT32. If FAT32 isn’t in the list, the drive is larger than 32 GB; skip to the command-line section.
- Type a name under Volume label if you want, keep Quick Format checked, and select Start.
- Select OK to confirm. A “Format Complete” message appears after a few seconds, and the drive shows as empty.
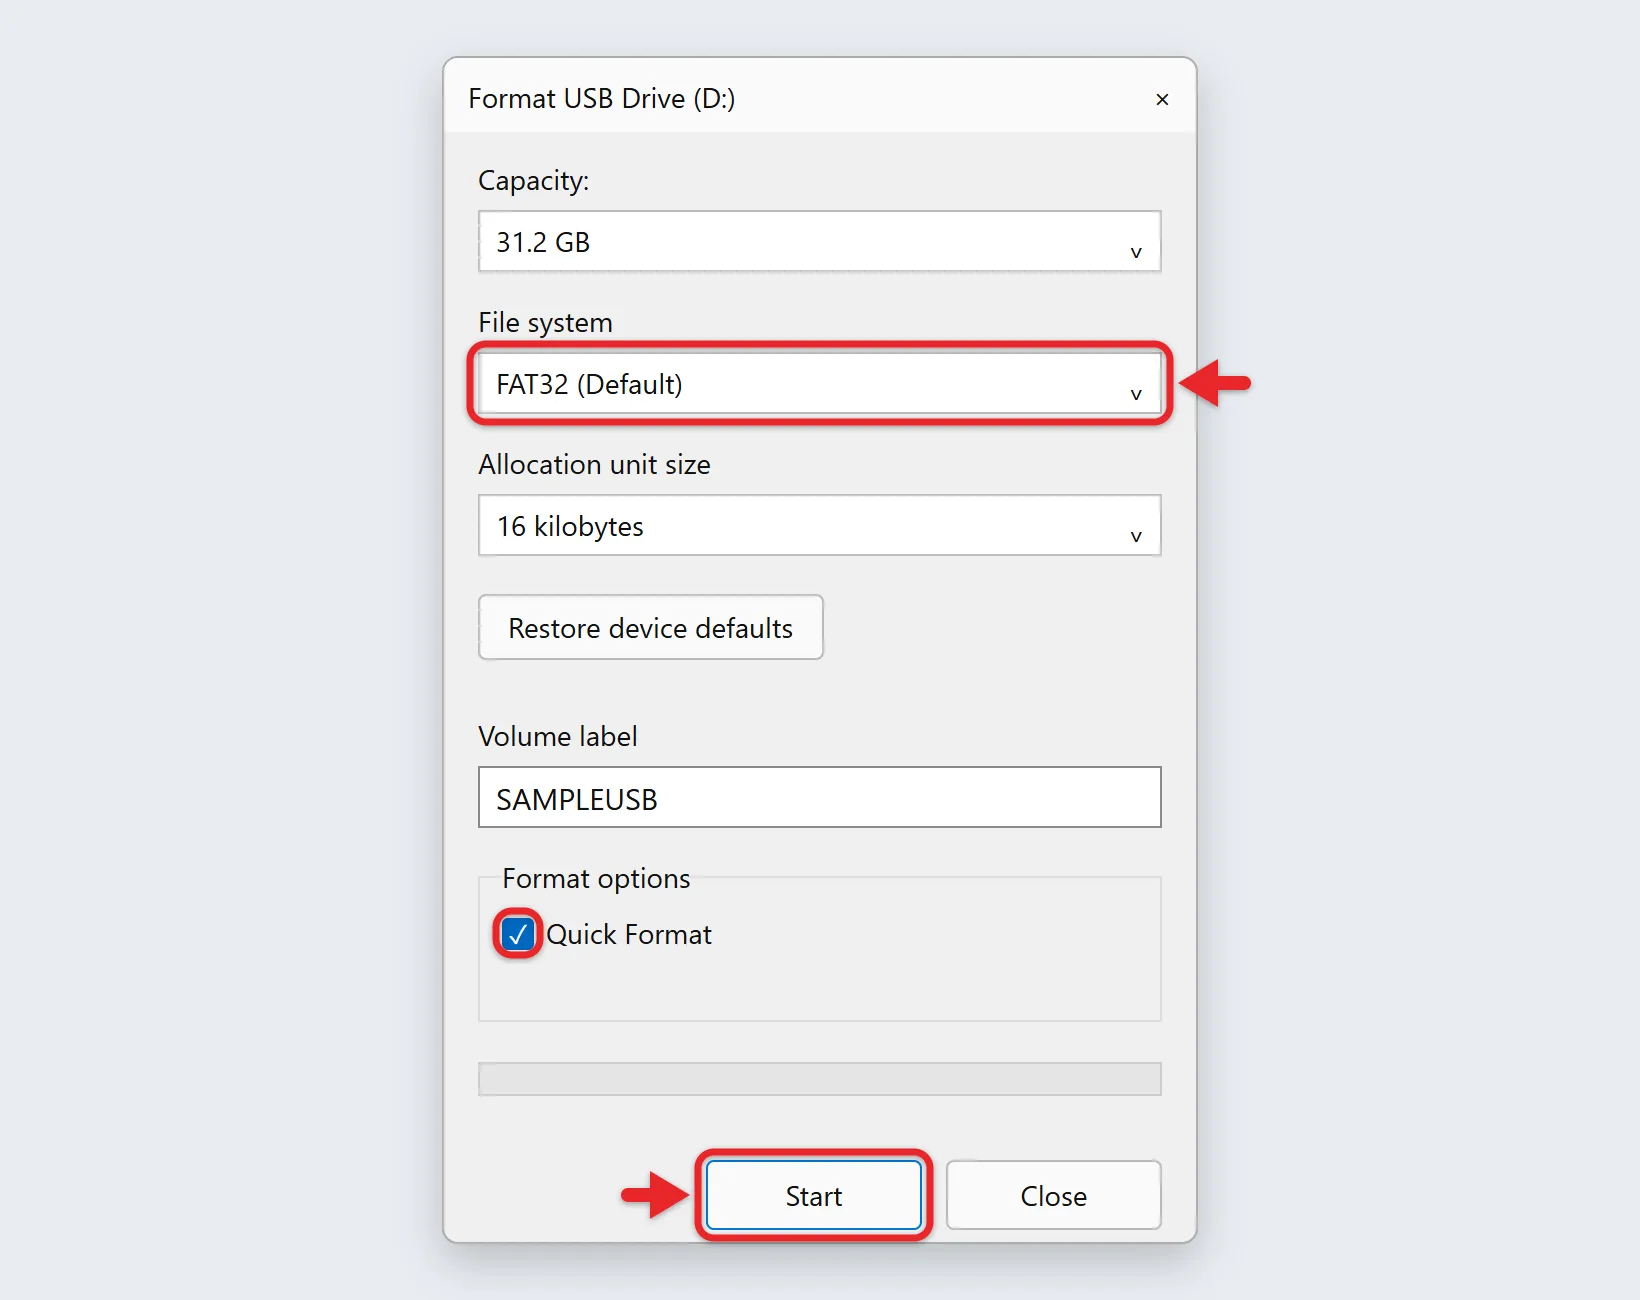
Leave Allocation unit size at its default. Windows picks a cluster size based on the drive’s size, and Microsoft recommends the default for general use. A FAT32 volume label can be up to 11 characters, so a longer name gets cut short.
Format in Settings
Windows 11 also has a format option in Settings, which shows every disk and volume in one list.
- Open Settings and go to System > Storage.
- Under Storage management, select Advanced storage settings, then Disks & volumes.
- Find the USB drive in the list and select Properties next to its volume (not the disk itself).
- Under Format, select Format. Choose FAT32 as the file system, keep the quick format option checked, and select Format again. The volume’s details update to show FAT32.
If the USB drive shows only unallocated space here, select it and choose Create volume instead, then pick FAT32 in that window.
Format in Disk Management
Disk Management is useful when a drive doesn’t show a letter in File Explorer. It has the same 32 GB limit for FAT32.
Before formatting, open the USB drive in File Explorer and copy off anything you want to keep.
- Right-click Start and select Disk Management. There are other ways to open Disk Management in Windows 11 as well.
- Find the USB drive in the bottom pane. Check the size carefully so you don’t pick another disk.
- Right-click its partition and select Format. If it says Unallocated, select New Simple Volume instead and follow the wizard.
- Choose FAT32, keep Perform a quick format checked, and select OK. The partition shows as FAT32 and Healthy.
Format Drives Larger Than 32 GB as FAT32
Microsoft’s April 30, 2026 update for Windows 11 versions 24H2 and 25H2 (KB5083631, builds 26100.8328 and 26200.8328) raised the size limit for formatting FAT32 from the command line from 32 GB to 2 TB. Later monthly updates include the change. File Explorer and Disk Management still stop at 32 GB.
This change rolls out gradually, so a PC can have the update before the feature turns on. If the command refuses a large drive, install the latest updates from Settings > Windows Update and try again later.
- Check the drive letter in File Explorer, such as E:.
- Right-click Start and select Terminal (Admin). Select Yes if asked.
- Type
format E: /FS:FAT32 /Q, replacing E: with your drive’s letter, and press Enter. - Press Enter again when asked to insert a disk, and type Y if asked to confirm. The drive is formatted as FAT32 within seconds.
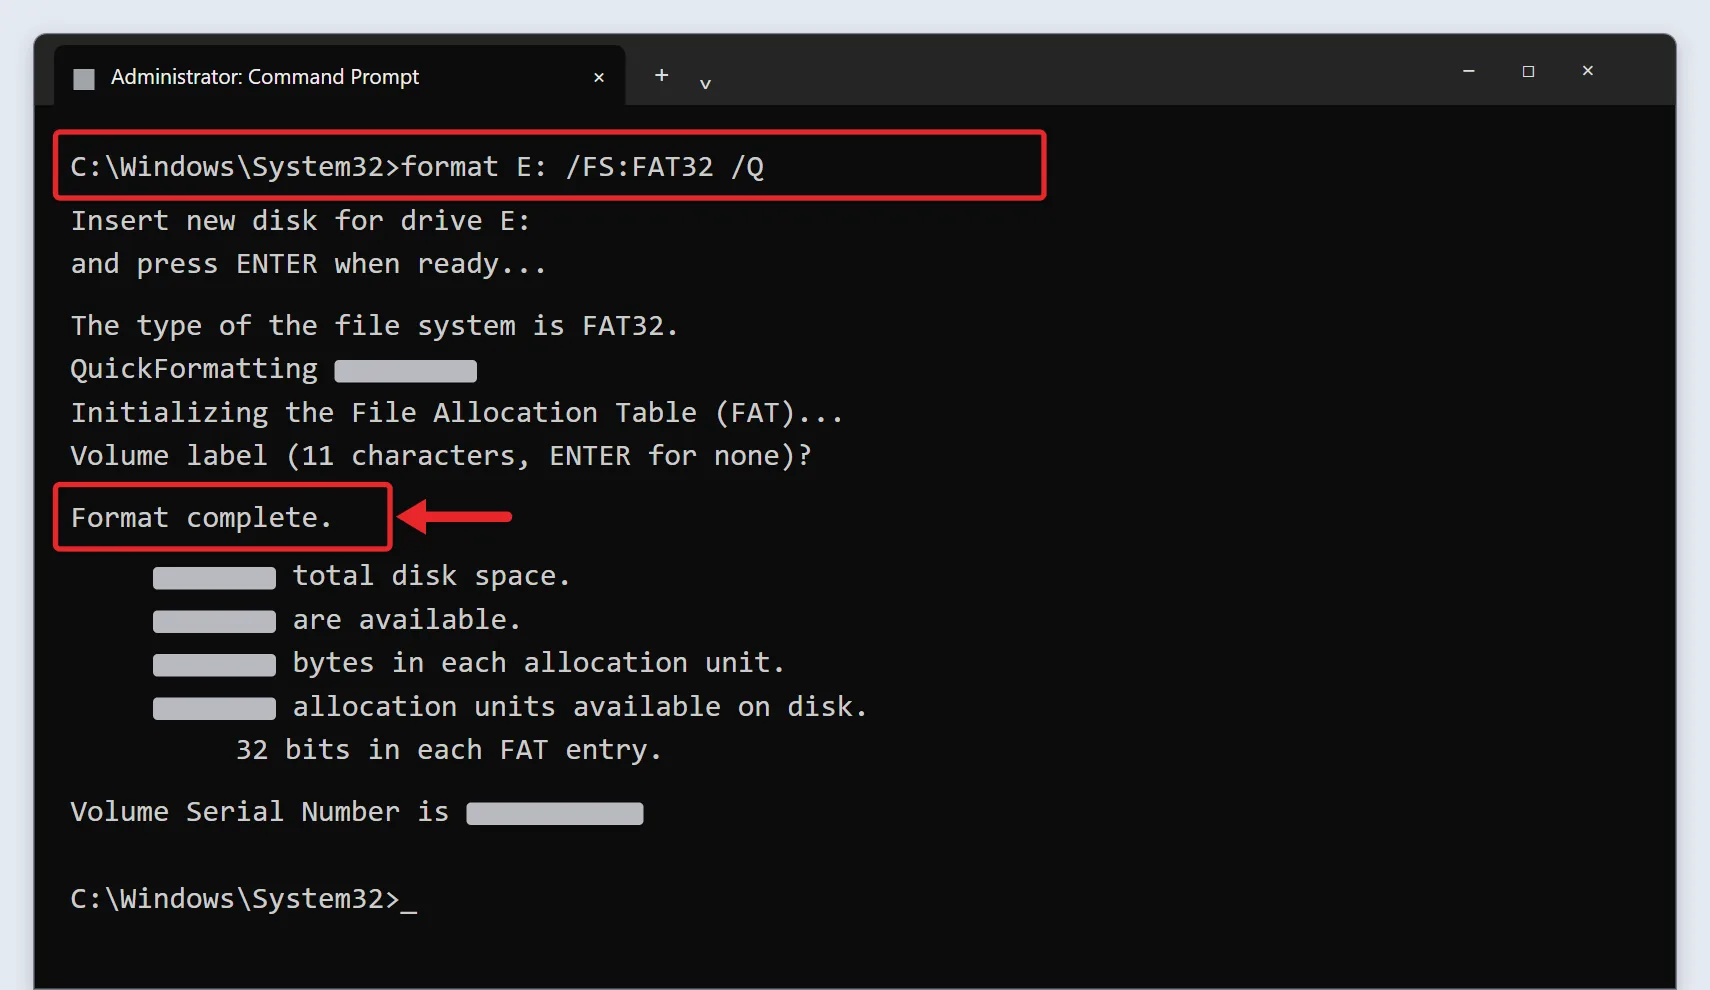
Double-check the letter, because this erases the drive. On a PC without the update, the command stops with an error on drives over 32 GB. Check your build in Settings > System > About.
To name the drive in the same command, add /V: and a label, as in format E: /FS:FAT32 /Q /V:MUSIC. Without a label, the command asks for one when it finishes; press Enter to skip it. Leaving out /Q runs a full format, which also checks for bad sectors and can take a long time on a large drive. All switches are listed on Microsoft’s format command page.
Drives larger than 2 TB can’t be formatted as FAT32 with Windows tools at all. Use exFAT for those.
Use PowerShell instead
PowerShell has its own command, Format-Volume. In Terminal (Admin), type Format-Volume -DriveLetter E -FileSystem FAT32 -NewFileSystemLabel USB and press Enter. It runs a quick format by default and shows the new file system when it’s done. Microsoft’s Format-Volume reference lists the other options. Microsoft’s 2 TB note names the format command, so use format for drives over 32 GB.
Workaround for older PCs: a smaller partition
If a large drive won’t format as FAT32 on an older PC, make a smaller partition instead. In Disk Management, delete the drive’s volume, then create a New Simple Volume of 32,000 MB or less and format it as FAT32. The rest of the drive stays unused unless you add another volume. For more on volumes and unallocated space, read about partitioning a drive on Windows 11.
Should You Use exFAT Instead?
- exFAT works on Windows, Mac, most cameras and game consoles, and has no 4 GB file-size limit. It’s the better choice for most large drives.
- FAT32 is still needed for some older TVs, car stereos, printers and BIOS or firmware update tools, which only read FAT32. Check the device manual first.
- NTFS is best for drives you only use with Windows PCs.
| File system | Largest single file | Format in Windows 11 | Good for |
|---|---|---|---|
| FAT32 | 4 GB | Up to 32 GB in File Explorer; up to 2 TB with the updated format command |
Older devices, firmware updates |
| exFAT | No practical limit | Any size USB drive | Large flash drives, Mac and Windows |
| NTFS | No practical limit | Any size | Drives used only with Windows |
If you need a new drive for a TV, car stereo, or game console that only reads FAT32, a basic SanDisk Ultra 64GB flash drive works well. Format it with the steps above before you use it.
Check That It Worked
Open File Explorer, right-click the drive under This PC, and select Properties. On the General tab, File system should read FAT32. You can also see the file system for each volume in Disk Management.
If Formatting Fails
- “Windows was unable to complete the format”: try Disk Management, or delete the volume and create a new one there.
- The drive is write-protected: check for a lock switch on the drive or SD card adapter.
- “The volume is too big for FAT32”: install the latest Windows updates and use the command line, or use exFAT.
- The drive isn’t detected: try another USB port or cable, then work through the fixes for a USB drive not showing up.
- “Windows can’t format this volume” or “in use”: close any file, photo or app that has the drive open, then try again. A restart frees a stuck drive.
- FAT32 is missing in Settings or Disk Management: the volume is larger than 32 GB. Use the command, a smaller partition, or exFAT.
- Format finishes but a device still won’t read it: check whether the device needs a specific allocation size or only reads one partition, and look in its manual.
Memory cards are formatted in much the same way. For card-specific steps, read about formatting an SD card in Windows 11.
Once the drive is formatted, you can copy files to the flash drive and eject it safely.
Frequently Asked Questions
What’s the file size limit on FAT32?
A single file can’t be larger than 4 GB, no matter how big the drive is. Use exFAT for larger files like movies or disk images.
Can I undo a format?
No. Formatting erases the drive. Recovery tools may find some files, but don’t count on it.
Why isn’t FAT32 in the list?
The drive is probably larger than 32 GB. Use the command line on an updated PC, or choose exFAT. If you’re making a Windows recovery drive, skip formatting and go straight to making a Windows 11 recovery USB.
Is Quick Format OK?
Yes, for most drives. A full format also scans for bad sectors and takes much longer, which can help with an older drive that gives errors.
Can a Mac read a FAT32 drive?
Yes. Macs can read and write FAT32 and exFAT drives, so either one works for moving files between a Mac and a Windows PC.
Not sure what format your drive uses now? Here’s how to check the file format of a USB flash drive.

Matthew Burleigh is the founder, head writer, and editor of Solve Your Tech, which he launched in 2012. He has written technology tutorials since 2008 and worked in IT since 2003, including small-business support, IT management, and consulting. He holds Bachelor’s and Master’s degrees in Computer Science from Arizona State University.
Matthew writes practical guides for Windows, iPhone and iPad, Microsoft Office, Outlook, Google apps, and Android. Solve Your Tech’s guides are checked step by step against the device or app maker’s own documentation and tested on his own devices whenever he has the hardware or software, with clear steps, sources, and update dates.
Read more about Matthew and how Solve Your Tech writes and updates its guides, or report a correction.