The fastest way to open Disk Management in Windows 11 is to right-click the Start button and select Disk Management. Disk Management is the built-in tool for viewing disks, partitions, drive letters, and unallocated space. You can also find it through Search, open it with the diskmgmt.msc command, or reach it through Computer Management.
Open Disk Management From the Start Button
- Right-click the Start button, or press Windows key + X.
- Select Disk Management.
- Wait a moment while it loads your drives. Opening it doesn’t change anything on your disks.
The risk comes from actions like formatting, deleting a volume, or initializing a disk, so make sure you understand a command before you confirm it.
How to Find Disk Management with Windows Search
Search is useful if you do not see Disk Management in the Start button menu or simply prefer typing the name of a tool.
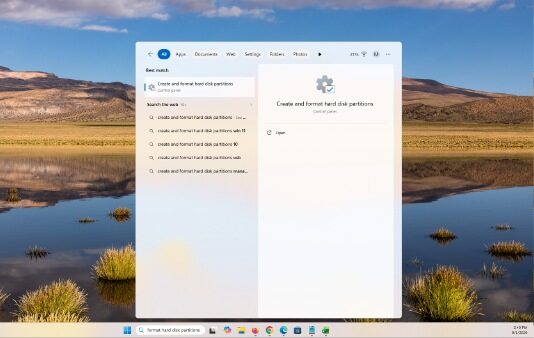
- Click Search on the taskbar or press the Windows key.
- Type Disk Management.
- Select Create and format hard disk partitions from the search results.
The wording in Search can be a little confusing because Windows may not label the result simply as “Disk Management.” Create and format hard disk partitions opens the same Disk Management console.
Open Disk Management with the Run Command
The Run command provides a direct way to start the utility.
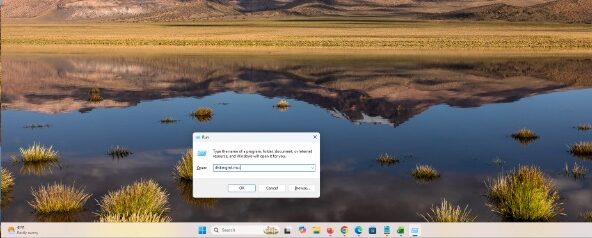
- Press Windows + R.
- Type
diskmgmt.msc. - Press Enter or click OK.
You can also run diskmgmt.msc from Command Prompt, PowerShell, or Windows Terminal.
Open Disk Management from Computer Management
Computer Management includes several administrative tools in a single window, such as Disk Management.
- Right-click Start.
- Select Computer Management.
- Expand Storage in the left column if necessary.
- Select Disk Management.
This route takes a little longer, but it is convenient when you are already using Computer Management for another administrative task.
Use Disks & Volumes in Settings Instead
Windows 11 also has a newer storage page in the Settings app. It covers many of the same basic tasks, like creating a volume, formatting, and changing a drive letter.
- Press Windows + I to open Settings.
- Select System, then Storage.
- Select Advanced storage settings.
- Choose Disks & volumes.
Disk Management still gives you the full map of every disk and partition, so it’s the better choice for tasks like shrinking or extending a volume.
What You See in Disk Management
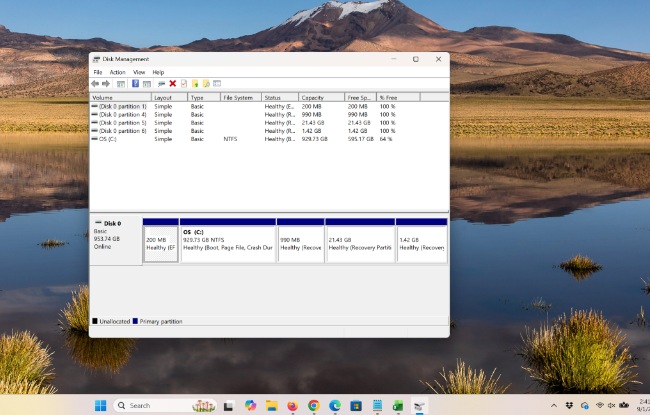
Disk Management presents your storage in two main views. The upper section lists volumes, including drive letter, file system, status, capacity, and free space. That file system column is one way to see what file format a USB flash drive uses. The lower section shows each physical disk and how its space is divided into partitions or unallocated areas.
The lower view is especially helpful when you are trying to determine whether two drive letters are on the same physical disk, whether a disk contains unallocated space, or where a recovery or system partition is located in the layout.
Windows normally shows unallocated space as an area that is not currently assigned to a volume. You may be able to use that space to create a new volume or, in some situations, extend an existing one. Whether a volume can be extended depends on the disk layout and other requirements, so do not assume any unallocated space can be added to any partition.
What Can You Do with Disk Management?
Disk Management handles many common storage tasks without requiring another program. Depending on the disk and volume involved, you can use it to initialize a new disk, create and format volumes, assign or change drive letters, shrink volumes, extend supported volumes, and delete volumes. Microsoft walks through these tasks in its Disk Management in Windows guide, and notes that the tool looks and works the same in Windows 10 and Windows 11. For a common example, see how to split the C drive in Windows 11.
These actions are more consequential than simply opening the utility. If a disk contains important files, make a current backup before changing its partitions or formatting a volume. Do not experiment with EFI, Recovery, OEM, or other unfamiliar system partitions.
What If a New Drive Says Not Initialized?
A brand-new drive may appear in Disk Management as Not Initialized. Initializing a genuinely new, empty disk is normally part of preparing it for use. Windows may ask you to choose a partition style before you can create a volume.
Be more cautious if an older drive that previously contained files suddenly appears as Not Initialized, RAW, or unallocated. Do not immediately initialize, format, or create a new volume on it. Those symptoms can indicate partition damage, connection problems, or another issue where preserving the existing data should come first.
What If a Drive Is Missing from Disk Management?
If a drive does not appear in File Explorer but does appear in Disk Management, check whether it is offline, lacks a drive letter, is unallocated, or uses a file system Windows cannot mount normally.
If the physical drive is missing from Disk Management entirely, the problem may be outside the partition layout. Check the connection, the USB cable or enclosure (if applicable), Device Manager, and whether the drive is detected by the computer’s firmware. Disk Management cannot partition a drive that Windows does not detect.
What If Disk Management Won’t Open or Keeps Loading?
If the window never finishes loading or doesn’t open at all, try these fixes in order.
- Wait a minute. Disk Management scans every connected drive when it starts, so a slow or failing drive can hold it up.
- Unplug external drives, SD cards, and USB sticks, then open Disk Management again. If it opens, reconnect them one at a time to find the one causing the delay.
- Open it another way: press Windows + R, type
diskmgmt.msc, and press Enter, or use Computer Management as shown above. - Restart the PC and try again.
- Repair system files. Open Terminal (Admin) and run
sfc /scannow, following Microsoft’s System File Checker guide.
While you troubleshoot, Settings > System > Storage > Advanced storage settings > Disks & volumes can handle many of the same jobs.
Be Careful Before Formatting or Deleting a Volume
Disk Management makes some destructive commands easy to reach. Formatting a volume erases the files stored on it, while deleting a volume removes it from the disk layout. Partition changes can also make data inaccessible if the wrong disk or volume is selected.
Before making a storage change, confirm the disk number, capacity, drive letter, volume label, and other identifying details. If BitLocker or device encryption is involved, make sure you have any recovery information you may need before making significant disk changes.
Frequently Asked Questions
Why does Windows Search say “Create and format hard disk partitions”?
That search result is the Windows entry for Disk Management. Selecting it opens the Disk Management console.
Can Disk Management create a new partition?
Yes. If suitable unallocated space is available, Disk Management can create a new simple volume and format it for use.
Can Disk Management change a drive letter?
Yes. Disk Management can assign or change drive letters for many volumes. Avoid casually changing the drive letter of a volume used by installed programs because existing paths may stop working. Our Windows 11 drive-letter guide explains when to use Add or Change, how to identify the correct volume, and how to undo a reassignment.
Why can’t I extend a volume even though I have unallocated space?
Windows has restrictions on which volumes can be extended and where usable unallocated space must be located. The exact answer depends on the partition layout, file system, and disk type.
For drives that don’t show up at all, see how to fix a USB drive not showing up. To prepare a USB drive for older devices, see how to format a USB drive to FAT32.
Do I need to download Disk Management?
No. Disk Management is built into every edition of Windows 11 and Windows 10, so there’s nothing to download. If a website offers a “Disk Management download,” skip it and open the tool with one of the methods above.
If Disk Management shows a drive with errors, run CHKDSK in Windows 11 to check and repair it.
Disk Management is one of several admin tools. See how to open Windows Tools (Administrative Tools) in Windows 11 for the rest.
Once Disk Management is open, you can use it to partition a hard drive on Windows 11 with Shrink Volume and New Simple Volume.

Matthew Burleigh is the founder, head writer, and editor of Solve Your Tech, which he launched in 2012. He has written technology tutorials since 2008 and worked in IT since 2003, including small-business support, IT management, and consulting. He holds Bachelor’s and Master’s degrees in Computer Science from Arizona State University.
Matthew writes practical guides for Windows, iPhone and iPad, Microsoft Office, Outlook, Google apps, and Android. Solve Your Tech’s guides are tested on current devices or checked against official product documentation, with clear steps, sources, and update dates.
Read more about Matthew and how Solve Your Tech writes and updates its guides, or report a correction.