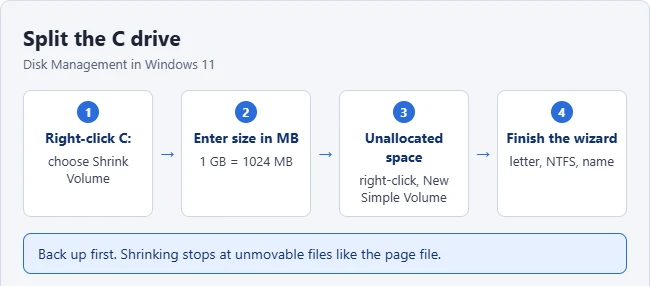
To split the C drive in Windows 11, open Disk Management, right-click the C: drive, select Shrink Volume, enter how much space to free, and select Shrink. Then right-click the new Unallocated space and select New Simple Volume. Your files on C: stay where they are, but back up first, since any partition change carries some risk.
This guide covers Windows 11 Home and Pro on a single internal drive. It shows how to shrink C: and create a new partition, how much space to leave, why Windows won’t let you shrink further, the diskpart alternative, and how to undo the split. Steps follow Microsoft’s Disk Management documentation, checked in October 2026. You need an administrator account.
Before You Start
- Back up important files. See how to back up Windows 11 to an external hard drive.
- Decide how big the new partition should be. Windows 11 needs at least 64 GB just to install, and updates, apps and the page file all live on C:. Leave plenty of free space on C: afterward.
- Use an administrator account. Microsoft says you need administrator (or Backup Operators) rights to shrink a volume.
- Know what you’ll use it for. A second partition is handy for organizing files, but it’s on the same physical drive, so it isn’t a backup.
Shrink C: and Create a New Partition
- Right-click Start and select Disk Management. Other ways to open it. Result: Disk Management lists your drives and partitions.
- Right-click the C: partition and select Shrink Volume. Result: Windows checks how much space it can free, then shows the Shrink dialog.
- Enter the amount to shrink in MB (1 GB = 1024 MB), up to the maximum shown, and select Shrink. Result: a black bar labeled Unallocated appears next to C:.
- Right-click the Unallocated space and select New Simple Volume. Result: the New Simple Volume Wizard opens.
- Keep the full size, pick a drive letter, choose NTFS, give it a name, keep Perform a quick format checked, and select Finish. Result: the new drive appears in File Explorer under This PC.
Microsoft’s Shrink a basic volume page explains that ordinary files are moved automatically to make room, so you don’t need to reformat C:. The quick format in the last step only affects the new, empty partition. To find the new drive later, see how to find drives in This PC.
Why You Can’t Shrink C: Any Further
Microsoft notes that some files can’t be moved, such as the page file and the shadow copy storage used by System Restore, so Windows can only shrink C: up to where those files sit. The Shrink dialog shows the most it can free.
- Free up space first: delete files you don’t need and empty the Recycle Bin.
- Check what’s blocking it: Microsoft says Event Viewer’s Application log records event ID 259 with details about the unmovable file.
- Move it temporarily: Microsoft suggests you can move the paging file or shadow copies elsewhere in Control Panel, shrink, then move them back.
Use diskpart Instead
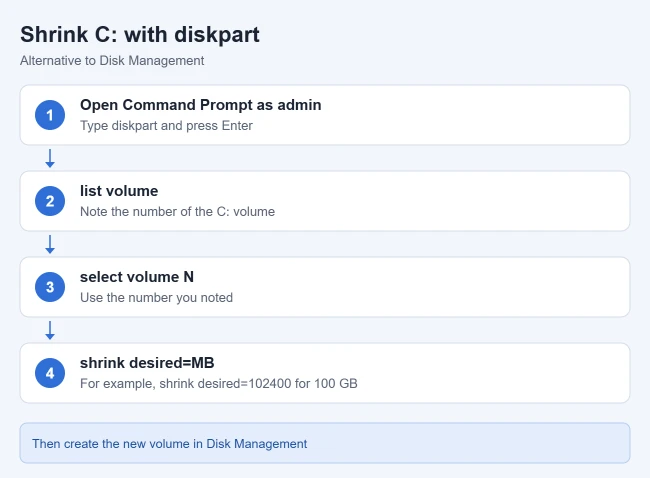
Microsoft documents a command-line method too. Open Command Prompt as administrator and run:
- diskpart Result: the DISKPART prompt appears.
- list volume Result: every volume is listed. Note the number next to C:.
- select volume followed by that number. Result: diskpart confirms the volume is selected.
- shrink desired= followed by the size in MB, for example shrink desired=102400 for 100 GB. Result: the volume shrinks; Microsoft notes no data is lost.
Type exit to leave diskpart, then create the new volume in Disk Management as above. Double-check the volume number before you shrink.
Undo the Split
- Copy any files you want to keep off the new partition. Result: nothing is lost in the next step.
- In Disk Management, right-click the new partition and select Delete Volume. Result: it turns back into Unallocated space and its files are erased.
- Right-click C: and select Extend Volume, then follow the wizard. Result: the space returns to C:.
Microsoft’s Extend a basic volume page explains that the unallocated space must be immediately after the volume you extend. If another partition, such as a recovery partition, sits between them, Extend Volume is grayed out.
Frequently Asked Questions
Will splitting the drive delete my files?
Shrinking C: keeps your files, and Microsoft says ordinary files are relocated automatically. Back up anyway in case something goes wrong.
How much space should C: keep?
At least the 64 GB Windows 11 needs to install, and in practice much more for updates, apps and free working space. Don’t shrink C: if it’s already close to full.
Can I split C: without Disk Management?
Yes, with diskpart as shown above. Third-party partition tools also exist, but Windows’ built-in tools are enough for a simple split.
Is a second partition the same as a second drive?
No. Both partitions are on the same physical drive, so if the drive fails, both are affected. Keep a separate backup.
Want the full walkthrough for any drive, including diskpart and a new second drive? See how to partition a hard drive on Windows 11.

Matthew Burleigh is the founder, head writer, and editor of Solve Your Tech, which he launched in 2012. He has written technology tutorials since 2008 and worked in IT since 2003, including small-business support, IT management, and consulting. He holds Bachelor’s and Master’s degrees in Computer Science from Arizona State University.
Matthew writes practical guides for Windows, iPhone and iPad, Microsoft Office, Outlook, Google apps, and Android. Solve Your Tech’s guides are tested on current devices or checked against official product documentation, with clear steps, sources, and update dates.
Read more about Matthew and how Solve Your Tech writes and updates its guides, or report a correction.