You can easily and quickly create an animated GIF in Photoshop CS5.5.
This procedure is accomplished by creating a new image in Photoshop that is the same size as the images that you want to include in the animation, then dragging your existing files into the Photoshop canvas.
Make a few adjustments to the animation, then your file is ready to share with the world.
Step for Creating Photoshop Animated GIFs
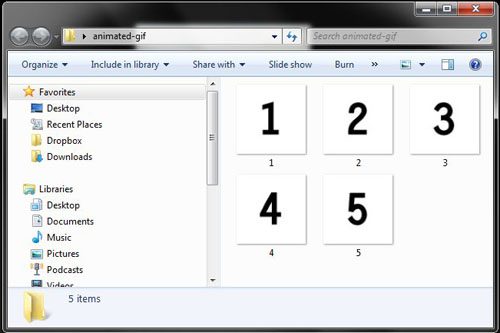
Step 1: Group all of your images into the same file. Note that each image must have the same dimensions.
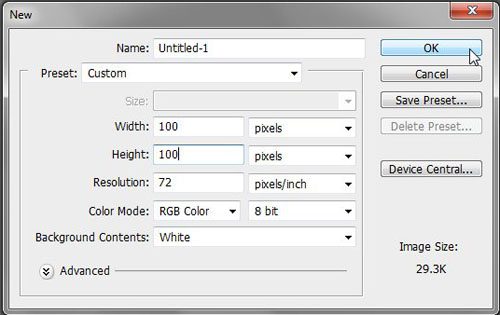
Step 2: Launch Photoshop CS5.5, click “File” at the top of the window, click “New,” then set the size of the new image to the same dimensions as your existing image. Click “OK” to create a new image.
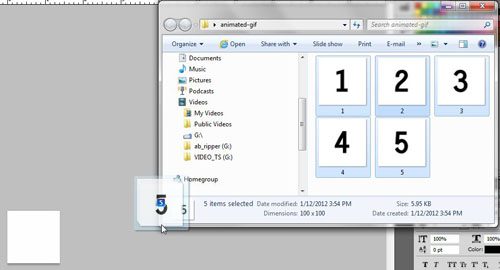
Step 3: Open the folder containing your images, press “Ctrl + A” on your keyboard to select all of the files, then drag them to the Photoshop canvas.
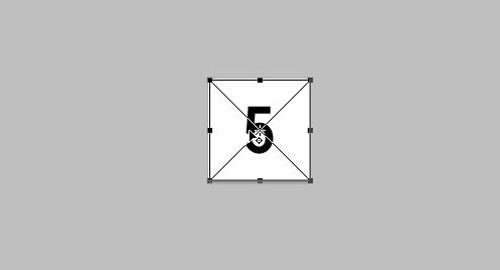
Step 4: Press “Enter” on your keyboard to set each image as its’ own layer.
Step 5: Reorganize your layers in the “Layers” panel at the right side of the window. The layer that you want to show as the last animation frame should be on top.
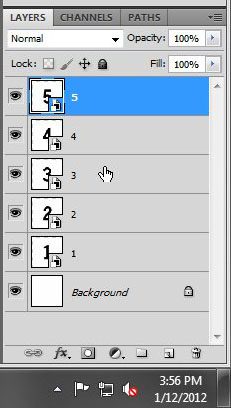
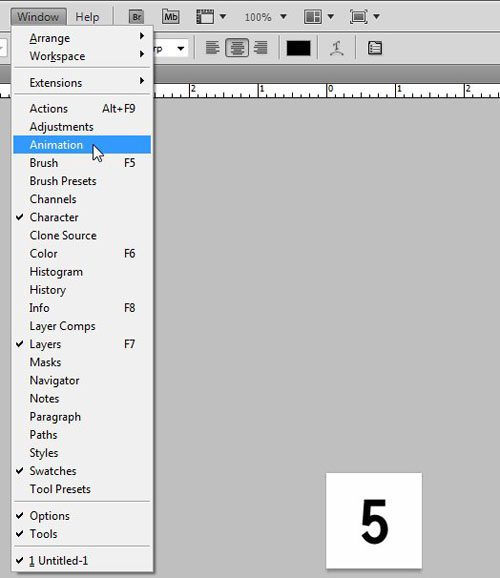
Step 6: Click “Window” at the top of the Photoshop window, then click “Animation” to display the Animation panel at the bottom of the Photoshop window.
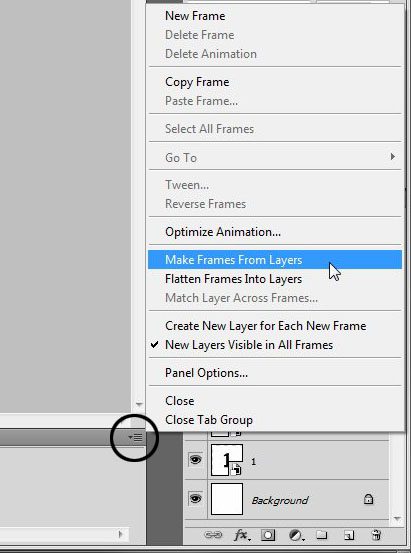
Step 7: Click the Animation panel menu at the top-right corner of the Animation panel, then click “Make Frames From Layers.”
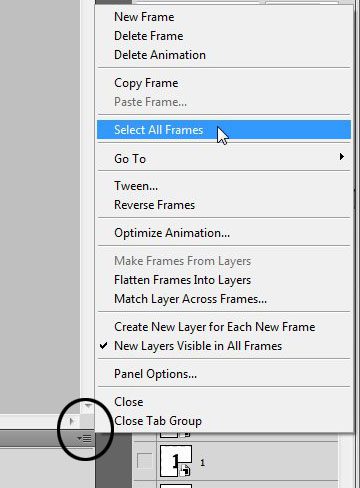
Step 8: Click the Animation panle menu again, then click “Select All Frames.” This allows you to make universal changes to all of your frames at once. If you want to set a different duration for each frame, this step is not needed.
Step 9: Click the “0 sec” drop-down menu under one of the frames, then click the duration for which you want each frame to be displayed.
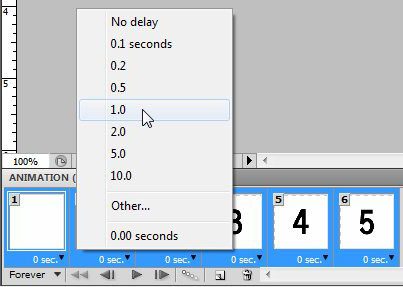
Step 10:Click the “Forever” drop-down menu, then click the amount of times that you want the animation to play. I selected “3” in my screen shot, but changed it to “Forever” when I realized that it would have stopped playing by the time you get to see it!

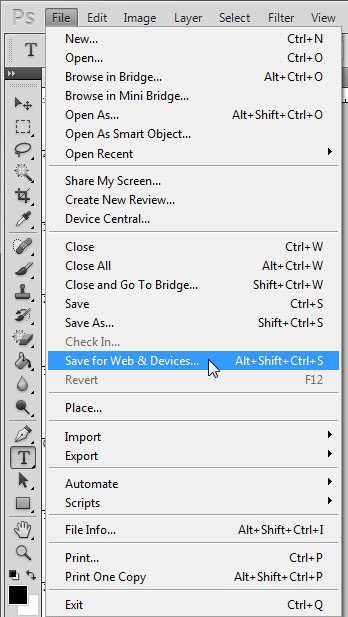
Step 11: Click “File” at the top of the window, then click “Save for Web & Devices.”
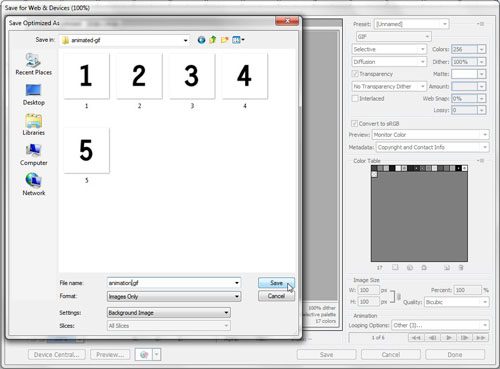
Step 12: Click the “Save” button on the “Save for Web & Devices” window, type a name for the animation into the “File Name” field, then click the “Save” button again.
My final product –

Now that you know how to create an animated GIF in Adobe photoshop, you can use these steps in the future when you need to generate that type of moving file.
Ah, animated GIFs! Those fun, short-looping videos that you see all over social media, blogs, and websites. They capture attention, evoke chuckles, and often go viral. But did you know that creating one doesn’t require a master’s degree in graphic design? In fact, you can craft your very own animated GIF right in Photoshop CS5.5. Let’s jump into the process, shall we?
Getting Started with Your GIF Journey
Before diving into the nitty-gritty, ensure you have Photoshop CS5.5 installed and multiple images or frames ready for your animation. These images will form the sequence of your GIF, similar to flipping through a comic book. The faster you flip, the smoother the animation appears!
Step by Step Guide to Crafting Your Animated GIF
- Opening Your Frames: Launch Photoshop CS5.5 and go to ‘File’ > ‘Open’. Select all the frames or images you want to include in your GIF and open them.
- Setting Up the Animation Window: Head over to ‘Window’ > ‘Animation’. This opens the animation timeline at the bottom.
- Creating a Frame Sequence: In the animation window, click on the dropdown menu (right corner) and choose ‘Make Frames From Layers’. This will line up all your layers as frames.
- Adjusting Frame Duration: Each frame has a time setting below it. You can adjust how long each frame appears before moving on to the next. Fancy a rapid-fire GIF or a slow, dramatic one? You’re the director here!
- Looping Settings: Want your GIF to play just once? Or loop indefinitely? Choose your preference from the ‘Looping Options’ dropdown.
- Previewing Your GIF: Before finalizing, hit the ‘Play’ button to see your GIF in action. Too slow? Too fast? Go back and adjust frame durations.
- Saving Your Masterpiece: Go to ‘File’ > ‘Save for Web & Devices’. Make sure the format is set to ‘GIF’, adjust other settings as desired, and hit ‘Save’. And voilà, you’ve just created a GIF!
Additional Information
- Quality Matters: Keep in mind that GIFs have a limited color palette, so sometimes the quality might not be as sharp as the original images. However, this is the charm of GIFs – they’re not meant to be HD masterpieces, but fun snippets.
- File Size: GIFs can get hefty in terms of file size. Keep an eye on it, especially if you’re planning to use it online. You don’t want to slow down your website or annoy your viewers with a loading icon, right?
- Other Tools: While Photoshop CS5.5 is a great tool for GIF creation, there are other online tools and software available if you’re looking for a quick fix or a different approach.
FAQs
- Can I add text to my GIF in Photoshop CS5.5?
- Absolutely! Just create a new text layer and position it as desired. This will become part of your GIF.
- Why is my GIF’s quality reduced?
- GIFs have a limited color palette, which can sometimes lead to reduced quality. But remember, it’s about the message and fun, not always the clarity!
- How can I reduce the file size of my GIF?
- Try reducing the number of frames, decreasing the overall dimensions, or increasing the lossy compression when saving.
- Can I use videos to create a GIF?
- Yes! Photoshop allows you to import videos and choose specific frames for your GIF.
- Why isn’t my GIF playing on some platforms?
- Some platforms may have restrictions or require specific settings. Always check platform-specific requirements when uploading.

Matthew Burleigh has been writing tech tutorials since 2008. His writing has appeared on dozens of different websites and been read over 50 million times.
After receiving his Bachelor’s and Master’s degrees in Computer Science he spent several years working in IT management for small businesses. However, he now works full time writing content online and creating websites.
His main writing topics include iPhones, Microsoft Office, Google Apps, Android, and Photoshop, but he has also written about many other tech topics as well.