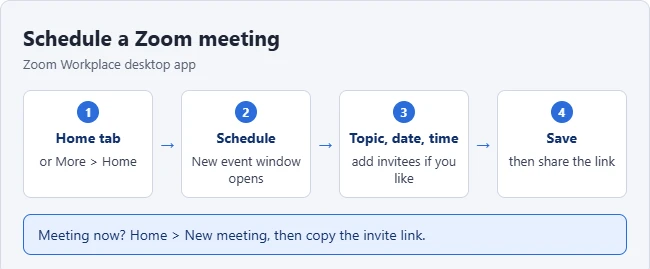
To set up a Zoom meeting, sign in to the Zoom Workplace desktop app, go to the Home tab, and click Schedule. Add a topic, pick the date and time, choose your options, and click Save. Then send the meeting link to the people you want to invite. To meet right now instead, click New meeting on the Home tab.
This guide covers everything from creating a free account to starting the meeting: scheduling on the desktop app, the web, and your phone, recurring meetings, which security options to pick, inviting people, and fixing common problems. Guests don’t need a Zoom account to join; only the host does.
Before You Start: Account and App
- Create an account. Go to the Zoom sign-up page, enter your birth year and email address, and select Continue. Zoom emails a verification code from no-reply@zoom.us; enter it, then add your name and a password. Expected result: Zoom creates a free Basic account.
- Install the app. Download Zoom Workplace for Windows, macOS, or Linux from Zoom’s Download Center, or get the mobile app from the App Store or Google Play.
- Sign in with the same account. Everything you schedule is tied to that account.
- Test your setup. Zoom suggests visiting zoom.us/test and selecting Join to check your microphone and speakers before your first real meeting.
These steps come from Zoom’s getting started guide for new users.
How to Schedule a Zoom Meeting (Desktop App)
- Open the Zoom Workplace desktop app and sign in.
- Click the Home tab. If you don’t see it, click More, then Home.
- Click Schedule. Expected result: the New event (or Schedule meeting) window opens.
- Enter a topic for your meeting and set the date and time.
- Add invitees by name, email or phone number, or skip this and invite people later.
- Click Settings (or scroll down) to choose options such as the meeting ID, passcode, waiting room, video, and audio. See the next section for recommendations.
- Click Save. If your calendar is connected, choose Send to email the invitation, or Don’t send to keep it on the calendar only. Expected result: the meeting appears under Upcoming on the Home tab and in the Meetings tab.
These steps come from Zoom’s scheduling meetings guide. Zoom notes that automatic email invitations only go out if calendar and contacts integration is turned on. Otherwise, copy the invitation from the meeting and send it yourself.
Choose the Right Meeting Settings
- Meeting ID: choose Generate automatically for most meetings. Your Personal Meeting ID (PMI) never changes, so anyone with an old link could try to join later meetings; save it for regular calls with people you know.
- Passcode: keep it on. The join link usually includes it, so invited guests won’t have to type it, but people joining by meeting ID will.
- Waiting room: holds people until you admit them, so you control exactly who gets in.
- Video: set host and participant video on or off at the start. Everyone can still turn their camera on or off after joining. Guests who join in Chrome on an iPhone may need to turn on camera access for Chrome first.
- Audio: Both lets people join by computer or phone.
- Allow participants to join before host: useful if you might be late, but leave it off if you want to be first in the room.
- Automatically record meeting: records locally or to the cloud, depending on your plan.
Zoom’s scheduling guide lists every option and notes that your administrator can lock some of them on work accounts.

How to Schedule From the Web Portal
- Sign in at zoom.us/signin.
- In the left navigation menu, click Meetings.
- Click Schedule a Meeting.
- Choose the date, time, and any other settings, then click Save. Expected result: the meeting details page shows the join link and an option to copy the invitation.
The web portal is handy on a computer where you can’t install the app, and it has options the app doesn’t, such as registration.
How to Schedule From Your Phone
- Open the Zoom Workplace app and sign in.
- Tap Schedule (on the Home or Meetings tab, depending on your app version).
- Enter the topic, date, and time, and set options such as the passcode and waiting room.
- Tap Save or Done, then share the link from the meeting details.
Set Up a Recurring Meeting
For a weekly team call or class, check Recurring meeting while scheduling. The options are: choose Daily, Weekly, or Monthly, how often it repeats, and an end date or number of occurrences. On the web portal you can also pick No Fixed Time, which gives you one link to use whenever you need it. Recurring meetings keep the same link, so you only have to send the invitation once.
How to Invite People
- Open the Meetings tab in the app and select your meeting, or open it under Upcoming on the web portal.
- Click Copy Invitation for the full details (link, meeting ID, and passcode) or copy just the link.
- Paste it into an email, text, or chat message. Expected result: invitees can click the link to join, or enter the meeting ID and passcode in Zoom.
How Your Guests Join
Share these steps with anyone new to Zoom. Zoom’s getting started guide says the easiest way is to click the join link in the invitation. Guests can also open Zoom, click Join, and enter the meeting ID, then the passcode if asked. On a computer without the app, the link offers to join from the browser instead. If you turned on the waiting room, they’ll see a message until you admit them.
How to Start a Meeting Right Away
- Open the Zoom app and go to the Home tab.
- Click New meeting. Expected result: your meeting window opens with your camera preview.
- Open the Participants panel and use the invite option to copy the meeting link, then share it.
How to Start Your Scheduled Meeting
When it’s time, open the app’s Home tab and click Start next to the meeting, or sign in to the web portal, click Meetings, and click Start under Upcoming. Zoom says the app then launches the meeting. Make sure you’re signed in to the account that scheduled it.
Before Your Meeting Starts
- Test your camera and microphone in Zoom’s settings. If your laptop camera doesn’t turn on, see how to turn on the camera in Windows 11.
- Pick a virtual background if you want one. See how to add and change Zoom backgrounds.
- Close apps you don’t need so Zoom runs smoothly, and plug in your laptop for long meetings.
New to Zoom? Zoom’s getting started guide for the desktop app covers installing and signing in.
Troubleshooting
Invitees didn’t get an email
Zoom only sends invitations automatically when calendar and contacts integration is on. Copy the invitation and send it yourself.
The meeting ended after 40 minutes
Zoom’s scheduling guide notes that meetings end after 40 minutes for Basic (free) users. Start a new meeting to continue, or upgrade to a paid plan.
Participants are stuck waiting
If the waiting room is on, open Participants and click Admit. If join before host is off, they wait until you start the meeting.
Your camera or microphone isn’t working
Check that Windows allows Zoom to use them; see how to allow app permissions in Windows 11.
Frequently Asked Questions
Is it free to set up a Zoom meeting?
Yes. Zoom’s free Basic plan lets you host meetings, but Zoom’s scheduling guide says they end after 40 minutes. Check Zoom’s current plans for other limits.
Do people need a Zoom account to join?
Usually not. Guests can join from the link, though some meetings require signed-in users if the host turns on authentication.
Can I schedule a Zoom meeting from my phone?
Yes. The Zoom Workplace mobile app also has a Schedule option. Set the topic, date and time, then save the meeting and share its link.
Presenting in the meeting? See how to screen share on Windows 11.

Matthew Burleigh is the founder, head writer, and editor of Solve Your Tech, which he launched in 2012. He has written technology tutorials since 2008 and worked in IT since 2003, including small-business support, IT management, and consulting. He holds Bachelor’s and Master’s degrees in Computer Science from Arizona State University.
Matthew writes practical guides for Windows, iPhone and iPad, Microsoft Office, Outlook, Google apps, and Android. Solve Your Tech’s guides are tested on current devices or checked against official product documentation, with clear steps, sources, and update dates.
Read more about Matthew and how Solve Your Tech writes and updates its guides, or report a correction.