To run a Microsoft Defender scan in Windows 11, open Windows Security, select Virus & threat protection, and select Quick scan. For a deeper check, select Scan options and choose Full scan, Custom scan, or Microsoft Defender Antivirus (offline scan).
Below you’ll find each scan type with what to expect, how to scan a single file, the PowerShell commands, what to do if Defender finds something, and fixes for a missing Scan button. Microsoft Defender Antivirus is the current name for what used to be called Windows Defender.
Run a Quick Scan
- Press Windows key + S, type Windows Security, and open it. You can also select the shield icon in the taskbar’s hidden icons.
- Select Virus & threat protection. Expected result: the Current threats section shows when the last scan ran and how many files it checked.
- Optional: under Virus & threat protection updates, select Protection updates > Check for updates so the scan uses the latest security intelligence, then go back.
- Select Quick scan. Expected result: a progress bar appears, and when it finishes Windows Security says whether any threats were found.
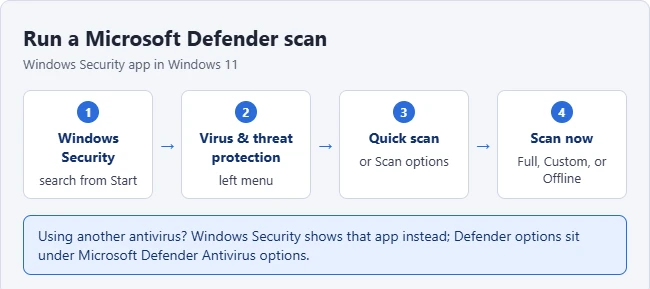
Don’t see Quick scan? If another antivirus app is active, Windows Security can show that provider instead. Use its scan controls for the primary check. If that app is Norton, our guide on scanning a USB flash drive with Norton 360 shows where its scan controls are. On an eligible personal PC, Microsoft Defender Antivirus options > Periodic scanning can expose additional Defender options. Microsoft’s limited periodic scanning guide explains that this is limited protection and is not supported as an enterprise scanning approach. Do not assume it replaces the active antivirus.
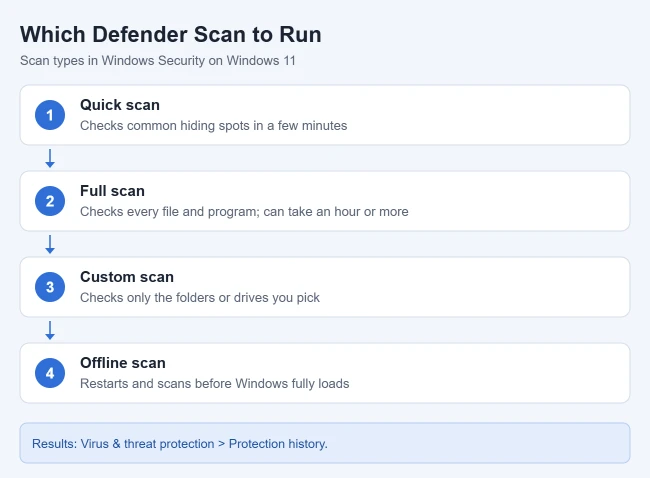
A quick scan checks the places threats usually hide and usually takes a few minutes. Microsoft says that if Windows Security thinks you need a deeper scan, it tells you when the quick scan finishes. The scan types below come from Microsoft’s Windows Security guide.
Run a Full System Scan in Windows 11
Use the built-in Windows Security app for this procedure. A Full scan is an antivirus check; it is different from a Windows system-file repair command or a Microsoft Defender Offline scan. Keep your laptop connected to power and allow enough time for the scan to finish.
- Open Windows Security. Search for it from Start, then select Virus & threat protection. If another antivirus provider controls this page, use that provider’s scan controls or see the missing-button section below.
- Update security intelligence. Under the protection-updates section, select Protection updates > Check for updates. Return to Virus & threat protection when the update check finishes.
- Select Full scan. Under Current threats, open Scan options and select the Full scan radio button. Selecting it alone does not start the scan.
- Start and monitor it. Select Scan now. Windows Security displays progress. You can keep using Windows during this scan, but other work may run more slowly. A Full scan does not require the offline scan’s restart.
- Review completion. When it finishes, check Current threats for its result and open Protection history for detections or actions. Follow any recommended action; an interrupted scan is not a completed Full scan.
A result with no detections means this scan found no threats; it does not guarantee that every problem is solved. If symptoms continue, review the errors and the other scan options below rather than repeatedly restarting the same scan.
Other Scan Types
- On the Virus & threat protection page, select Scan options.
- For a Full or Custom scan, select the type and then Scan now. A Custom scan asks you to choose a folder or drive. These scans let you keep using Windows. Before selecting an Offline scan, save your work and read its prerequisites below: it restarts the PC instead.
- Full scan: begins with a Quick scan, then checks mounted fixed disks. Removable and network-drive coverage depends on configuration and access. Microsoft’s scan comparison says it can take hours or even days for some data sets; there is no fixed completion time.
- Custom scan: checks only the folders or drives you pick, such as a USB drive or your Downloads folder.
- Microsoft Defender Antivirus (offline scan): runs a Quick scan outside the normal Windows session to help detect persistent threats. Microsoft’s Offline scan guide lists x64 Windows 11, administrator access, enabled Windows Recovery Environment and Defender as the primary antivirus among its prerequisites; ARM Windows 11 is excluded. Before continuing, save files and check the guide’s BitLocker preparation: a recovery-key prompt may appear at restart. On a managed PC, ask IT to handle that preparation. After the scan, the PC restarts into Windows; review Protection history.
Scan a Single File or Folder
Right-click the file, folder, or drive in File Explorer and select Scan with Microsoft Defender. On Windows 11’s shorter menu, Microsoft says you may need to select Show more options first. Expected result: Windows Security opens and shows the result for just that item.
Run a Scan From PowerShell
- Right-click Start and select Terminal (Admin). Approve the administrator prompt only on a PC you administer, and use a Windows PowerShell tab rather than Command Prompt.
- Type
Start-MpScan -ScanType QuickScanand press Enter to choose a Quick scan explicitly. - For a full scan, type
Start-MpScan -ScanType FullScaninstead.
Microsoft documents Start-MpScan and its ScanType values, and the separate MpCmdRun.exe -Scan -ScanType 1 command-line tool, in its on-demand scan guide.
If Defender Finds a Threat
- Follow the prompt when the scan finishes. Defender removes or quarantines most threats automatically.
- Open Protection history on the Virus & threat protection page to see what was found and what action was taken.
- Select an item to see details and choose an action if one is offered. Only choose Allow or Restore if you’re sure the file is safe.
- Follow any further scan or restart recommendation. A Full scan can check additional locations, but a clean result is not a guarantee that nothing else remains.
If you allowed something by mistake, Microsoft says you can open Allowed threats, select the item, and choose Don’t allow so Defender acts on it again.
Troubleshooting
The Scan button or Current threats section is missing
Check which antivirus provider Windows Security identifies, and use that provider’s scan controls if it is active. The optional periodic setting above is not available in every configuration. If no provider explains the missing controls, install pending Windows updates, restart and reopen Windows Security from Start. App-repair controls vary by Windows build, so do not assume Windows Security appears under Installed apps. On a work or school PC, ask IT about policy restrictions before changing protection.
The scan won’t start
Restart the PC and try again, and make sure Windows is up to date. You can also start one from PowerShell with Start-MpScan to see if it reports an error.
A full scan is taking a very long time
Large data sets can take a long time. Check that the progress is still changing, keep the PC powered, and avoid sleep or shutdown if you want the scan to finish. You can cancel it and choose a Custom scan for a specific concern, but that is a narrower check and does not complete the cancelled Full scan.
Frequently Asked Questions
Do I need to scan manually?
Not usually. Defender scans in the background and checks files as you open them. A manual scan is useful if something seems wrong. Microsoft lists signs of malware such as a PC that suddenly runs much slower, unexpected pop-ups, or being redirected to different websites; see when to run a scan.
If your PC is slow but the scan is clean, try the steps in how to fix a slow computer in Windows 11.
Why should I run a full scan?
A Full scan covers additional locations beyond a Quick scan, with drive coverage depending on configuration. Microsoft generally recommends Quick scans with real-time protection for routine use. Choose Full scan when you specifically want that broader check or when protection guidance recommends it; do not treat a monthly Full scan as a universal requirement.
Where can I see what Defender found?
Select Protection history on the Virus & threat protection page. Offline scan results show up there too.
Can I schedule a scan?
Defender already schedules scans and tries to avoid interfering with your work. Microsoft’s Task Scheduler instructions use Task Scheduler Library > Microsoft > Windows > Windows Defender: double-click Windows Defender Scheduled Scan, open Triggers, and choose New to set the time and frequency. On a managed PC, use the schedule set by IT.
How do I turn off Defender temporarily?
See how to turn off Windows Defender in Windows 11.

Matthew Burleigh is the founder, head writer, and editor of Solve Your Tech, which he launched in 2012. He has written technology tutorials since 2008 and worked in IT since 2003, including small-business support, IT management, and consulting. He holds Bachelor’s and Master’s degrees in Computer Science from Arizona State University.
Matthew writes practical guides for Windows, iPhone and iPad, Microsoft Office, Outlook, Google apps, and Android. Solve Your Tech’s guides are tested on current devices or checked against official product documentation, with clear steps, sources, and update dates.
Read more about Matthew and how Solve Your Tech writes and updates its guides, or report a correction.