To install Jupyter Notebook on Windows 11, install Python 3.10 or newer, open Command Prompt, create a project folder with a virtual environment, and run python -m pip install notebook. Then run jupyter notebook, and the Notebook dashboard opens in your web browser.
These steps cover Jupyter Notebook 7 (version 7.6.3 was the latest stable release on PyPI in October 2026) on Windows 11 and Windows 10, using the free Python from python.org or the Microsoft Store and the plain Command Prompt. You don’t need Anaconda or an administrator account. The commands follow Project Jupyter’s official install page.
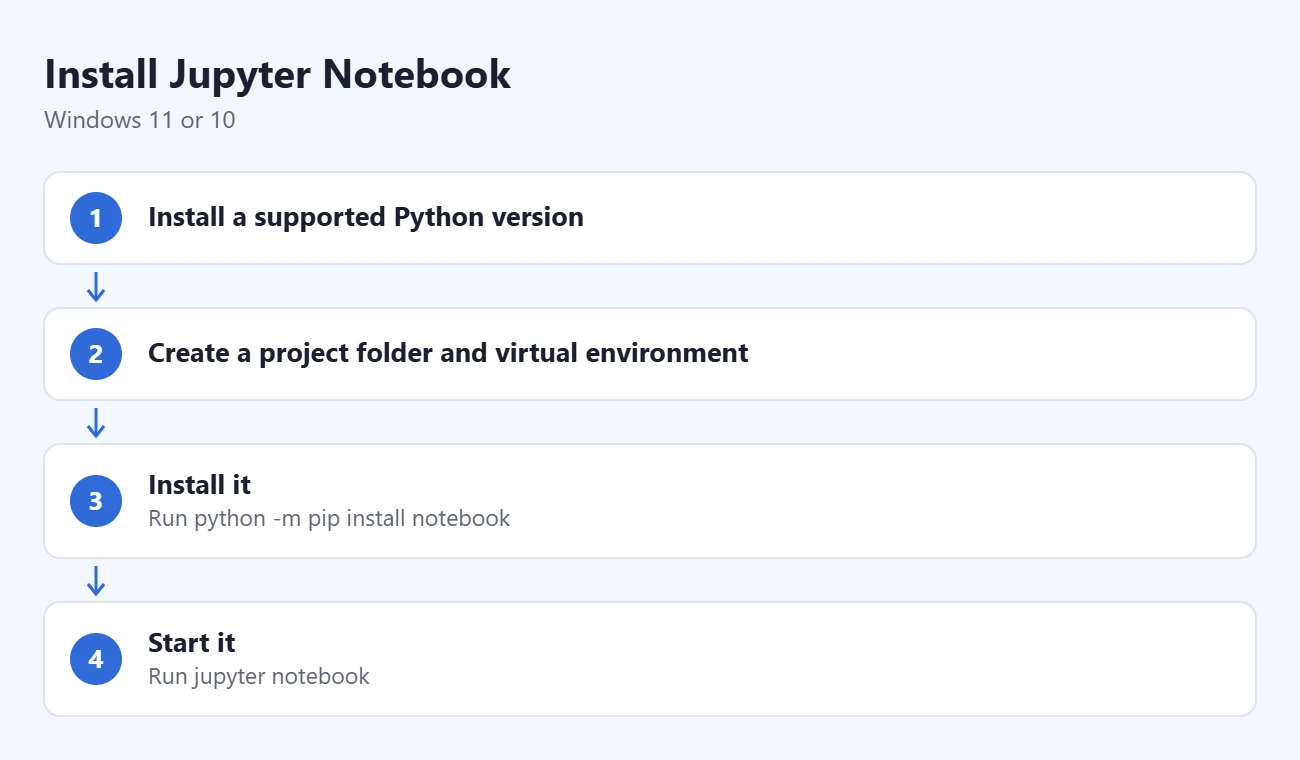
Jupyter Notebook is a free, open-source tool that lets you write Python code in small blocks called cells and see the output, charts and notes right below each one, all in a browser tab. It saves your work as .ipynb files.
What You Need Before You Start
- Python 3.10 or newer. The current notebook package lists that as its minimum. Older guides that say Python 3.7 works are out of date for Notebook 7.
- An internet connection for the download. After installation, Notebook runs on your own PC and doesn’t need the internet.
- Command Prompt. Open Start, type cmd, and select Command Prompt. A normal window is fine; you don’t need Run as administrator. If you haven’t used it before, here’s how to open Command Prompt in Windows 11.
Step 1: Check or Install Python
- In Command Prompt, type
python --versionand press Enter. - Read the reply. If you see something like Python 3.14 or 3.15, you’re ready for Step 2.
- If the Microsoft Store opens or Windows says python is not recognized, install the Python Install Manager from python.org/downloads or the Microsoft Store. The two versions are identical, according to Python’s Windows documentation. These Windows Python setup steps walk through it.
- Close Command Prompt, open a new window, and run
python --versionagain. A version number means Python is working.
If you already have a working Python 3.10 or newer, keep it. You don’t need to reinstall.
Step 2: Create a Project Folder and Virtual Environment
A virtual environment is a private copy of Python for one project. Packages you install there don’t clash with other projects, and you can delete the whole thing without affecting anything else. Python’s docs recommend one per project.
- Run
mkdir "%USERPROFILE%\jupyter-notebooks"to make a folder in your user folder. Skip this if the folder already exists. - Run
cd /d "%USERPROFILE%\jupyter-notebooks"to move into it. The prompt now ends with that folder name. - Run
python -m venv .venv. After a few seconds, a hidden-looking.venvfolder appears inside the project folder. - Run
.venv\Scripts\activate.bat. The prompt now starts with(.venv), which means the environment is active. - Run
where python. The first line should end injupyter-notebooks\.venv\Scripts\python.exe. If it doesn’t, the environment isn’t active; repeat step 4.
The quotes keep the commands working if your user name contains a space, and /d lets cd switch drives too.
Step 3: Install Jupyter Notebook
Stay in the same activated window.
- Run
python -m pip install --upgrade pipto update the package installer. - Run
python -m pip install notebook. Pip downloads Notebook and the packages it depends on, which can take a minute or two. - Look for a line that begins with Successfully installed and no red error at the end.
Using python -m pip instead of plain pip makes sure the package goes into the Python you just activated. The notebook package is the one Project Jupyter lists for Notebook. Some guides use pip install jupyter instead; that is a larger bundle that adds extra tools, such as the terminal-based Jupyter console, that you don’t need for this task.
Step 4: Launch Notebook and Test It
- Run
jupyter notebook. Command Prompt prints server messages, and your default browser opens the dashboard at an address that starts withhttp://localhost:8888. If that port is busy, Jupyter picks the next free one, as the Jupyter documentation on running Notebook explains. - Leave the Command Prompt window open. Closing it stops Notebook.
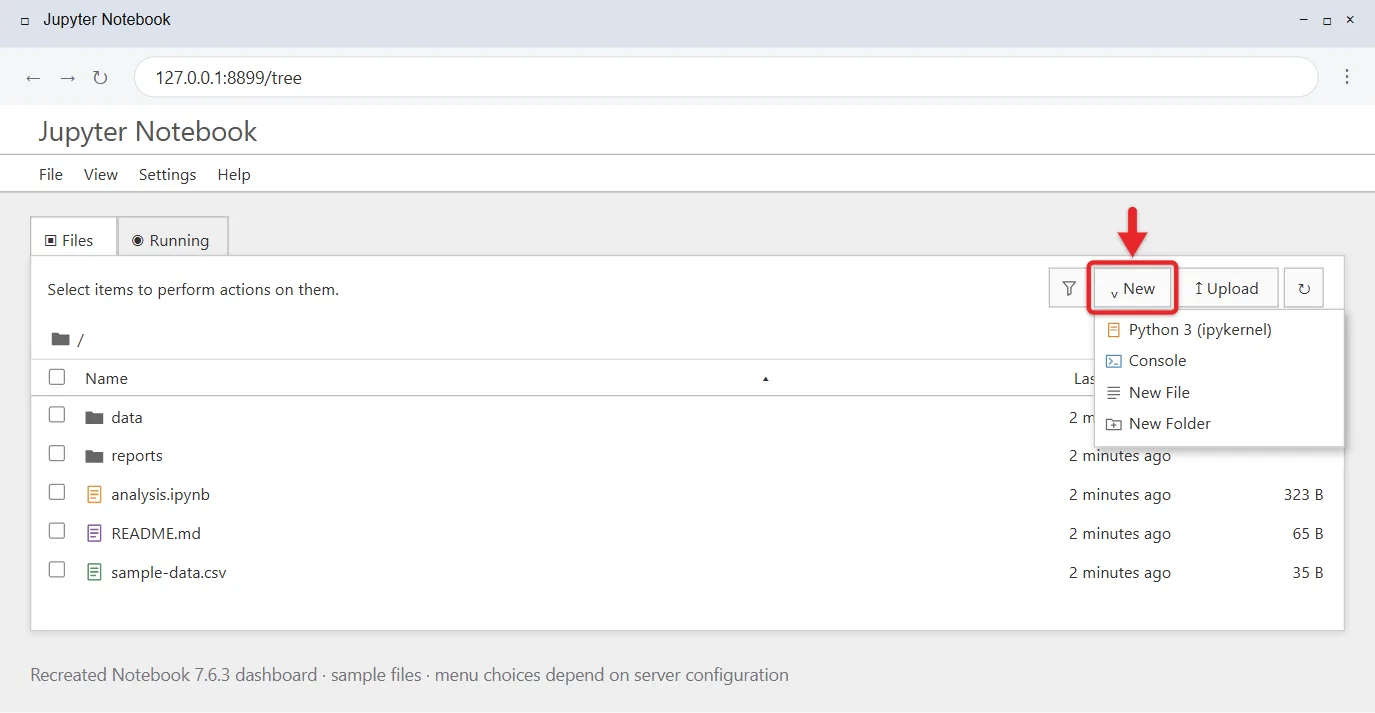
- On the dashboard, which lists the files in your project folder, select New and then Notebook. A new tab opens.
- If Notebook asks you to select a kernel, choose Python 3 (ipykernel) and select Select. The kernel is the engine that runs your code.
- Click the first cell, type
2 + 2, and press Shift + Enter. The output4appears below the cell. That confirms the install works. - Click the name Untitled at the top, type a new name, and press Enter. Notebook saves the file as an
.ipynbfile in your project folder.
If the browser doesn’t open, copy the full link from Command Prompt, including the part after token=, and paste it into your browser’s address bar. Typing only localhost:8888 may ask you for a password or token. Treat that token like a password, because Jupyter’s security guidance notes that anyone with access to the server can run code on your PC.
Stop Jupyter Notebook
Closing the browser tab does not stop the server or the code running in your notebooks.
- Save your notebook with Ctrl + S.
- Switch to the Command Prompt window running Notebook and press Ctrl + C.
- If it asks whether to shut down, type y and press Enter. Pressing Ctrl + C twice skips the question.
- Wait for the normal prompt to return, then close the window.
You can also choose File and then Shut Down in Notebook, which stops the server from the browser.
Open Jupyter Notebook Again Later
You install once. Each time you want to work, open a new Command Prompt window and run these three commands one at a time:
cd /d "%USERPROFILE%\jupyter-notebooks".venv\Scripts\activate.batjupyter notebook
Notebook always opens in the folder you start it from, so run it from your project folder to see your files.
Other Ways to Install It
JupyterLab instead of Notebook. JupyterLab is Jupyter’s newer interface, with tabs, a file browser sidebar and a built-in terminal. Notebook 7 already includes it, because JupyterLab is a dependency, as the Notebook 7 interface guide explains. Run jupyter lab in the activated environment to open it. Both interfaces open the same .ipynb files, and you can switch between them from the Notebook toolbar.
PowerShell or Windows Terminal. Windows Terminal opens PowerShell by default. The steps are the same except activation: run .venv\Scripts\Activate.ps1 instead of activate.bat. If PowerShell says running scripts is disabled, either open a Command Prompt tab or follow the execution policy note in Python’s venv documentation.
Anaconda. The Anaconda Distribution installs Python, Jupyter and hundreds of data science packages together, and you start Notebook from Anaconda Navigator with Launch. It is a much bigger download. Under Anaconda’s terms of service, it is free for individuals and for companies with 200 or fewer employees, while larger companies need a paid plan. Pick it if your class or job already uses it; otherwise the pip method above is smaller.
Microsoft Store. Project Jupyter doesn’t publish a Notebook app in the Microsoft Store. Get Python from the Store if you like, then install Notebook with pip as shown above.
Fix Common Setup Problems
- The Store opens or python is not recognized. Finish installing the Python Install Manager, then open a new window. If it still fails, select Start, open Manage app execution aliases, and make sure the Python (default) aliases are on. Python’s Windows documentation suggests turning them off and on again if they already are. If you added Python’s folder yourself, the steps for editing environment variables in Windows 11 shows where Path lives.
- ‘jupyter’ is not recognized. The environment isn’t active, or Notebook went into a different Python. Run
.venv\Scripts\activate.bat, thenpython -m pip show notebook. If it shows nothing, install it again in this window. - Pip fails to build a package. A Python release that came out days ago may not have ready-made packages for every library yet. If you use the Python Install Manager, install the previous version with
py install 3.14, delete the.venvfolder, and create it again withpy -V:3.14 -m venv .venv. - Permission errors. Don’t run Command Prompt as administrator to fix them. Installing inside a virtual environment in your user folder avoids most permission problems, so check that
(.venv)is showing. - An old extension stopped working. Extensions built for Notebook 6 are not compatible with Notebook 7, the notebook package page says. Look for an updated version of the extension.
Update or Remove Jupyter Notebook
To update, stop Notebook, activate the environment, and run python -m pip install --upgrade notebook.
To remove it completely, stop Notebook and delete the .venv folder inside your project folder. Your .ipynb files sit outside .venv, so they stay where they are. Copy them somewhere safe first if you plan to delete the whole project folder.
Frequently Asked Questions
Is Jupyter Notebook free?
Yes. Jupyter Notebook and Python are both free and open source. Anaconda is free for individuals but has license limits for larger companies.
Do I need Anaconda to use Jupyter Notebook?
No. Python plus pip install notebook gives you the same Notebook. Anaconda only adds extra packages and its own launcher.
Does Jupyter Notebook work without the internet?
Yes, after it is installed. The address it opens, localhost, points to your own PC, so Notebook runs offline. You only need the internet to install or update packages.
Where are my notebook files saved?
In the folder you started Notebook from. With these steps, that is the jupyter-notebooks folder inside your user folder, which you can open in File Explorer.
Can I use Jupyter Notebook in Linux on Windows?
Yes, but it is a separate setup. If you want a Linux environment, install WSL2 on Windows 11 and install Notebook inside it with pip.
Once your first notebook runs, install the libraries your project needs, such as pandas, in the same activated window with python -m pip install pandas.

Matthew Burleigh is the founder, head writer, and editor of Solve Your Tech, which he launched in 2012. He has written technology tutorials since 2008 and worked in IT since 2003, including small-business support, IT management, and consulting. He holds Bachelor’s and Master’s degrees in Computer Science from Arizona State University.
Matthew writes practical guides for Windows, iPhone and iPad, Microsoft Office, Outlook, Google apps, and Android. Solve Your Tech’s guides are checked step by step against the device or app maker’s own documentation and tested on his own devices whenever he has the hardware or software, with clear steps, sources, and update dates.
Read more about Matthew and how Solve Your Tech writes and updates its guides, or report a correction.