To check your BIOS version in Windows 11, press Windows key + R, type msinfo32, and press Enter. In System Summary, look at the BIOS Version/Date line. It shows the firmware maker, the version number and its release date, and you don’t need to restart.
These steps work on Windows 11 (25H2 and 26H2) and on Windows 10, on any brand of desktop or laptop. Most modern PCs use UEFI firmware rather than an old-style BIOS, but Windows still labels the information “BIOS,” and the steps are the same.
Why You Might Need the BIOS Version
The BIOS (or UEFI firmware) is the small program stored on a chip on the motherboard that starts your hardware before Windows loads. You usually need its version number when:
- a support agent asks for it while troubleshooting,
- you’re adding a newer processor, more memory or a new SSD, and the maker’s compatibility list names a minimum BIOS version,
- you want to know whether your PC maker has released a fix or security update for your model.
Checking the version only reads information. Nothing on your PC changes.
Check the BIOS Version in System Information
System Information is built into Windows and is the quickest method.
- Press Windows key + R to open the Run box.
- Type msinfo32 and press Enter or click OK. The System Information window opens.
- Make sure System Summary is selected at the top of the left pane.
- In the right pane, find BIOS Version/Date. It reads something like Dell Inc. 1.24.0, 3/12/2026 or American Megatrends International, LLC. 1402, 8/5/2025.
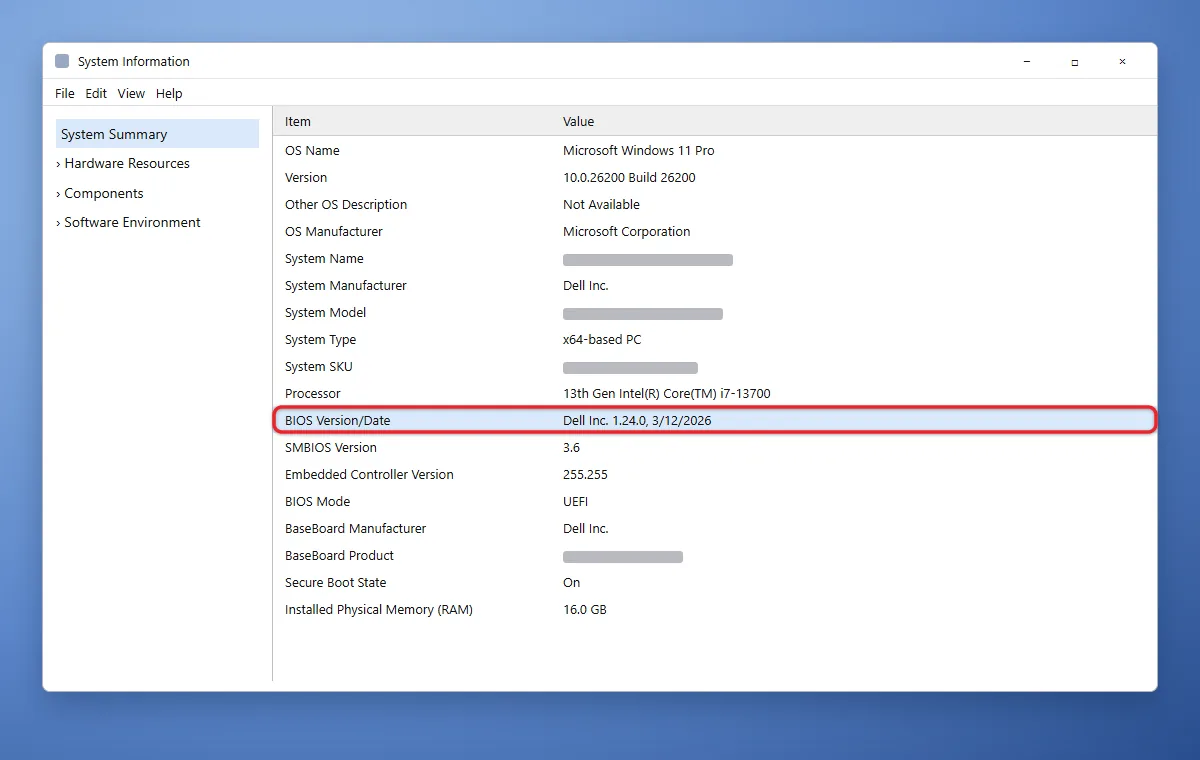
- Write down the full value. If it’s cut off, drag the edge of the Value column to widen it.
You can also open the tool by clicking Start, typing System Information, and selecting the result. Microsoft describes the tool in its System Information overview, and Dell uses the same msinfo32 steps in its BIOS update guide.
While you’re on this screen, also note System Manufacturer and System Model. You’ll need them to find the right updates.
Check It With PowerShell
PowerShell gives you plain text you can copy and paste into a support chat or forum post.
- Right-click Start and select Terminal. A PowerShell tab opens by default.
- Type or paste this command and press Enter:
Get-CimInstance -ClassName Win32_BIOS | Select-Object Manufacturer, SMBIOSBIOSVersion, ReleaseDate- Read the SMBIOSBIOSVersion line. That’s your BIOS version. Manufacturer is the firmware maker, and ReleaseDate is when that version was released.
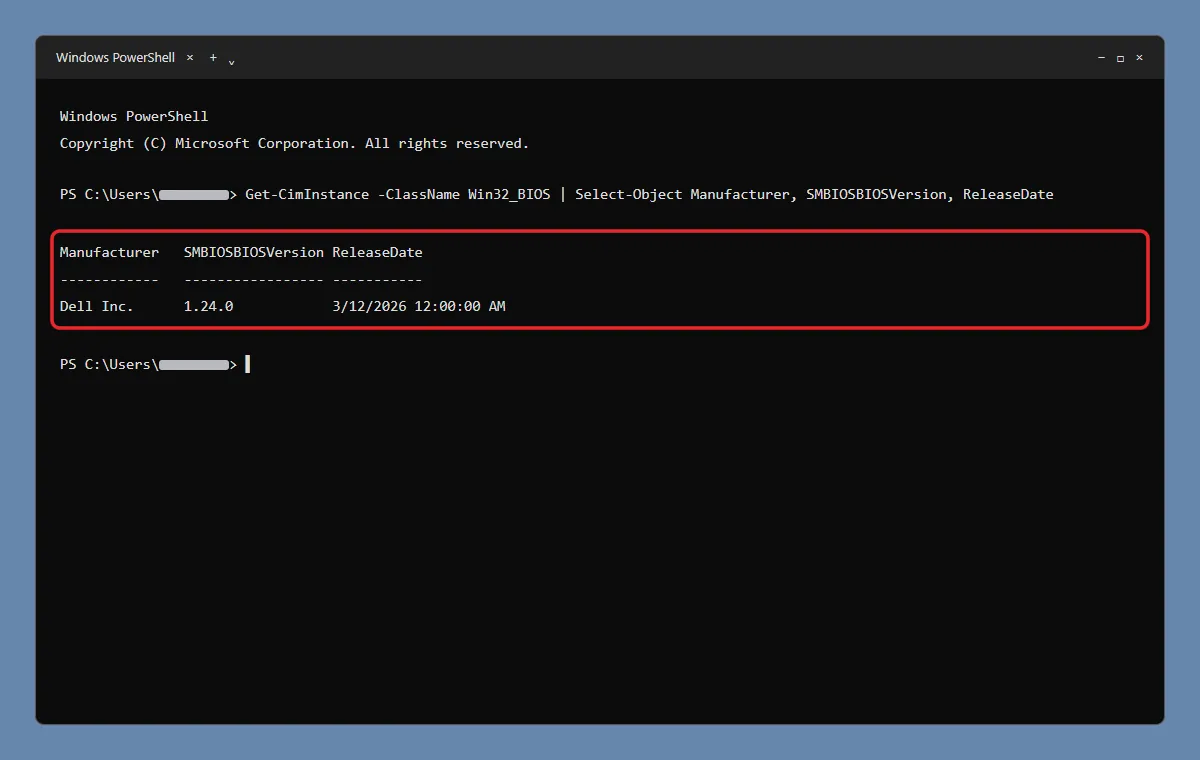
The command only reads information and doesn’t need administrator rights. Microsoft’s Win32_BIOS reference defines SMBIOSBIOSVersion as the BIOS version reported by SMBIOS, the standard table where the firmware describes itself.
To get your PC’s model in the same window, run Get-CimInstance -ClassName Win32_ComputerSystem | Select-Object Manufacturer, Model. On some Lenovo PCs, Model shows a short machine-type code rather than the product name; the maker’s support site accepts either.
The same Win32_BIOS class also stores the serial number, so you can find your PC serial number in Windows 11 with a similar command.
From Command Prompt
If you’re already in Command Prompt, run systeminfo | findstr /C:"BIOS Version". It prints one line with the firmware maker, version and date. The full systeminfo report takes a few seconds to collect before the line appears.
Why the Old WMIC Command Fails
Older guides tell you to run wmic bios get smbiosbiosversion. Microsoft deprecated WMIC years ago and is now removing it from Windows: it’s taken out when you upgrade to Windows 11 version 25H2, removed from 24H2 and 25H2 by the August 2026 updates, and missing from 26H1. If you see “wmic is not recognized,” use the PowerShell or systeminfo command instead.
Check It in Your PC Maker’s App or in BIOS Setup
Most laptop and prebuilt desktop brands include a support app that shows the BIOS version and tells you whether an update is available. Look for Dell SupportAssist or Dell Command | Update on Dell PCs, HP Support Assistant on HP, Lenovo Vantage on Lenovo, and MyASUS on ASUS laptops. The BIOS or firmware version is usually listed on the system information or updates page.
You can also see the version in the firmware setup screen itself. This requires a restart. The steps for entering BIOS or UEFI settings in Windows 11 cover the Settings > System > Recovery > Advanced startup route and common startup keys. Where to look once you’re in:
| Brand | Where the version usually appears |
|---|---|
| Dell | Overview or System Information (press F2 at the Dell logo) |
| HP | Main > System Information |
| Lenovo | Main or Information page |
| ASUS | Top of EZ Mode, or Main in Advanced Mode |
| Custom-built PCs | First page of the board’s setup screen |
Menus differ by model, so treat this as a starting point. Exit without saving if you only went in to look.
On many desktops, the same setup screen has a hardware monitor page where you can check your CPU temperature without installing anything.
How to Read the Result
- Version. This is the part you compare with your manufacturer’s downloads page. Brands format it differently: Dell uses numbers like 1.24.0, HP uses codes like F.24 or 01.12.00, Lenovo uses codes like N3HET85W, and motherboard makers such as ASUS use plain numbers like 1402. You can’t compare one brand’s numbering to another’s.
- Date. This is when the firmware version was released, not when you installed it or bought the PC. A date more than a year old is a good reason to check the maker’s site, though it doesn’t mean an update exists.
- Manufacturer. On some PCs this is the PC maker (Dell, HP, Lenovo). On others it’s a firmware vendor such as American Megatrends (AMI), Insyde or Phoenix. For updates, always go by your System Model, not the firmware vendor’s name.
A few lines in System Information look similar but mean something else. BIOS Mode tells you whether the PC boots in UEFI or Legacy mode. SMBIOS Version is the version of a hardware-reporting standard, and Embedded Controller Version belongs to a separate chip. None of these is your BIOS version.
What to Do With the Version Number
- Go to the support site of the company that made your computer and search for your System Model, or enter the service tag or serial number printed on the bottom of the laptop. For a custom-built PC, go to the motherboard maker’s site and search for the board’s exact model, shown as BaseBoard Product in System Summary.
- Open the Drivers & Downloads or BIOS section for that model.
- Compare the newest listed version with yours. If they match, you’re up to date, and there’s no reason to reinstall the same version.
If a newer version is available, read its release notes before deciding to install it. Update when it fixes a problem you have, adds support for hardware you’re installing, or patches a security issue your maker marks as important.
Before you update, keep these rules in mind:
- Use the maker’s own tool or file. Install BIOS updates only through your PC maker’s support app, its support website, or Windows Update. Never use a BIOS file from a third-party download site or driver updater, and never install one made for a different model, even a similar one.
- Don’t interrupt it. Keep a laptop plugged in, close your apps, and don’t press the power button or close the lid while the update runs. The screen can go black and the fans can get loud for several minutes. Cutting power partway through can leave the PC unable to start.
- Have your BitLocker recovery key ready. A firmware change can trigger a recovery prompt at the next startup. Suspend BitLocker protection before a BIOS update and resume it afterward. The steps are in turning off BitLocker in Windows 11.
Some makers also send firmware through Windows Update. Check Settings > Windows Update > Advanced options > Optional updates, where optional driver updates appear, for an entry with your PC maker’s name.
Fan and overheating fixes are a common reason to update, and you can also check fan speed and control your laptop fan from Windows.
Troubleshooting
BIOS Version/Date is blank or shows odd text. Make sure you’re in normal Windows. System Information can’t show hardware details in Safe Mode. If it’s still blank, check the version in BIOS setup or with your PC maker’s support app.
The PowerShell command shows an error. Check that you’re in a PowerShell tab, not Command Prompt, and that you pasted the whole command on one line. You can also try Get-CimInstance Win32_BIOS on its own.
“wmic is not recognized as an internal or external command.” WMIC is no longer included in current Windows 11. Use the PowerShell or systeminfo command above.
System Model says “To be filled by O.E.M.” or “System Product Name.” This is common on custom-built PCs. Use the BaseBoard Manufacturer and BaseBoard Product lines, or the model printed on the motherboard, to find the right support page.
The version didn’t change after an update. Restart the PC fully, then check again. Some updates finish installing during the restart, and Windows shows the new version only after that.
With Fast Startup on, Shut down is not a full restart, so if you want every shutdown to be complete, disable Fast Startup in Windows 11.
Frequently Asked Questions
Can I check my BIOS version without restarting?
Yes. System Information (msinfo32), the PowerShell command and the systeminfo command all read the version while Windows is running.
Is checking the BIOS version safe?
Yes. All of these methods only read information. Nothing on your PC changes unless you install an update.
Is the BIOS version the same as my Windows version?
No. The BIOS version belongs to your computer’s firmware, which comes from the PC or motherboard maker. Your Windows version (such as 25H2) is under Settings > System > About.
Does Windows Update install BIOS updates?
Sometimes. Some manufacturers publish firmware through Windows Update, where it appears as an optional or firmware update. Many PCs still need updates from the maker’s support app or website, so check there too.
Should I always install the newest BIOS?
Not necessarily. Install an update when it fixes a problem you have, adds something you need, or addresses a security issue your manufacturer flags as important.
Can I go back to an older BIOS version?
Sometimes, but don’t count on it. Many makers block downgrades after a security update. Read the release notes before you install, and follow only your maker’s instructions if you need to roll back.

Matthew Burleigh is the founder, head writer, and editor of Solve Your Tech, which he launched in 2012. He has written technology tutorials since 2008 and worked in IT since 2003, including small-business support, IT management, and consulting. He holds Bachelor’s and Master’s degrees in Computer Science from Arizona State University.
Matthew writes practical guides for Windows, iPhone and iPad, Microsoft Office, Outlook, Google apps, and Android. Solve Your Tech’s guides are checked step by step against the device or app maker’s own documentation and tested on his own devices whenever he has the hardware or software, with clear steps, sources, and update dates.
Read more about Matthew and how Solve Your Tech writes and updates its guides, or report a correction.