You usually can’t flip a whole router to 2.4 GHz with one button, and you rarely need to. A dual-band router already broadcasts 2.4 GHz and 5 GHz at the same time. To put a device on 2.4 GHz, sign in to your router’s settings, turn off the feature that combines both bands under one Wi-Fi name (TP-Link, NETGEAR and ASUS call it Smart Connect; other brands call it band steering), give the 2.4 GHz network its own name, and connect the device to that name.
The steps below cover that route first, then the brand-specific menus, what to do on mesh systems that won’t split the bands, how to confirm it worked, and how to undo it.
Before you start
- Check whether you already have a 2.4 GHz network. Open the Wi-Fi list on your phone or computer. If you see two names for your home network, such as one ending in -5G and one without it, the bands are already separate. Just connect to the one that isn’t labeled 5G and skip the router steps.
- Have the router’s admin login ready. This is not the same as your Wi-Fi password. The default address and login are often printed on a label on the router. If you still use the factory default, change it, as in these Netgear N600 admin password steps. If the router came from your internet provider, the provider’s app may be the only place to change these settings.
- Know what “band” means. Wi-Fi routers send data over radio frequency ranges called bands. Most home routers use 2.4 GHz and 5 GHz, and newer ones add 6 GHz. The Wi-Fi name you tap to connect is the SSID (network name).
- Expect a short interruption. Saving wireless settings can briefly disconnect every device, and devices that used the old name may need to be reconnected. Pick a time when nobody is on a video call.
How to change your Wi-Fi to 2.4 GHz on your router
These steps apply to most standalone dual-band routers. Menu names differ between brands and firmware versions, so look for the closest match.
- Connect a phone or computer to the router’s Wi-Fi, or plug a computer into the router with an Ethernet cable. A cable is safer, because you won’t lose your connection when the Wi-Fi settings change.
- Open the router’s app or type its address into a web browser. Common addresses are 192.168.0.1 and 192.168.1.1, but use the one on the router’s label or in its manual. TP-Link routers also answer at tplinkwifi.net, NETGEAR routers at www.routerlogin.net, and ASUS routers at www.asusrouter.com.
- Sign in with the router’s admin username and password.
- Open the Wireless or Wi-Fi settings. On some routers these are under an Advanced tab.
- Find the option that merges the bands. It is usually called Smart Connect or Band Steering. Turn it off. Separate settings for 2.4 GHz and 5 GHz should appear.
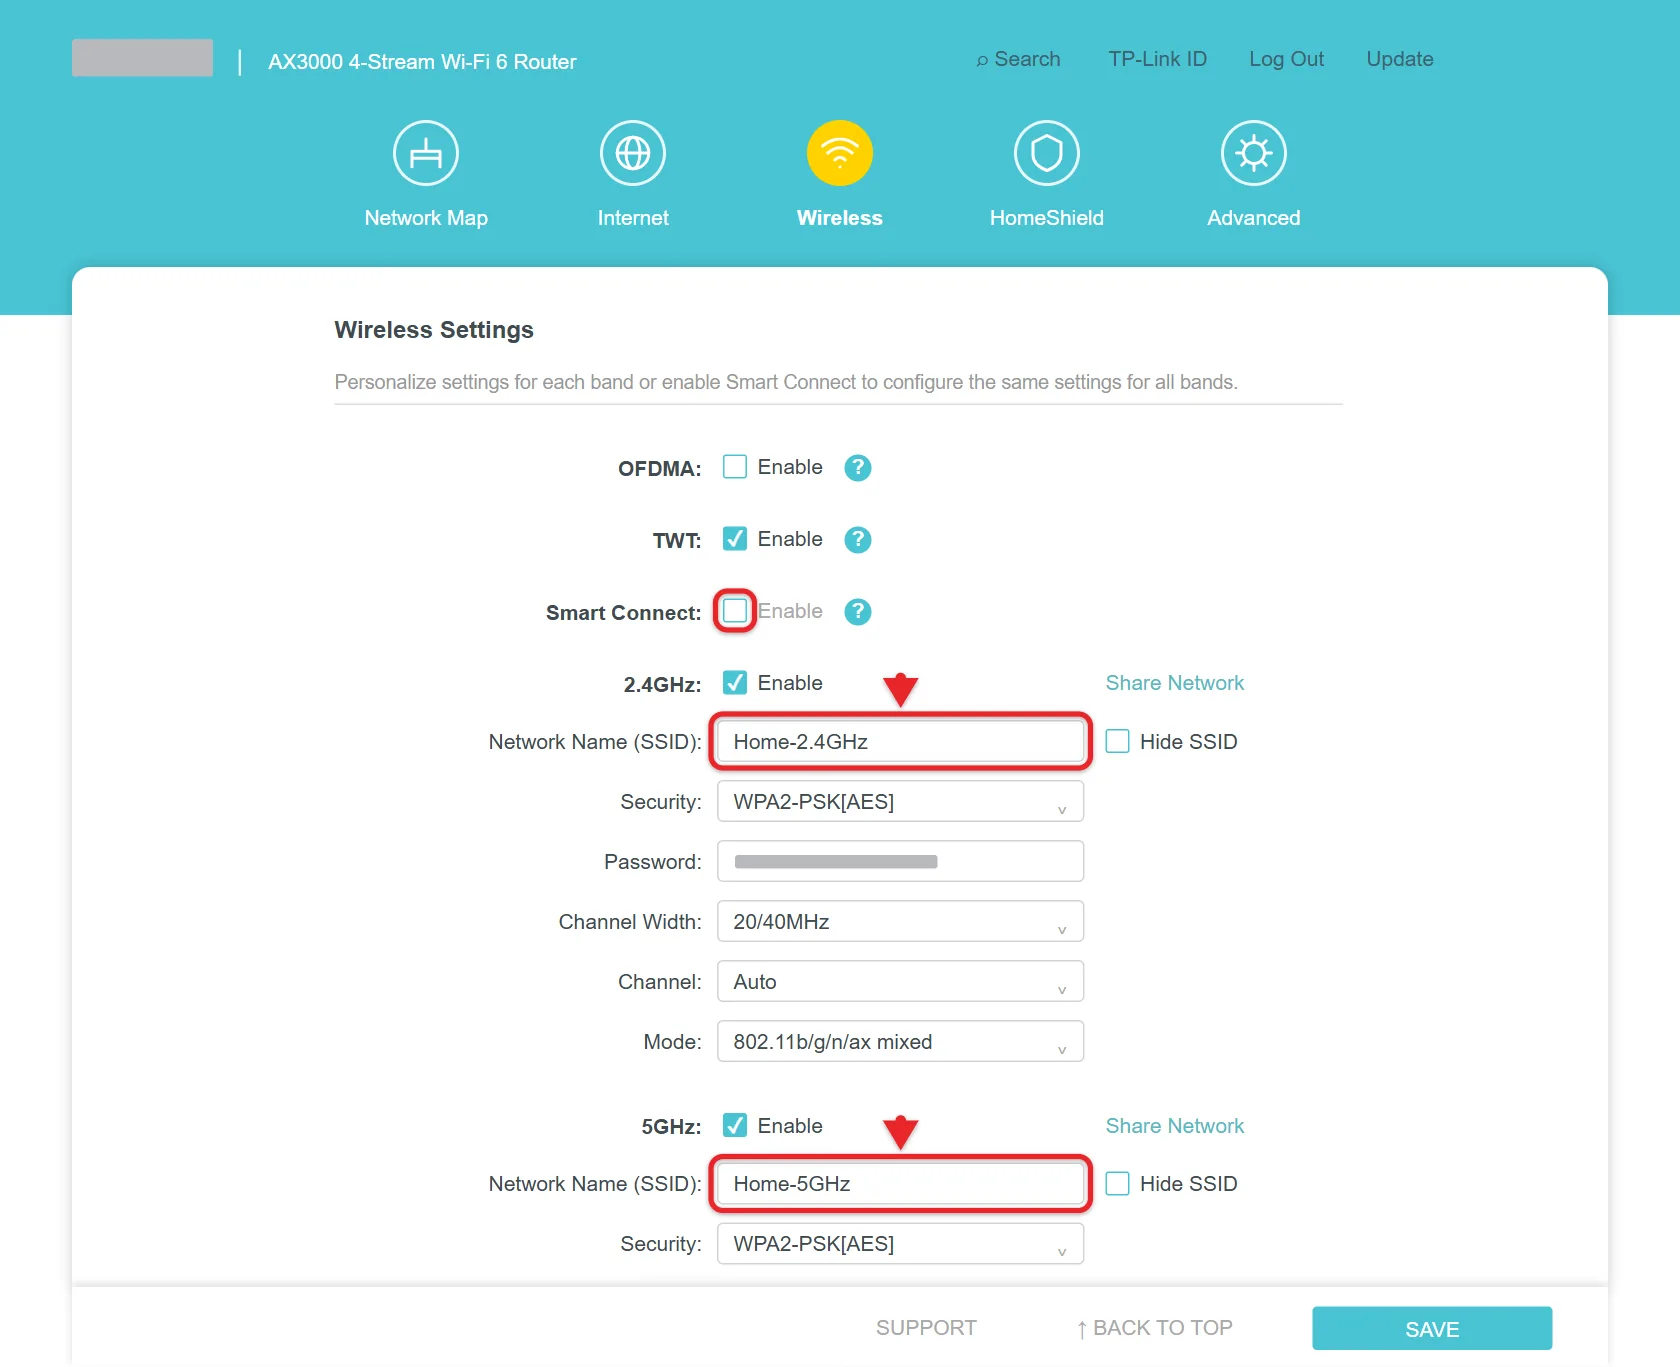
- Make sure the 2.4 GHz radio is enabled, then give it a network name you’ll recognize, such as HomeWiFi-2.4. Give the 5 GHz network a different name, such as HomeWiFi-5. You can use the same password for both.
- Select Save or Apply. The Wi-Fi may drop for a moment while the router applies the change.
- On the device you want on 2.4 GHz, open the Wi-Fi list, choose the 2.4 GHz name, and enter the password.
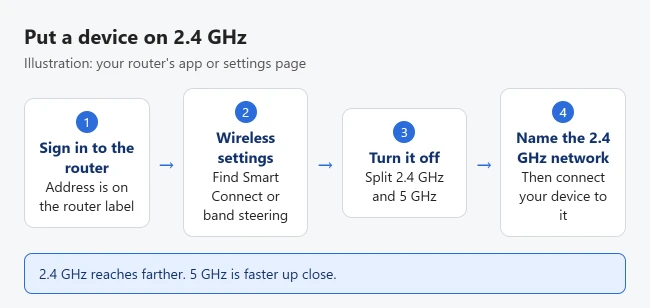
After you rename the networks, your other devices will not find the old combined name. Reconnect each one to whichever band suits it. Keep phones, laptops and TVs near the router on 5 GHz.
A smart thermostat that shows offline afterward may need its Wi-Fi changed, for example by resetting the network on a Nest thermostat.
Where the setting is on common routers
These paths come from each manufacturer’s current support pages. Your model may use slightly different labels.
TP-Link
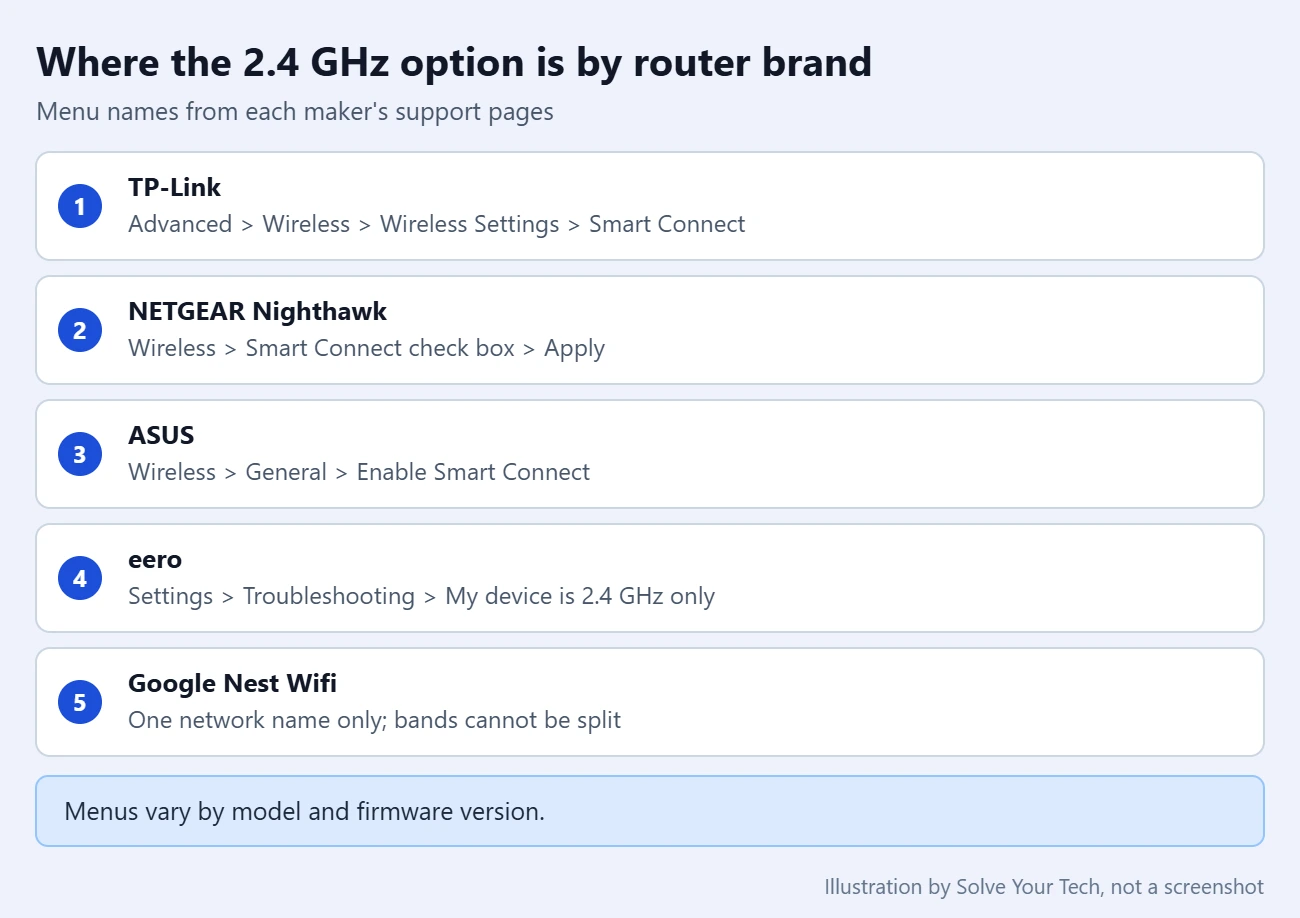
TP-Link explains that with Smart Connect turned on, both bands share the same network name and password, and the router assigns each device to a band. In the web interface, go to Advanced > Wireless > Wireless Settings and switch off the Smart Connect toggle. In the Tether app, go to More > Wi-Fi Settings > 2.4GHz & 5GHz Network. With it off, you can name the two bands separately.
NETGEAR Nighthawk
NETGEAR describes Smart Connect as a feature that combines the router’s Wi-Fi bands into one network name. Sign in at www.routerlogin.net, select Wireless (on some models, Settings > Setup > Wireless Setup), clear the Smart Connect check box, and click Apply. The router then broadcasts separate names. In NETGEAR’s example, the 5 GHz name ends in -5G and the 2.4 GHz name does not. Whether Smart Connect is on by default depends on the model.
ASUS
ASUS says its Smart Connect feature lets all Wi-Fi bands use one name and password. On older firmware, go to Wireless > General, turn off Enable Smart Connect, and click Apply. On newer firmware, the setting is under Network > Main network profile, where you choose which bands share the main network name. Leave 2.4 GHz out of the shared group, or give it its own name, then click Apply.
If your router or mesh system won’t split the bands
Some mesh Wi-Fi systems are built around one network name and don’t offer separate band names. You still have options, and none of them require changing the whole network.
eero
eero states that there is no way to permanently separate its 2.4 GHz and 5 GHz bands. Instead, the eero app can pause the faster bands for a short time while you set up a 2.4 GHz-only device:
- Open the eero app and tap Settings.
- Scroll down and tap Troubleshooting.
- Tap My device won’t connect.
- Tap My device is 2.4 GHz only.
- Tap Pause 5 GHz and 6 GHz.
The 5 GHz and 6 GHz bands come back on their own after 10 minutes, or sooner if you tap Cancel. Other devices may slow down during the pause. eero says a device set up this way stays connected after the pause ends.
Google Nest Wifi and Google Wifi
Google explains that Nest Wifi and Google Wifi use a single network name across all bands and steer each device to the band that should perform best. Google’s help page does not describe a setting for separate band names. For a device that only supports 2.4 GHz, move farther from the router or point until your phone shifts to the 2.4 GHz band, then run the device’s setup.
NETGEAR Orbi
NETGEAR’s support article for Orbi says separating 2.4 GHz and 5 GHz into two networks is not supported, and that the system picks the band for each device based on its hardware, distance and obstacles. Use the workarounds below.
General workarounds
- Set up the device farther from the router. 2.4 GHz reaches farther than 5 GHz, so a phone at the edge of your Wi-Fi range is more likely to be on 2.4 GHz during setup.
- Temporarily turn off 5 GHz. If your router has an on/off switch for each band, turn off 5 GHz, set up the device, then turn 5 GHz back on right away. Leaving it off slows down everything else.
- Use a guest network. Some routers let you limit a guest network to 2.4 GHz. If you no longer need it afterward, you can switch it off again, as in this example of turning off the guest network on a Cisco E1000 router. Keep in mind that devices on a guest network are often blocked from talking to devices on your main network.
2.4 GHz vs 5 GHz: when to use each
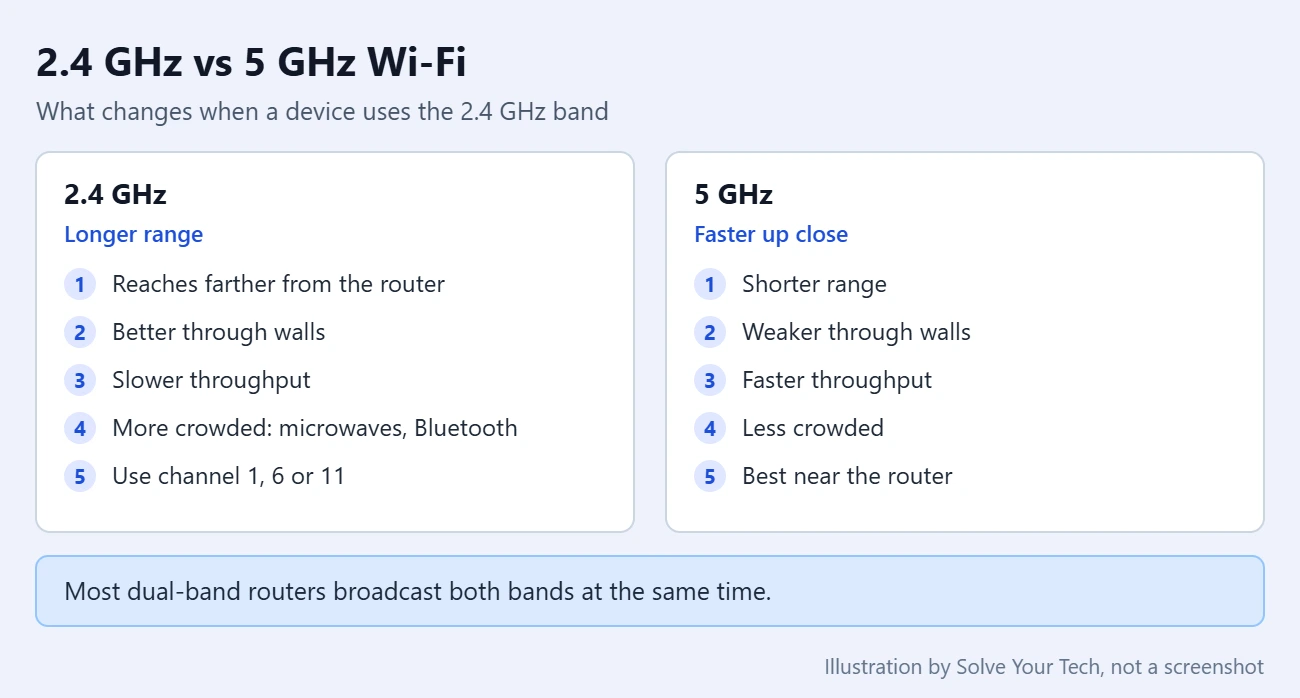
Microsoft’s Wi-Fi guidance for Windows sums up the trade-off: 2.4 GHz has a longer range and gets through walls better, but it is slower and more crowded, because microwaves, cordless phones and Bluetooth devices share that band. 5 GHz is faster and less crowded, but it has a shorter range and doesn’t pass through obstacles as well.
If one room is out of reach on both bands, learn how to decide if you need a Wi-Fi extender before buying more hardware.
2.4 GHz is usually the right choice for:
- Smart plugs, bulbs, cameras and other smart home devices that only support 2.4 GHz.
- Devices far from the router or behind several walls, such as a garage door hub or an outdoor camera.
- Older laptops, printers and streaming sticks that can’t see 5 GHz networks at all.
If your 2.4 GHz device is a Chamberlain hub, here’s how to open and close your garage from your iPhone once it’s online.
If it’s a Nest thermostat, here’s how to control a Nest thermostat from your iPhone once it’s back online.
Keep 5 GHz for phones, laptops, game consoles and TVs that sit near the router and need speed. Don’t move everything to 2.4 GHz. That crowds the slower band and can make the whole network feel sluggish.
If your iPhone is the one device that won’t join either band, work through these fixes for iPhone Wi-Fi problems.
How to confirm the device is on 2.4 GHz
- Check the network name. If you gave the bands different names, the name the device is connected to tells you the band.
- Check in Windows 11. Go to Settings > Network & internet > Wi-Fi, open the properties for your network, and look at the value next to Network band (channel). The Wi-Fi guide for Windows walks through that screen.
- Check the router’s device list. Many router apps and admin pages list connected devices and show which band each one is using. This is the easiest way to check a smart plug or camera that has no screen.
An iPhone may appear in that list under a private Wi-Fi address rather than its hardware one. Here’s how to find the MAC address on your iPhone so you can match it.
How to undo the change
Sign in to the router again, return to the same wireless page, and turn Smart Connect or band steering back on. The router goes back to one name for both bands and chooses the band for each device. Devices that only support 2.4 GHz will keep using 2.4 GHz, because that is the only band they can see. If you changed the network name, devices that saved the temporary name will need to be reconnected.
Apple’s recommended router settings advise using the same name for every band, so going back to one name is a reasonable long-term setup once your 2.4 GHz-only devices are connected. If one of them drops off later and can’t rejoin, split the names again.
Troubleshooting
There’s no Smart Connect or band steering option
The setting may have a different name, may be in the router’s app instead of the web page, or may not exist on your model. Look for separate 2.4 GHz and 5 GHz tabs in the wireless settings. If each has its own name field, type a different name in each one. If your router is a mesh system, see the mesh section above. A firmware update can also add or move settings, so check how to update router firmware.
The wireless settings are grayed out or you can’t sign in
Routers supplied by an internet provider are often managed through the provider’s app or account page, and some settings are locked. Check the provider’s app first, then contact the provider. If you’ve forgotten an admin password that you set yourself, the router’s manual explains how to reset it. A factory reset erases all of your settings, including the Wi-Fi name and password, so treat it as a last resort.
The phone or PC keeps jumping back to 5 GHz
The device still has the 5 GHz name saved and prefers it. Forget the 5 GHz network on that device, or turn off automatic joining for it. On a Windows PC, here’s how to forget a Wi-Fi network in Windows 11.
A smart device still won’t connect
- Make sure the phone running the setup app is connected to the 2.4 GHz name. Many setup apps pass the phone’s current network to the new device.
- Move the device closer to the router for setup, then move it to its final spot.
- Check the device’s manual for the Wi-Fi security types it supports. For the router, Apple’s recommended settings are WPA3 Personal, or WPA2/WPA3 Transitional for compatibility with older devices.
- On an ASUS Wi-Fi 6 router, ASUS’s compatibility guide for smart home devices suggests turning off Enable Smart Connect and, if needed, 802.11ax / WiFi 6 mode for the 2.4 GHz band under Wireless > General.
2.4 GHz is slow or drops out
The band is crowded. On 2.4 GHz, Microsoft’s picks are channel 1, 6 or 11, because those channels don’t overlap. Apple’s advice differs: leave the channel on Auto and set the 2.4 GHz channel width to 20 MHz. Start with Auto and 20 MHz. If the connection is still unreliable, try each of the three channels in turn. Moving the router away from a microwave or cordless phone base can also help.
Frequently asked questions
Can I convert my 5 GHz network to 2.4 GHz?
No. The two bands are separate radios inside the router. You don’t convert one into the other. You make sure the 2.4 GHz radio is on, give it a name you can pick out, and connect your device to it.
Will switching to 2.4 GHz slow down my internet?
It can for the device you move. 2.4 GHz has slower throughput than 5 GHz, although a device far from the router may get a steadier connection on 2.4 GHz. Devices that stay on 5 GHz are not slowed down by splitting the names.
Can I use 2.4 GHz and 5 GHz at the same time?
Yes. A dual-band router broadcasts both, and each device uses one band at a time. Separate names just let you choose the band yourself instead of letting the router decide.
Can I switch to 2.4 GHz from my Windows 11 PC?
Sometimes. Some Wi-Fi adapters have a preferred band option in their advanced driver properties, but it depends on the adapter and its driver, and many don’t have it. To look for it, open the adapter settings in Windows 11. Connecting to a separate 2.4 GHz network name is more reliable.
If the PC drops the connection or the option is missing, try to update the Wi-Fi driver on Windows 11 first.
Does Alexa need 2.4 GHz?
Not usually. Echo devices work with dual-band Wi-Fi, so check your model’s specifications before changing anything. To set one up, follow the steps for connecting Alexa to Wi-Fi.
Do printers need 2.4 GHz?
Some older printers only join a 2.4 GHz network. Setting up a Brother inkjet? Here are the steps to connect the Brother MFC-J4510DW to a wireless network.
Once that printer is on your network, you can print to the MFC-J4510DW from an iPhone with AirPrint.
Is 2.4 GHz less secure than 5 GHz?
No. Security comes from the encryption setting and password, not the band. Use the same security setting on both bands.
Next step
Once the device is connected, write down the names you chose for each band and the router’s admin login, so the next 2.4 GHz-only gadget takes a minute to set up. If the far corners of your home still have a weak signal on 2.4 GHz, a range extender may help. Here’s how to set up a TP-Link Wi-Fi extender.

Matthew Burleigh is the founder, head writer, and editor of Solve Your Tech, which he launched in 2012. He has written technology tutorials since 2008 and worked in IT since 2003, including small-business support, IT management, and consulting. He holds Bachelor’s and Master’s degrees in Computer Science from Arizona State University.
Matthew writes practical guides for Windows, iPhone and iPad, Microsoft Office, Outlook, Google apps, and Android. Solve Your Tech’s guides are checked step by step against the device or app maker’s own documentation and tested on his own devices whenever he has the hardware or software, with clear steps, sources, and update dates.
Read more about Matthew and how Solve Your Tech writes and updates its guides, or report a correction.