To turn on spell check in Word, go to File › Options › Proofing and check Check spelling as you type. Word then underlines misspelled words in red as you type. To check the whole document at once, press F7.
This guide covers turning on automatic spell check in Word for Windows, running a full check, fixing spell check when it still doesn’t work, Word for Mac and Word for the web, grammar checking, and turning spell check off. The steps follow Microsoft’s support articles for Word in Microsoft 365, Word 2021 and Word 2019.
Turn on automatic spell check (Windows)
These steps follow Microsoft’s Check spelling and grammar in Office guide.
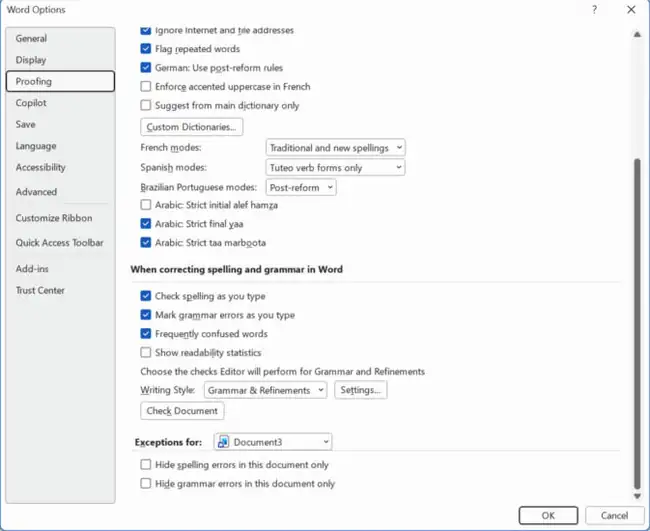
- Select File › Options.
- Select Proofing.
- Under When correcting spelling and grammar in Word, check Check spelling as you type. Check Mark grammar errors as you type too if you want grammar help.
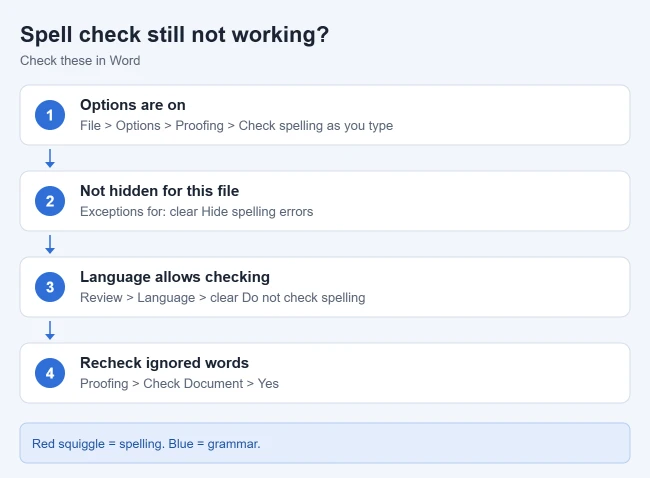
- Look at Exceptions for at the bottom. Make sure Hide spelling errors in this document only is unchecked.
- Select OK.
Result: Word marks possible spelling errors with a red squiggly line and, if grammar checking is on, grammar issues with a blue line, according to Microsoft.
Check the whole document
- Press F7, or go to Review and select Editor (or Spelling & Grammar in older versions).
- Go through each suggestion. Pick a correction, select Ignore, or select Add to Dictionary for names and words Word doesn’t know.
Result: Word steps through every flagged word and tells you when the check is complete. Words you add to the dictionary won’t be flagged again.
Fix a single word
Right-click any underlined word and choose a suggestion, Ignore All, or Add to Dictionary. Microsoft suggests right-clicking an underlined word whenever you want help fixing it.
If spell check still isn’t working
- Check the language. Select all text (Ctrl + A), go to Review › Language › Set Proofing Language, and make sure Do not check spelling or grammar is unchecked. Pick the right language while you’re there.
- Recheck ignored words. In File › Options › Proofing, select Check Document (called Recheck Document in some versions), then Yes. Microsoft says this resets words and grammar you previously skipped.
- Check a style. Text copied from a website or email can carry the “don’t check” setting with it. Reapply the Normal style or set the proofing language as above.
- Check the document exception. The Exceptions for boxes only hide errors in one file, so a single document can look unchecked while others are fine.
Word for Mac
- Select Word › Preferences (or Settings in newer versions).
- Select Spelling & Grammar.
- Check Check spelling as you type, then close the window.
Result: red underlines appear under misspelled words. To check the whole document on a Mac, use Review › Spelling & Grammar (or Editor).
Word for the web
Word for the web checks spelling automatically. If you don’t see underlines, select Review › Editor or the Editor icon, and check that the document’s proofing language is correct under Review › Language.
Turn grammar checking off but keep spelling
In File › Options › Proofing, clear Mark grammar errors as you type and Check grammar with spelling (if your version shows it). Microsoft notes that not every Office app shows both options. Spelling checks keep working.
Turn spell check off
Go back to File › Options › Proofing and uncheck Check spelling as you type. To hide the red lines in just one document, use the Exceptions for options instead.
Frequently asked questions
What is the shortcut for spell check in Word?
Press F7 on Windows to check the whole document.
Why does Word flag a word I know is spelled correctly?
It isn’t in Word’s dictionary. Right-click it and select Add to Dictionary.
Does spell check work in Excel and Outlook?
Outlook checks as you type. Microsoft says automatic checking isn’t available in Excel, but you can press F7 there to run a manual check.
Why is spell check only off in one document?
That document probably has Hide spelling errors in this document only checked, or its text is set to Do not check spelling or grammar.
Related: stop Word from flagging frequently confused words, or run spell check in Google Docs. If Docs changes words you typed on purpose, see how to turn off AutoCorrect in Google Docs.

Matthew Burleigh is the founder, head writer, and editor of Solve Your Tech, which he launched in 2012. He has written technology tutorials since 2008 and worked in IT since 2003, including small-business support, IT management, and consulting. He holds Bachelor’s and Master’s degrees in Computer Science from Arizona State University.
Matthew writes practical guides for Windows, iPhone and iPad, Microsoft Office, Outlook, Google apps, and Android. Solve Your Tech’s guides are tested on current devices or checked against official product documentation, with clear steps, sources, and update dates.
Read more about Matthew and how Solve Your Tech writes and updates its guides, or report a correction.