To enable Telnet on Windows 11, open Control Panel, go to Programs > Turn Windows features on or off, check Telnet Client, and select OK. You can also run dism /online /Enable-Feature /FeatureName:TelnetClient in an administrator Command Prompt. After it installs, open Terminal or Command Prompt and type telnet followed by a host name and port.
These steps apply to Windows 11 Home, Pro, Enterprise and Education, and the same steps work on Windows 10. Windows 11 includes only the Telnet client, which connects to other devices. It doesn’t include a Telnet server. Microsoft’s telnet command reference says you must install the client before the command will run.
What the Telnet Client Is For
Telnet is an old text-based protocol for connecting to another computer over a network. It sends everything, including user names and passwords, as plain unencrypted text, which is why Windows ships with the client turned off.
Today most people turn it on for one of these jobs:
- Checking whether a port is open. If
telnet server 443connects, nothing between you and that server is blocking port 443. - Testing a mail server. You can connect to an SMTP server on port 25 or 587 and read its greeting.
- Managing older equipment. Some routers, switches, printers and lab devices still accept Telnet logins on a local network.
For a remote login on anything you care about, use SSH instead (see the FAQ below).
Before You Start
- An administrator account. Adding a Windows feature needs admin rights. On a standard account, Windows asks for an administrator password.
- Work or school PCs. Your organization can hide the Windows Features window or block optional features with Group Policy, which Microsoft describes in Add, remove, or hide Windows features. If the option is missing or greyed out, ask your IT team.
- No download needed in most cases. The Telnet Client files are already on the PC, so the change usually finishes in under a minute.
Turn On Telnet Client in Windows Features
- Press Windows key + R to open the Run box, type
control, and press Enter. Control Panel opens. - Select Programs. If you don’t see it, change View by in the top right corner to Category.
- Under Programs and Features, select Turn Windows features on or off. Approve the administrator prompt if one appears. The Windows Features window opens with a list of checkboxes.
- Scroll down and check Telnet Client.
- Select OK. Windows installs the feature and shows “Windows completed the requested changes.”
- Select Close. If Windows offers Restart now, restart before you use Telnet.

Other ways to open the same window
- Press Windows key + R, type
optionalfeatures, and press Enter. This opens Windows Features directly. - Search the Start menu for Turn Windows features on or off.
- Open Settings > System > Optional features, scroll down to Related settings, and select More Windows features. On some Windows 11 builds, Microsoft notes that Optional features sits under Settings > Apps instead.
The same window installs other built-in tools, such as the IIS web server, so it’s worth knowing all three routes.
Turn It On With a Command
This method is faster if you already have a terminal open, and it works the same way when you set up several PCs.
- Open Command Prompt, PowerShell or Terminal as an administrator. See how to run Command Prompt as admin. The window title starts with Administrator.
- In Command Prompt, run
dism /online /Enable-Feature /FeatureName:TelnetClient. A progress bar runs to 100% and DISM reports “The operation completed successfully.” - Or, in PowerShell, run
Enable-WindowsOptionalFeature -Online -FeatureName TelnetClient. PowerShell lists the result and shows RestartNeeded : False when no restart is required.
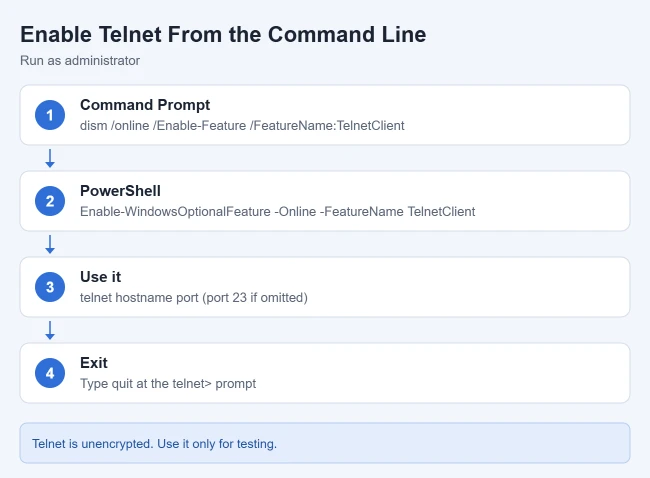
Type the feature name exactly as TelnetClient, with no space or hyphen. DISM reports an unknown feature if the name is wrong. Microsoft’s Enable or Disable Windows Features Using DISM guide shows that dism /online /Get-Features lists every feature name on the PC.
On Windows Server, the Telnet Client is a server feature instead, so the PowerShell command there is Install-WindowsFeature Telnet-Client.
Check That Telnet Is Installed
- Close any Command Prompt or PowerShell windows that were open before the install, and open a new one. Windows doesn’t need admin rights to run Telnet.
- Type
telnetand press Enter. The Microsoft Telnet> prompt appears. - Type
quit(orq) and press Enter to leave the prompt.
You can also run Get-WindowsOptionalFeature -Online -FeatureName TelnetClient in an admin PowerShell window. State : Enabled means the client is on.
How to Use Telnet to Test a Port
The basic syntax is telnet hostname port. Put a space between the address and the port, not a colon.
- Open Terminal or Command Prompt.
- Type
telnetfollowed by the server name or IP address and the port, for exampletelnet mail.example.com 25, and press Enter. - Read what happens next:
- The window clears or shows a text greeting. You’re connected, so the port is open and reachable. A mail server, for example, usually replies with a line starting with 220.
- You see a message that Telnet could not open a connection to the host. Nothing accepted the connection on that port. The service may be stopped, the port may be wrong, or a firewall is blocking it.
- It waits a long time before failing. A firewall is often dropping the traffic, or the host is offline.
- The name can’t be found. Check the spelling, or try the IP address instead.
- To end the session, press Ctrl + ] to return to the Microsoft Telnet> prompt, then type
quitand press Enter.
If you leave out the port, Microsoft’s reference says Telnet uses TCP port 23, the standard Telnet port.
Common ports to test
| Service | Port |
|---|---|
| Telnet | 23 |
| SSH | 22 |
| SMTP mail (server to server) | 25 |
| SMTP mail submission | 587 |
| Web (HTTP) | 80 |
| Web (HTTPS) | 443 |
| Remote Desktop | 3389 |
A connection to port 443 only proves the port is open. Telnet can’t perform the encryption handshake that HTTPS uses, so you won’t see a web page. Many home internet providers also block outgoing port 25, so a failed test on that port from home doesn’t always mean the mail server is down.
Worked example: check a mail server
- Run
telnet mail.example.com 587. - If the server replies with a 220 line, type
EHLOfollowed by any name, such asEHLO test, and press Enter. The server lists the features it supports. - Type
QUITand press Enter to close the connection.
Windows Telnet doesn’t show what you type by default. If you want to see your typing, press Ctrl + ], type set localecho, press Enter, and then press Enter again to return to the session.
Telnet Prompt Commands and Options
At the Microsoft telnet> prompt, Microsoft documents these commands:
open hostname port(oro) connects to a host from the prompt.closeends the current connection without leaving Telnet.statusshows whether you’re connected.set localechoshows the characters you type.set logfile filenamesaves the session to a file on your PC.quit(orq) exits Telnet.
The telnet command itself also takes options before the host name, according to Microsoft’s reference:
/f filenamelogs the session to a file. Microsoft’s example istelnet /f telnetlog.txt telnet.microsoft.com 44./l usernamesets the user name to log on with on the remote computer, and/atries to log on with your current Windows user name./tsets the terminal type: vt100, vt52, ansi or vtnt./e characterchanges the escape character that returns you to the Telnet prompt.
Microsoft’s telnet set page lists the rest of the session options.
If Telnet Doesn’t Work
- “‘telnet’ is not recognized as an internal or external command.” The client isn’t installed, or the window was open before you installed it. Close the window, open a new one, and try again. If it still fails, repeat the install steps and check for State : Enabled.
- Telnet Client is missing or greyed out. Make sure you’re using an administrator account. On a managed PC, a policy may hide Windows Features or block optional features, so ask your IT team.
- DISM says the source files could not be found, or the install fails. This often happens on work PCs that get updates from a company server instead of Windows Update. Try the Windows Features window instead, or ask IT to allow the feature.
- Windows asks you to restart. Restart before you run the command. Telnet Client usually works right away without one.
- Telnet connects to nothing. Check that the service is running on the remote device and that the right port is open in its firewall. On a Windows PC you control, see how to turn off the firewall on Windows 11, which also shows how to open a single port instead.
- The session is stuck. Press Ctrl + ] and type
quit. Ctrl + C usually doesn’t end a Windows Telnet session.
How to Turn Telnet Off
Turn the client off when you no longer need it. You can always add it back later.
- Windows Features: open the window again, uncheck Telnet Client, and select OK.
- Command Prompt (admin): run
dism /online /Disable-Feature /FeatureName:TelnetClient. - PowerShell (admin): run
Disable-WindowsOptionalFeature -Online -FeatureName TelnetClient.
Typing telnet in a new window then gives the “not recognized” message, which confirms it’s off.
Frequently Asked Questions
Is Telnet safe to use?
Telnet doesn’t encrypt anything, including passwords, so anyone who can see the network traffic can read it. Use it for connection tests, not for signing in with accounts that matter. Connect only to systems you own or have permission to test. For remote logins, use SSH. For remote control of a Windows PC, see how to enable Remote Desktop on Windows 11.
Can I use SSH on Windows 11 instead?
Windows 11 supports the OpenSSH client, which lets you type ssh user@hostname in Terminal. If ssh isn’t recognized, add OpenSSH Client from Settings > System > Optional features. Microsoft explains the client and server in its OpenSSH for Windows overview.
Is there a quicker way to test a port without installing Telnet?
Yes. Microsoft’s Test-NetConnection cmdlet is built into PowerShell. Run Test-NetConnection hostname -Port 443. TcpTestSucceeded : True means the port answered.
Can I use Telnet on Windows 11 Home?
Yes. Telnet Client is in the Windows Features list on Home as well as Pro. Home doesn’t include the Group Policy Editor, but you don’t need it for this.
Do I need to restart after enabling Telnet?
Usually not. Open a new Command Prompt or Terminal window and the command works. Restart only if Windows asks.
Can I run a Telnet server on Windows 11?
No. Windows 11 includes only the client. If you need to accept remote command-line logins, Microsoft supports the OpenSSH Server optional feature instead.
Once Telnet is on, try telnet against a device you manage, such as your router on port 80, to see what an open port looks like before you troubleshoot a real problem.

Matthew Burleigh is the founder, head writer, and editor of Solve Your Tech, which he launched in 2012. He has written technology tutorials since 2008 and worked in IT since 2003, including small-business support, IT management, and consulting. He holds Bachelor’s and Master’s degrees in Computer Science from Arizona State University.
Matthew writes practical guides for Windows, iPhone and iPad, Microsoft Office, Outlook, Google apps, and Android. Solve Your Tech’s guides are checked step by step against the device or app maker’s own documentation and tested on his own devices whenever he has the hardware or software, with clear steps, sources, and update dates.
Read more about Matthew and how Solve Your Tech writes and updates its guides, or report a correction.