To change network adapter settings in Windows 11, open Start > Settings > Network & internet > Advanced network settings. That page lets you enable, disable, and rename each adapter, and its More network adapter options link opens the classic Network Connections window (the old “Change adapter settings” screen). You can also jump straight to that window by pressing Windows key + R, typing ncpa.cpl, and pressing Enter.
These steps are for Windows 11 versions 24H2 and 25H2 as of October 2026. Some adapter settings live in different places, so the first section explains which tool to open for the change you want to make.
Which Tool to Use
| What you want to change | Where to do it |
|---|---|
| Turn an adapter on or off, or rename it | Settings > Network & internet > Advanced network settings |
| IP address, DNS servers, DNS over HTTPS | Settings > Network & internet > Wi-Fi or Ethernet (your network) |
| Public or Private network profile | Same network properties page in Settings |
| TCP/IPv4 properties, protocols, adapter priority | Network Connections (ncpa.cpl) |
| Driver options such as preferred band or roaming | Device Manager > Network adapters > Advanced tab |
Before you change anything, take a screenshot of the current values. Most home networks work best with the automatic settings, so it helps to know exactly what to put back.
Enable, Disable, or Rename an Adapter in Settings
Disabling an adapter cuts every connection that uses it. If you’re connected to the PC remotely, don’t disable the adapter that carries that connection.
- Click Start, then Settings, or press Windows key + I.
- Click Network & internet in the left pane, then click Advanced network settings near the bottom of the page.
- Under Network adapters, find the adapter you want, such as Wi-Fi or Ethernet.
- Click Disable to turn it off, or Enable to turn it back on. The status changes right away.

- To rename it, click the adapter to expand it, then click Rename next to Rename this adapter. Type a new name and click Save. The new name shows up in Settings and in Network Connections.
When you expand an adapter, you’ll also see View additional properties, which shows its IP and DNS details, and More adapter options with an Edit button that opens the classic properties window for just that adapter.
Open the Classic Network Connections Window (ncpa.cpl)
Network Connections is the Control Panel view that lists every adapter, including virtual ones from VPN apps and virtual machines.
- Press Windows key + R to open the Run box.
- Type ncpa.cpl and press Enter. You can also go to Settings > Network & internet > Advanced network settings and click More network adapter options under Related settings.
- Right-click an adapter to see Disable, Status, Diagnose, Rename, and Properties.
- Click Properties and approve the administrator prompt if one appears. A list of items the adapter uses opens, such as Internet Protocol Version 4 (TCP/IPv4) and Internet Protocol Version 6 (TCP/IPv6).
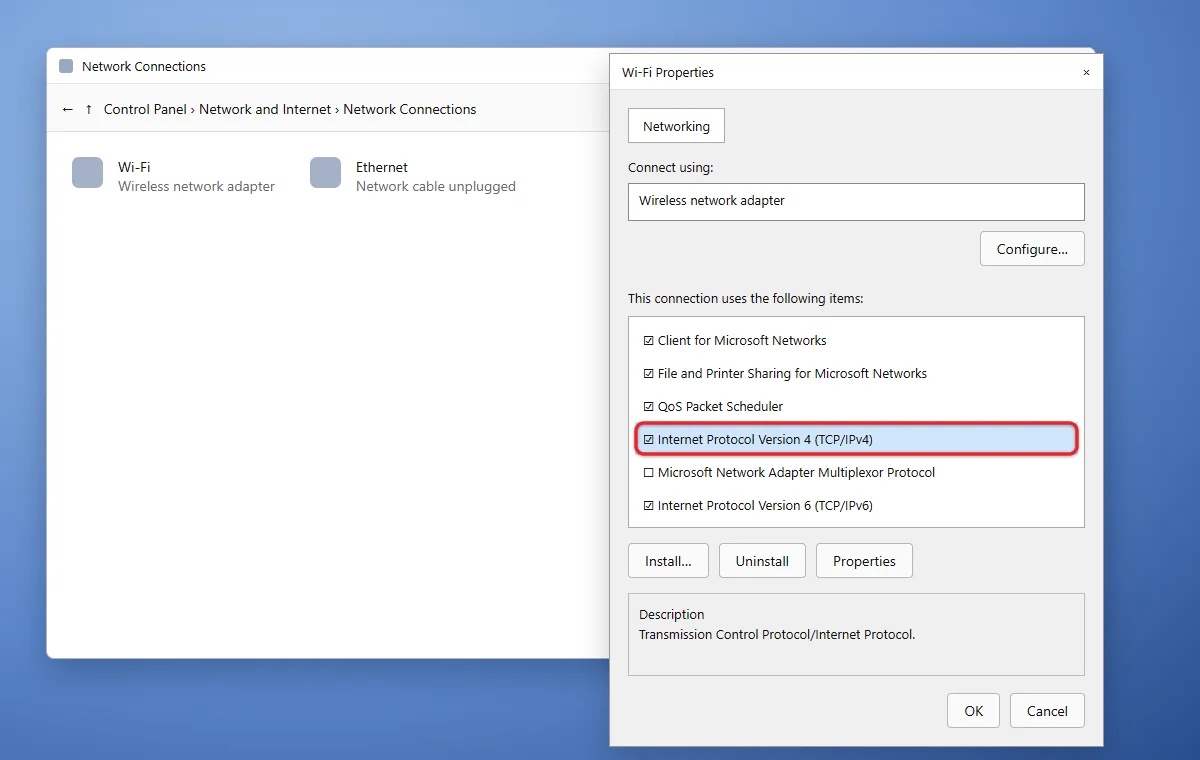
- Select Internet Protocol Version 4 (TCP/IPv4) and click Properties to set an IP address or DNS servers the classic way.
- Click OK to save, or Cancel to leave everything as it was.
Leave the checkboxes in the item list alone unless you have a specific reason. Clearing one turns that protocol off for the adapter. Microsoft recommends keeping IPv6 enabled, because parts of Windows rely on it.
Change IP and DNS Settings in Settings
Windows 11 can handle IP and DNS from the Settings app, which is easier than the classic dialog. Microsoft walks through each field in its essential network settings guide.
- Open Settings > Network & internet.
- For Wi-Fi, click Wi-Fi > Manage known networks, then click your network. For a wired connection, click Ethernet. The network’s properties page opens.
- Click Edit next to IP assignment to change the address, or Edit next to DNS server assignment to change only DNS.
- Choose Automatic (DHCP) or Manual. With Manual, turn on IPv4 and fill in the boxes. For IP assignment, that’s IP address, Subnet mask, and Gateway. For DNS, it’s Preferred DNS and Alternate DNS.
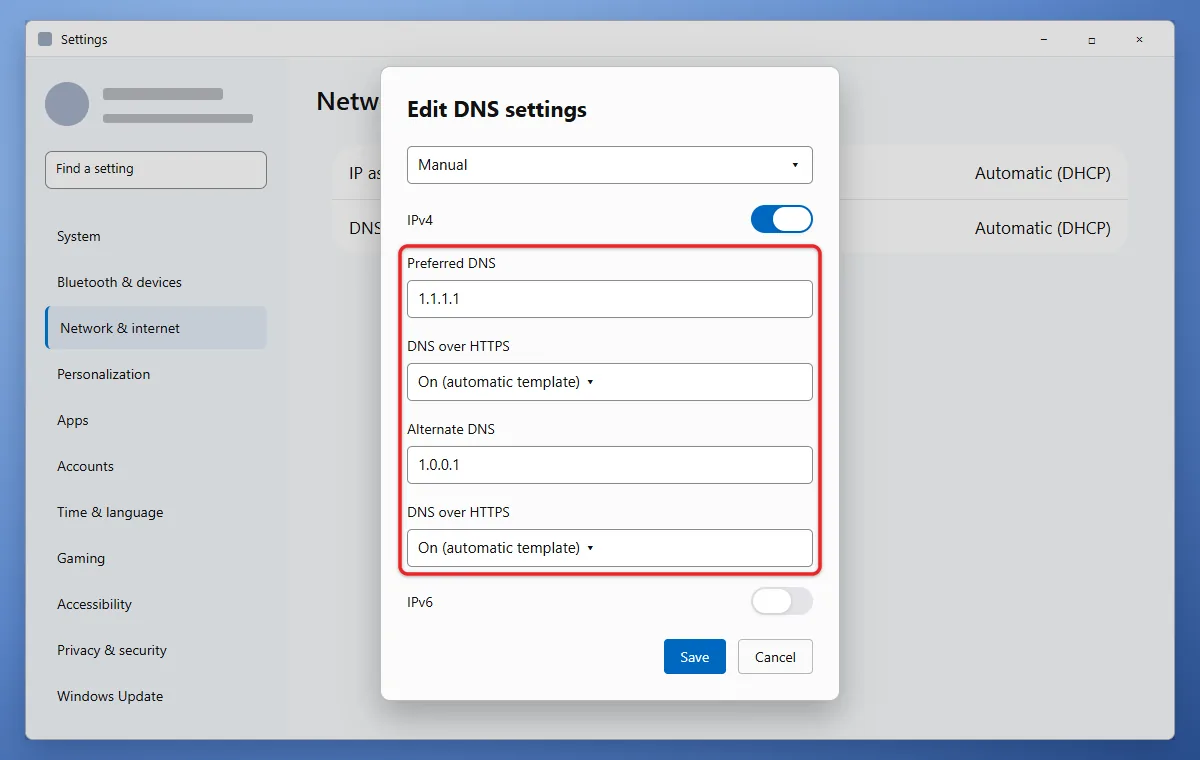
- Optionally set DNS over HTTPS to On (automatic template) to encrypt DNS lookups, if your DNS provider supports it.
- Click Save. The properties page shows the new values.
If websites stop loading, go back to the same Edit button and choose Automatic (DHCP). For a full walkthrough of a static address, see our guide on how to change your IP address in Windows 11. To record your current DNS servers first, use our guide to finding your primary and secondary DNS.
Change the Network Profile
On the same properties page, under Network profile type, choose Public network (Recommended) or Private network. Public hides your PC from other devices on the network, and Microsoft recommends it for most networks, including at home. Choose Private only when you want file or printer sharing with devices you trust, and pair it with network discovery.
Set Which Adapter Windows Prefers
When a PC is on Wi-Fi and Ethernet at the same time, Windows uses the adapter with the lowest interface metric. It assigns metrics automatically based on link speed, as Microsoft explains in its automatic metric article, so the faster link usually wins. To override it:
- In Network Connections (ncpa.cpl), right-click the adapter and click Properties.
- Select Internet Protocol Version 4 (TCP/IPv4), click Properties, then click Advanced.
- On the IP Settings tab, clear Automatic metric and type a number in Interface metric. A lower number means higher priority.
- Click OK in each window.
To undo this, check Automatic metric again.
Change Advanced Wi-Fi Driver Settings in Device Manager
Hardware options come from the adapter’s driver, so they’re in Device Manager rather than Settings.
- Right-click Start and click Device Manager.
- Expand Network adapters and double-click your Wi-Fi or Ethernet adapter.
- Click the Advanced tab. Select a property on the left and change its Value on the right.
- Click OK. The adapter may disconnect for a few seconds while the driver reloads.
Property names depend on the adapter maker. For Intel Wi-Fi adapters, Dell’s Wi-Fi adapter settings guide suggests Preferred Band set to Prefer 5GHz band and Roaming Aggressiveness set to Lowest on a PC that stays in one place. If the Advanced tab has very few options, update your Wi-Fi driver from the PC or adapter maker.
Troubleshooting
- Internet stopped working after a change. Set IP assignment and DNS server assignment back to Automatic (DHCP), or restore the values you wrote down. A single wrong digit in the gateway breaks the connection.
- An adapter shows in ncpa.cpl but not in Settings. Some VPN clients cause this. Use Network Connections for now and check for a VPN client update.
- The adapter is missing everywhere. Open Device Manager and look under Network adapters and Other devices. A missing or yellow-flagged entry usually means the driver needs to be installed or updated.
- Controls are grayed out. Changing adapter properties needs an administrator account. On a work or school PC, your IT department may lock these settings.
- Nothing else works. Run the network troubleshooter (see how to run a troubleshooter in Windows 11). Use Network reset last, because it removes and reinstalls every network adapter and clears their settings.
Frequently Asked Questions
Where is “Change adapter options” in Windows 11?
Windows 11 moved it. Go to Settings > Network & internet > Advanced network settings and click More network adapter options, or press Windows key + R and run ncpa.cpl. Both open the same Network Connections window.
Should I use automatic or manual IP settings?
Use Automatic (DHCP) unless your internet provider or network administrator gave you specific values. With DHCP, your router hands out the address and DNS servers, and the PC keeps working when you move to another network.
Does disabling an adapter uninstall it?
No. Disabling just turns it off. Click Enable in Advanced network settings, or right-click it in Network Connections and click Enable, to turn it back on with its settings intact.
Do I need to restart after changing adapter settings?
Usually not. Most changes apply as soon as you click Save or OK. A driver change in Device Manager can briefly drop the connection while the adapter reloads.

Matthew Burleigh is the founder, head writer, and editor of Solve Your Tech, which he launched in 2012. He has written technology tutorials since 2008 and worked in IT since 2003, including small-business support, IT management, and consulting. He holds Bachelor’s and Master’s degrees in Computer Science from Arizona State University.
Matthew writes practical guides for Windows, iPhone and iPad, Microsoft Office, Outlook, Google apps, and Android. Solve Your Tech’s guides are checked step by step against the device or app maker’s own documentation and tested on his own devices whenever he has the hardware or software, with clear steps, sources, and update dates.
Read more about Matthew and how Solve Your Tech writes and updates its guides, or report a correction.