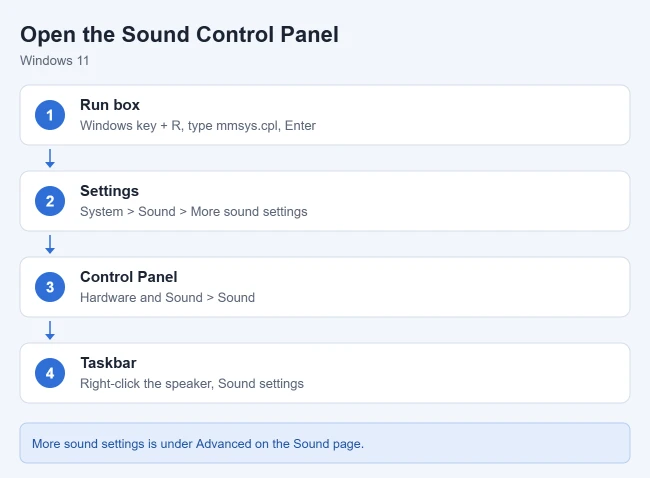
To open the classic Sound control panel in Windows 11, press Windows key + R, type mmsys.cpl, and press Enter. You can also open Settings > System > Sound and, under Advanced, select More sound settings. Both routes open the same small Sound window with the Playback, Recording, Sounds, and Communications tabs.
This guide covers Windows 11. The Settings and Control Panel routes below follow Microsoft’s Fix sound or audio problems in Windows guide. Labels can shift slightly between Windows 11 updates, so if a name on your PC differs a little, look for the closest match.
Before You Start
- Nothing to install. The Sound control panel is part of Windows 11. You do not need to download it, and you should be wary of any website offering it as a separate download.
- What “classic” means. Windows 11 has two places for audio options: the newer Sound page in the Settings app, and the older Sound window that comes from Control Panel. This article is about reaching the older one.
- Work or school PCs. An organization can restrict Control Panel items or Settings pages. If a route here is missing or blocked on a managed PC, ask your IT administrator.
Method 1: Use the Run Box (Fastest)
- Press Windows key + R. A small Run box opens, usually near the bottom-left corner of the screen.
- Type
mmsys.cplin the Open field. There are no spaces, and it starts with two letter m’s. - Press Enter or select OK. The Sound window opens on the Playback tab.
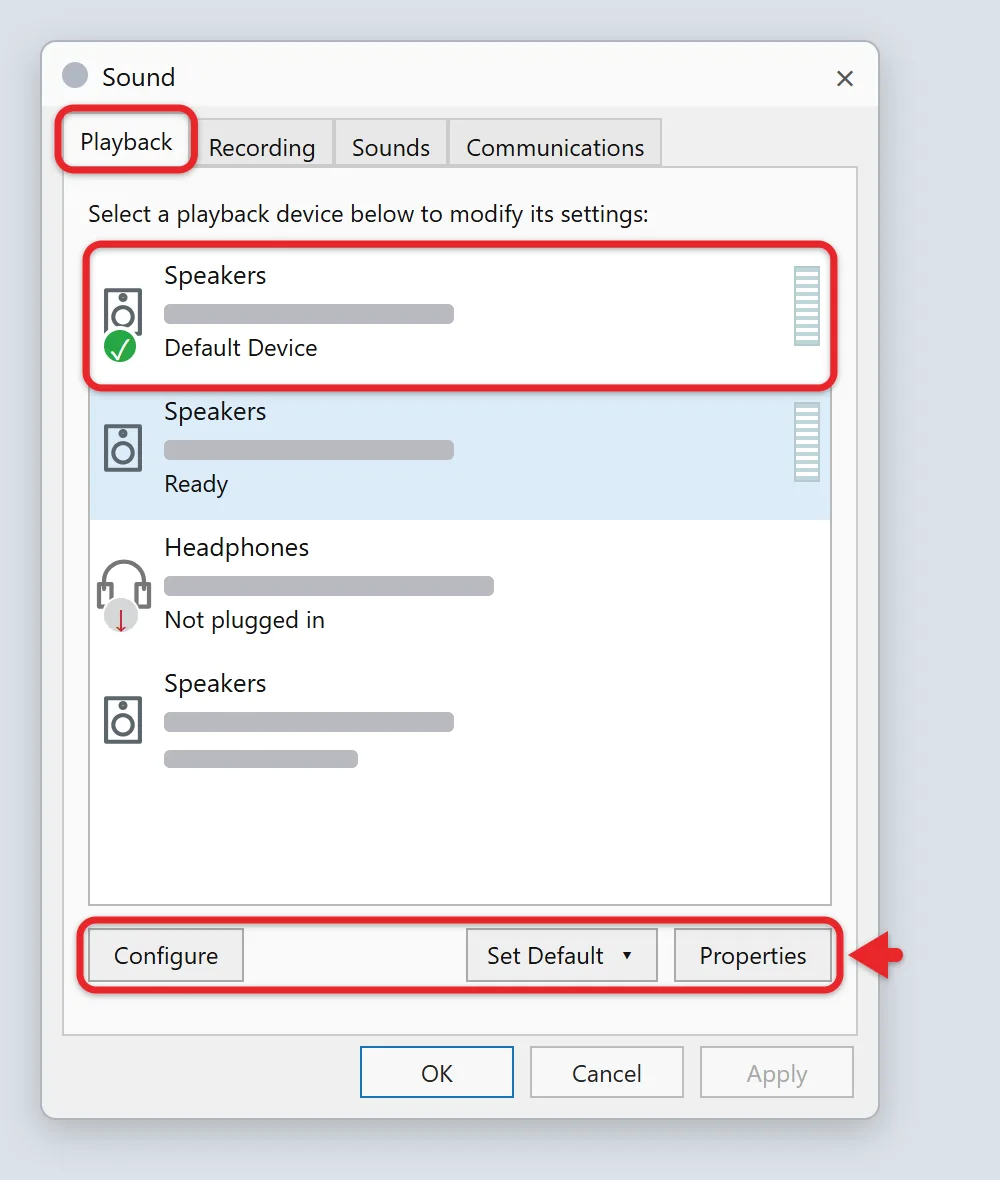
If that does not work, try control mmsys.cpl instead. An older Microsoft support article, How to run Control Panel tools by typing a command, lists that form, and the same command can be typed in Command Prompt or Windows Terminal.
Method 2: Go Through Settings
This is the route Microsoft documents for Windows 11, and it is the easiest one to describe to someone over the phone.
- Select Start, then Settings. You can also press Windows key + I.
- Select System in the left column, then Sound.
- Scroll down past the Output and Input sections to the Advanced section.
- Select More sound settings. The classic Sound window opens in front of Settings.
The link is near the bottom of the page, so it is easy to miss if you do not scroll. If you would rather jump straight to the Sound page, press Windows key + R, type ms-settings:sound, and press Enter, then scroll to More sound settings.
Method 3: Open It From Control Panel
- Type control panel in the search box on the taskbar and select Control Panel from the results.
- Select Hardware and Sound.
- Select Sound.
If you do not see Hardware and Sound, Control Panel is probably showing icons instead of categories. In that case, look for Sound in the list of icons, or change View by in the top-right corner. There are several other ways to open Control Panel in Windows 11 as well.
Method 4: Start From the Taskbar Speaker Icon
- Right-click the Speakers icon at the right end of the taskbar. On a touchscreen, press and hold it.
- Select Sound settings. The Settings app opens to the Sound page.
- Scroll down to Advanced and select More sound settings.
If the Speakers icon is not on the taskbar, it may be in the overflow area. Select Show hidden icons (the small arrow) to check there.
How to Tell You Are in the Right Place
The classic panel is a small, separate window titled Sound. It has four tabs across the top and OK, Cancel, and Apply buttons at the bottom. If you see a full Settings page with a left-hand menu instead, you are on the newer Sound page and still need to select More sound settings.
Opening the window changes nothing by itself. To leave without changing anything, select Cancel or close the window.
What Each Tab Does
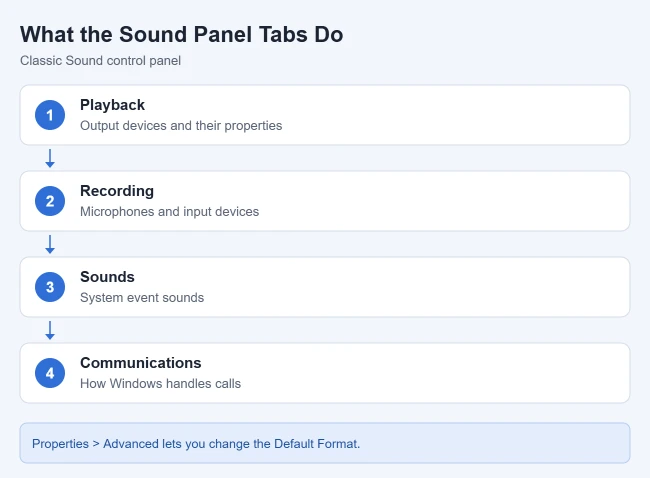
- Playback: lists output devices such as speakers, headphones, and monitors with speakers. Select a device and choose Properties to see its options. Picking the right output is one of the first steps to fix no sound on Windows 11.
- Recording: lists input devices such as microphones. It works the same way as the Playback tab.
- Sounds: controls the sounds Windows plays for events such as notifications and errors. You can change a sound or choose a scheme with no sounds.
- Communications: controls whether Windows lowers the volume of other audio when it detects a call.
The Recording tab is also where Microphone Boost lives, which helps when you need to increase mic volume in Windows 11. It is also where you can turn on Stereo Mix to record PC audio, if your audio driver includes it.
The Sounds tab is also where classic Outlook gets its New Mail Notification chime, so you can use it to turn off the new email sound in Outlook.
Two Checks Microsoft Does in This Window
Microsoft’s audio troubleshooting guide sends you to the classic Sound window for two specific checks. Before you change anything, note the current setting so you can put it back.
Make sure a device is not disabled
- Open the Sound window and select the Playback tab for speakers or headphones, or the Recording tab for a microphone.
- Select your device, then select Properties.
- Next to Device usage, make sure Use this device (enable) is selected.
- Select OK.
Try a different audio format
- On the Playback tab, right-click your default device and select Properties.
- Open the Advanced tab.
- Under Default Format, write down the current choice, pick a different one, and select OK.
- Play something to test. If it does not help, try another format. To undo the change, return to the same list and pick the original format.
Change a Supported Audio Bit Depth and Sample Rate
Each Default Format entry combines bit depth and sample rate, such as 24 bit, 48000 Hz. The choices depend on your device and driver, so not every output offers 24-bit.
- Open the classic Sound window and select the Playback tab.
- Select your speakers or headphones, select Properties, and open the Advanced tab.
- Write down the current Default Format, then pick the format you want.
- Select Apply or OK, play some audio, and reopen Properties to confirm the change stuck.
- If sound stops or becomes distorted, switch back to the original format.
Testing a different Default Format is one of the documented fixes for sound problems in Windows. A higher bit depth won’t add detail that is missing from the recording. Exclusive-mode apps can use their own format, and audio bit depth is not the same as monitor color depth or 32-bit and 64-bit Windows.
Settings vs. the Classic Sound Window
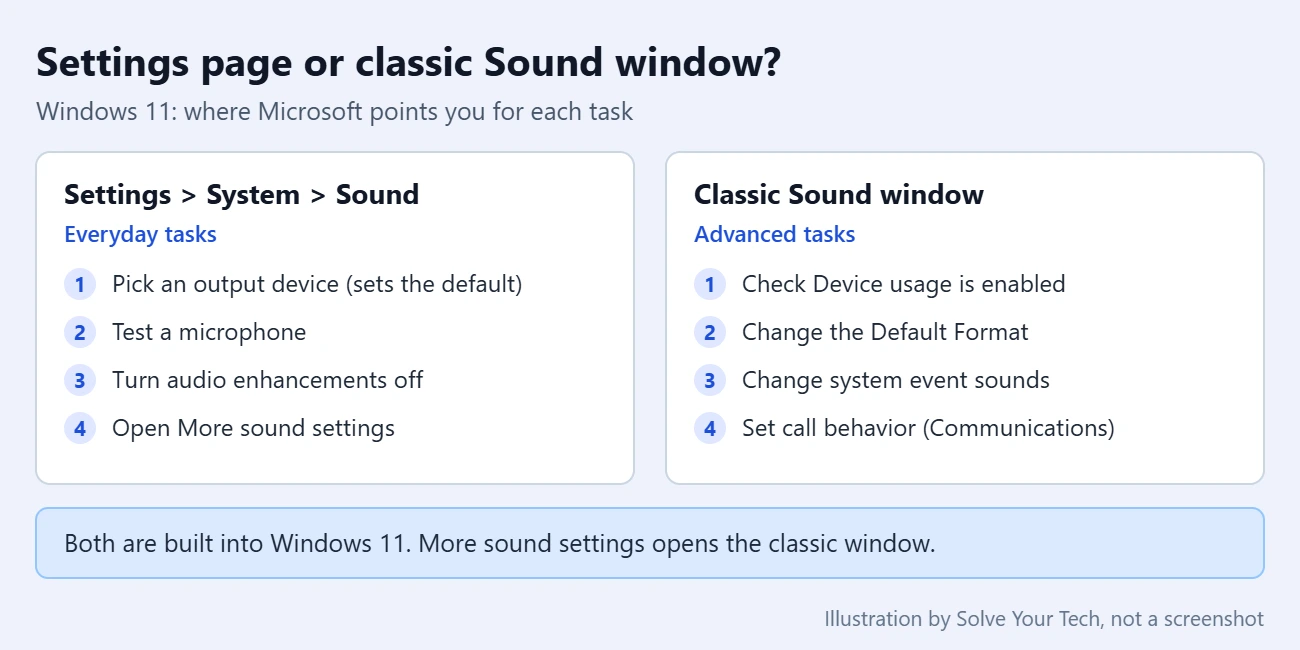
You may not need the classic window at all. Microsoft now handles most everyday audio tasks in Settings > System > Sound. Choosing a device in the Output section there also makes it the default. Audio enhancements are turned off from a device’s Advanced settings in Settings, and Microsoft’s Fix microphone problems page tests and adjusts a microphone from the Input section. The classic window is still where Microsoft checks Device usage and Default Format, and it is where the Sounds and Communications tabs live.
Troubleshooting
- Run says Windows cannot find the file. Check the spelling:
mmsys.cpl, with no spaces. Then trycontrol mmsys.cpl, or use the Settings route instead. - You cannot find More sound settings. Make sure you are on System > Sound and scroll all the way down to the Advanced section. If the label has changed after an update, the Run box and Control Panel routes do not depend on it.
- Right-clicking the speaker does not open the old window. That is expected in Windows 11. The menu leads to the Settings page, and the classic window is one more step away under More sound settings.
- Your device is not in the list. Right-clicking an empty area of the Playback or Recording list normally offers options to show disabled and disconnected devices. If the device still does not appear, Microsoft’s guide moves on to checking cables, Windows Update, and the audio driver.
- Buttons or tabs are missing or grayed out. The options in a device’s Properties window depend on its driver, so not every device shows the same tabs. On a work or school PC, a policy may also be limiting what you can change.
- Sound still is not working. Run the audio troubleshooter: select Start > Settings > System, select Troubleshoot > Other troubleshooters, and select Run in the Audio section.
Frequently Asked Questions
What is the command for the Sound control panel?
The command is mmsys.cpl. Press Windows key + R, type it, and press Enter. control mmsys.cpl opens the same window.
Did Windows 11 remove the Sound control panel?
No. It is still included, but Microsoft has moved many everyday options to the Settings app, so the classic window now sits behind the More sound settings link instead of the taskbar speaker menu.
Can I make a desktop shortcut to it?
Generally, yes. Right-click an empty part of the desktop, select New > Shortcut, enter mmsys.cpl as the location, select Next, name it Sound, and select Finish. Microsoft’s sound guides do not cover this, so treat it as a convenience rather than an official route.
How do I adjust each app’s volume?
That is done in the volume mixer, not the classic Sound window. Here’s how to open Volume Mixer in Windows 11.
How do I turn off audio enhancements?
Go to Start > Settings > Sound, select your device in the Output section, scroll to Advanced settings, and set Audio enhancements to Off. You can also do the opposite and turn on sound equalization.
Where do I turn off a program’s beeps and alert sounds?
Use the Sounds tab of the classic Sound window, which lists the sounds tied to Windows and program events. For one example, here’s how to stop QuickBooks from beeping every time you enter an invoice.
Next Step
Open the window once with mmsys.cpl so you know what it looks like, then check that the device with the default mark on the Playback tab is the one you actually listen through.

Matthew Burleigh is the founder, head writer, and editor of Solve Your Tech, which he launched in 2012. He has written technology tutorials since 2008 and worked in IT since 2003, including small-business support, IT management, and consulting. He holds Bachelor’s and Master’s degrees in Computer Science from Arizona State University.
Matthew writes practical guides for Windows, iPhone and iPad, Microsoft Office, Outlook, Google apps, and Android. Solve Your Tech’s guides are checked step by step against the device or app maker’s own documentation and tested on his own devices whenever he has the hardware or software, with clear steps, sources, and update dates.
Read more about Matthew and how Solve Your Tech writes and updates its guides, or report a correction.