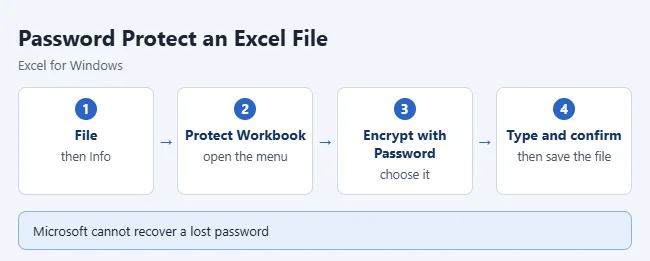
To password protect an Excel file in Windows, click File > Info > Protect Workbook > Encrypt with Password, type a password, click OK, type it again, and click OK. On a Mac, click File > Passwords and fill in the Password to open box. Save the file, and Excel asks for the password every time someone opens it. This guide covers Excel for Microsoft 365, Excel 2024, 2021, 2019 and 2016 on Windows, Excel for Mac, and what Excel for the web can and cannot do.
The steps come from Microsoft’s Protect an Excel file article and its Protection and security in Excel overview.
Read This First: A Lost Password Cannot Be Recovered
Warning: If you forget the password to an encrypted workbook, you lose the workbook. Microsoft states plainly that it cannot retrieve a forgotten password for you. There is no reset link, no security question and no support call that gets the file back.
Do these three things before you add a password:
- Store the password first. Put it in a password manager or write it down and keep it somewhere secure before you type it into Excel.
- Check your capitals. Excel passwords are case-sensitive, so “Budget” and “budget” are different passwords. Make sure Caps Lock is off.
- Decide whether you need a backup. If the file matters, keep an unprotected copy in a place only you can reach, such as an encrypted drive.
Microsoft sets no rules for length or character types, so the strength of the password is up to you.
Which Kind of Excel Protection Do You Need?
Excel has four separate password features. They sound alike, but they do very different jobs. Only the first one keeps people out of the file.
| Feature | What it does | What it does not do |
|---|---|---|
| Encrypt with Password (password to open) | Encrypts the file. Nobody can open it without the password. | It does not limit what someone can do after they open it. |
| Password to modify | Anyone can open the file read-only. Only people with the password can save changes to it. | It does not hide the contents. |
| Protect Workbook (structure) | Stops people from adding, moving, deleting, hiding and renaming worksheets. | It does not stop anyone from opening the file or editing cells. |
| Protect Sheet | Stops people from changing locked cells on one worksheet. | Microsoft says it is not intended as a security feature. Everything on the sheet can still be read. |
You can combine them. A common setup is a password to open the file plus a protected sheet, so the few people who can get in still cannot overwrite your formulas.
What You Need
- The Excel desktop app for Windows or Mac. You cannot add a file password in a browser.
- The workbook open, with permission to save changes to it.
- A password you have already stored somewhere safe.
How to Password Protect an Excel File in Windows
These steps apply to Excel for Microsoft 365, Excel 2024, 2021, 2019 and 2016.
- Open the workbook and click File at the top left.
- Click Info in the left column.
- Click the Protect Workbook box. A menu of protection options opens.
- Choose Encrypt with Password.
- Type a password in the Password box and click OK.
- Type the same password in the Reenter Password box and click OK.
- Save the file. The password is not applied to the saved copy until you do.
How to Password Protect an Excel File on a Mac
These steps apply to Excel for Microsoft 365 for Mac, Excel 2024 for Mac and Excel 2021 for Mac. Excel for Mac puts the file password in the File menu at the top of the screen.
- Open the workbook in Excel.
- Click File in the menu bar at the top of the screen.
- Click Passwords.
- Type a password in the Password to open box.
- Click OK. If Excel asks you to enter the password again, type it once more and confirm.
- Save the file.

The same window has a Password to modify box. Fill that one in instead if you want people to be able to view the file but need a password to edit it.
How to Check That the Password Works
- Save and close the workbook.
- Open it again. Excel should show a password prompt before any data appears.
- Type the password. The workbook opens normally.
If the file opens with no prompt, the password was not saved. Repeat the steps and save again. Test the password yourself before you delete any unprotected copy.
How to Set a Password to Modify Instead
Use this when people should be able to read the workbook but not change your copy. It is a second, separate password, and it does not encrypt the file.
In Excel for Windows:
- Click File > Save As, then pick a location or click Browse so the Save As window opens.
- Click Tools next to the Save button and choose General Options.
- Type a password in the Password to modify box. You can also check Read-only recommended.
- Click OK, reenter the password to confirm it, and click OK.
- Click Save.
The next time someone opens the file, Excel asks for the password and offers a Read Only button. People without the password can still view the data, and they can save their own copy under a different name. The General Options window also has a Password to open box, so you can set both passwords in one place.
In Excel for Mac, click File > Passwords and type a password in the Password to modify box. If you only want the file to open read-only with no password, see how to make an Excel spreadsheet read-only for others.
How to Protect the Workbook Structure
Structure protection locks the set of sheets, not the data in them. Use it to stop sheets from being added, deleted, renamed, moved, hidden or unhidden. The path is the same in Excel for Windows and Excel for Mac, but Excel for Mac asks for the password in a Password box and again in a Verify box in the same window.
- Click the Review tab.
- Click Protect Workbook.
- Type a password. It is optional, but without one anyone can turn the protection off.
- Click OK, reenter the password, and click OK again.
You can tell it worked because the Protect Workbook button on the Review tab stays highlighted, and options such as Insert, Delete, Rename, Move, Copy, Hide and Unhide are unavailable when you right-click a sheet tab. This is the usual reason the Delete option is greyed out when you try to remove a worksheet tab in Excel Online.
How to Protect a Sheet
Sheet protection stops edits to locked cells on a single worksheet. All cells are locked by default, so unlock the ones people should fill in before you turn it on.
- Select the cells that people are allowed to change.
- Right-click the selection, choose Format Cells, open the Protection tab, and clear the Locked check box. Click OK.
- Click the Review tab and click Protect Sheet.
- Check the actions you want to allow, such as sorting or inserting rows.
- Type a password if you want one, click OK, and confirm the password.
In Excel for Mac, the path is the same: Review > Protect Sheet, then type the password in the Password box and again in the Verify box. Remember that a protected sheet is a guard against accidents, not a lock on confidential data.
What Excel for the Web Can and Cannot Do
Excel for the web is the browser version you use through OneDrive, SharePoint or Microsoft 365.
- It cannot add a file password. Microsoft directs you to protect workbooks with passwords in the Excel desktop app. There is no Encrypt with Password command in the browser.
- It cannot change or remove a file password. Open the workbook in the desktop app to do that.
- It can open encrypted workbooks. Microsoft’s current documentation says workbooks encrypted with a password can be viewed and edited in Excel for the web. You still need the password.
- It respects sheet protection. A protected sheet loads in the browser, but locked cells stay locked. Microsoft says to open the workbook in Excel on the desktop to remove that protection.
If your file lives in OneDrive or SharePoint, sharing it with specific people as view-only is often a better fit than a password. That controls who can reach the file at all.
How to Change or Remove the Password
You need the current password for every one of these. Without it, you cannot open the file to reach the setting.
To remove a password to open in Excel for Windows:
- Open the workbook with its current password.
- Click File > Info > Protect Workbook > Encrypt with Password.
- Delete everything in the Password box and click OK.
- Save the file.

To change the password instead, type the new password over the old one in step 3, click OK, reenter it, and save.
To remove or change a password in Excel for Mac:
- Open the workbook with its current password.
- Click File > Passwords.
- Clear the Password to open box, or type a new password in it. Do the same for Password to modify if you set one.
- Click OK and save the file.
For the other kinds of protection:
- Password to modify (Windows): Go back to File > Save As > Tools > General Options, clear or replace the password, click OK, and save over the file.
- Workbook structure: Click Review > Protect Workbook, enter the password, and click OK.
- Sheet: Click Review > Unprotect Sheet and enter the password if one was set. In Windows you can also use File > Info > Protect > Unprotect Sheet.
Troubleshooting
You cannot find Encrypt with Password
Check which app you are in. Excel for the web has no file password command, and Excel for Mac uses File > Passwords instead of the Info screen. In the browser, open the file in the desktop app first.
Excel says the password is incorrect
Turn off Caps Lock and type it again slowly. Passwords are case-sensitive. If you copied the password from somewhere, check that you did not pick up a space at the start or end.
The file opens without asking for a password
You most likely protected the sheet or the workbook structure instead of encrypting the file, or you closed without saving. Use Encrypt with Password in Windows or Password to open on a Mac, then save.
People can still edit a file that has a password
A password to open does not restrict editing once someone is in. Add a protected sheet or a password to modify if you also need to limit changes.
The protection options are greyed out
You may have the file open as read-only, or you may not have edit permission on a shared file. Save your own copy to your computer, open that copy, and try again. On a work or school account, your organization can also control these settings.
Frequently Asked Questions
What if I forget the Excel password?
Microsoft cannot recover it, and the file stays locked. Your only real options are an unprotected backup copy or an earlier version saved before you added the password. This is why you should store the password before you set it.
Does the password protect every sheet?
Yes. A password to open blocks the whole workbook until someone enters it. Once the file is open, every sheet is visible and editable unless you also protect the sheets or the workbook structure.
Is a password-protected Excel file secure?
A password to open encrypts the file, which is real protection against someone who gets hold of it. Microsoft still cautions that it is not always secure to distribute password-protected files that hold sensitive details such as credit card numbers, and that a shared password can end up with the wrong person.
How should I send someone the password?
Send it separately from the file. If you email the workbook, give the password by phone or in person. A password in the same message protects nothing.
Can I password protect an Excel file in a browser?
No. Excel for the web cannot add a file password. Microsoft’s instructions for encrypting a workbook cover the Windows and Mac desktop apps, so set the password there.
Does the password carry over if I move the file to another app?
Do not count on it. Sheet and workbook protection are Excel features, and other spreadsheet apps handle them their own way. For example, Google has separate tools, which is why there is a different process to remove sheet protection in Google Sheets.
Can I do the same thing in Word?
Word has its own set of password and editing restrictions. See how to edit permissions on a Word document for those.
Next Step
Close the workbook, reopen it, and confirm that the password prompt appears and your password works. Then make sure the password is stored somewhere you will still be able to find a year from now.

Matthew Burleigh is the founder, head writer, and editor of Solve Your Tech, which he launched in 2012. He has written technology tutorials since 2008 and worked in IT since 2003, including small-business support, IT management, and consulting. He holds Bachelor’s and Master’s degrees in Computer Science from Arizona State University.
Matthew writes practical guides for Windows, iPhone and iPad, Microsoft Office, Outlook, Google apps, and Android. Solve Your Tech’s guides are checked step by step against the device or app maker’s own documentation and tested on his own devices whenever he has the hardware or software, with clear steps, sources, and update dates.
Read more about Matthew and how Solve Your Tech writes and updates its guides, or report a correction.