When Windows 11 or 10 asks you to “Enter network credentials,” it wants the user name and password of an account on the other computer, the one sharing the files or printer. It isn’t your Wi-Fi password. If that PC uses a Microsoft account, enter its email address and Microsoft account password, not the PIN.
These steps cover Windows 11 Home, Pro and Education and also match Windows 10, which reached end of support on October 14, 2025. They apply to your own PCs and accounts, or a network whose owner has given you access. Below is what to type, how to find the user name, how to see what Windows has saved, how to find a Wi-Fi password if that is what you need, and how to stop the prompt.
Which Credentials Is Windows Asking For?
Three different things get called “network credentials,” and each lives in a different place.
| What you need | Where it comes from | Where to look |
|---|---|---|
| Sign-in for a shared folder, printer or NAS | An account on the PC or device that shares it | That PC’s account details, or the NAS admin settings |
| Sign-ins Windows already saved | Earlier times you checked Remember my credentials | Credential Manager > Windows Credentials |
| Wi-Fi password | Your router | Windows Wi-Fi settings, the router label, or the network owner |
The “Enter network credentials” box is always the first row. The other two are covered further down.
What to Type in the Credentials Box
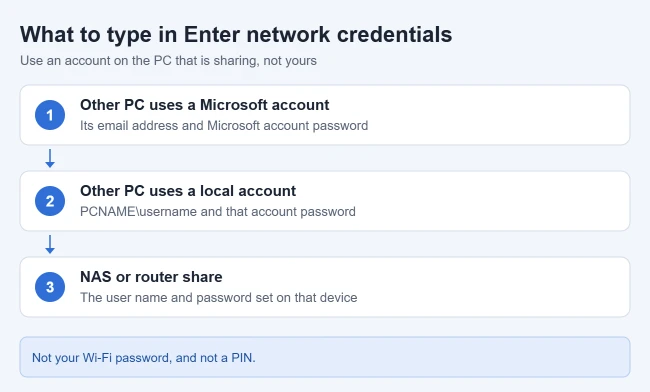
- If the other PC uses a Microsoft account: type the full email address and the Microsoft account password. If that is rejected, try MicrosoftAccount\ followed by the email address, with the same password.
- If the other PC uses a local account: type the computer name and user name, such as OFFICE-PC\jane, and that account’s password.
- If it’s a NAS or router share: use the user name and password set up in that device’s admin settings.
A local account is one that exists only on that PC and signs in with a name instead of an email address. The account you type must exist on the sharing PC and have permission to the shared folder. A correct password can’t open a folder the account isn’t allowed to use.
If a NAS stopped accepting your sign-in after a Windows update, SMB signing is the likely cause. SMB is the protocol Windows uses for file sharing, and signing adds a security check to each connection. Windows 11 version 24H2 Pro, Enterprise and Education require SMB signing for incoming and outgoing connections; Home does not.
Requiring signing also blocks guest access, so you may see a message that your organization’s security policies block unauthenticated guest access. Microsoft’s SMB signing documentation recommends turning on signing on the NAS rather than turning it off in Windows. Sign in with a named account that has access to the shared folder, and ask the NAS owner to enable SMB signing in its settings.
Find the User Name on the Other PC
- Go to the computer that is sharing the folder.
- Right-click Start and select Terminal.
- Type whoami and press Enter.
The result shows the computer name and user name in the format you need, such as office-pc\jane. If the account is a Microsoft account, you can also see its email address in Settings > Accounts > Your info. There are other ways to find your computer username in Windows 11 too.
To confirm the computer name by itself, open Settings > System > About and check Device name. If you’d rather connect by address, find the PC’s IPv4 address using how to find your IP address on Windows 11.
On a work PC, the part before the backslash can be a domain instead; here is how to find the domain name in Windows 11.
What About the Password?
Windows doesn’t have a screen that shows an account’s sign-in password, and Credential Manager doesn’t reveal saved network passwords in plain text. Use the password for the account that has access on the computer or NAS sharing the resource, not a Windows Hello PIN.
If the owner has forgotten it, they should use the account’s normal recovery process:
- Microsoft account: reset it on Microsoft’s password reset page or select I forgot my password on the sign-in screen.
- Local account: type any password at the sign-in screen, select Reset password, and answer the security questions. An administrator on that PC can also set a new one.
If that account has no usable password, ask its owner or administrator for a network account you can use instead of guessing credentials or weakening the connection’s security.
Sharing from an account with a blank password usually won’t work, because Windows blocks network sign-ins to accounts without a password by default.
Save Credentials So Windows Stops Asking
In the prompt
- Type the user name and password.
- Check Remember my credentials.
- Select OK.
Windows stores the credentials in Credential Manager and can reuse them for that computer. It may ask again if the password changes, the saved resource name differs or the server rejects the account.
Add them ahead of time in Credential Manager
- Select Start, type credential manager, and open it.
- Select Windows Credentials.
- Select Add a Windows credential.
- Enter the other PC’s name or IP address, such as OFFICE-PC, plus the user name and password.
- Select OK.
The new entry appears in the Windows Credentials list under the name you typed. Use the same name you use to open the share. Windows treats OFFICE-PC, an IP address such as 192.168.1.20 and a full name such as office-pc.home.lan as separate entries, so a saved credential for one isn’t used for the others.
See Which Network Credentials Windows Has Saved
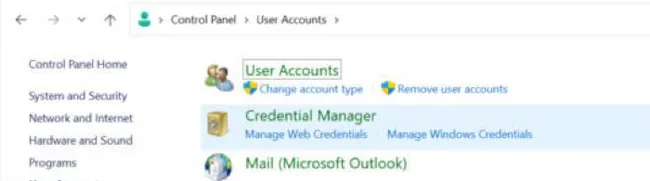
- Open Credential Manager from Start, or go to Control Panel > User Accounts > Credential Manager.
- Select Windows Credentials. Network shares, NAS devices and Remote Desktop sign-ins appear under Windows Credentials.
- Select an entry to expand it. You see the saved address, user name and when it was last changed.
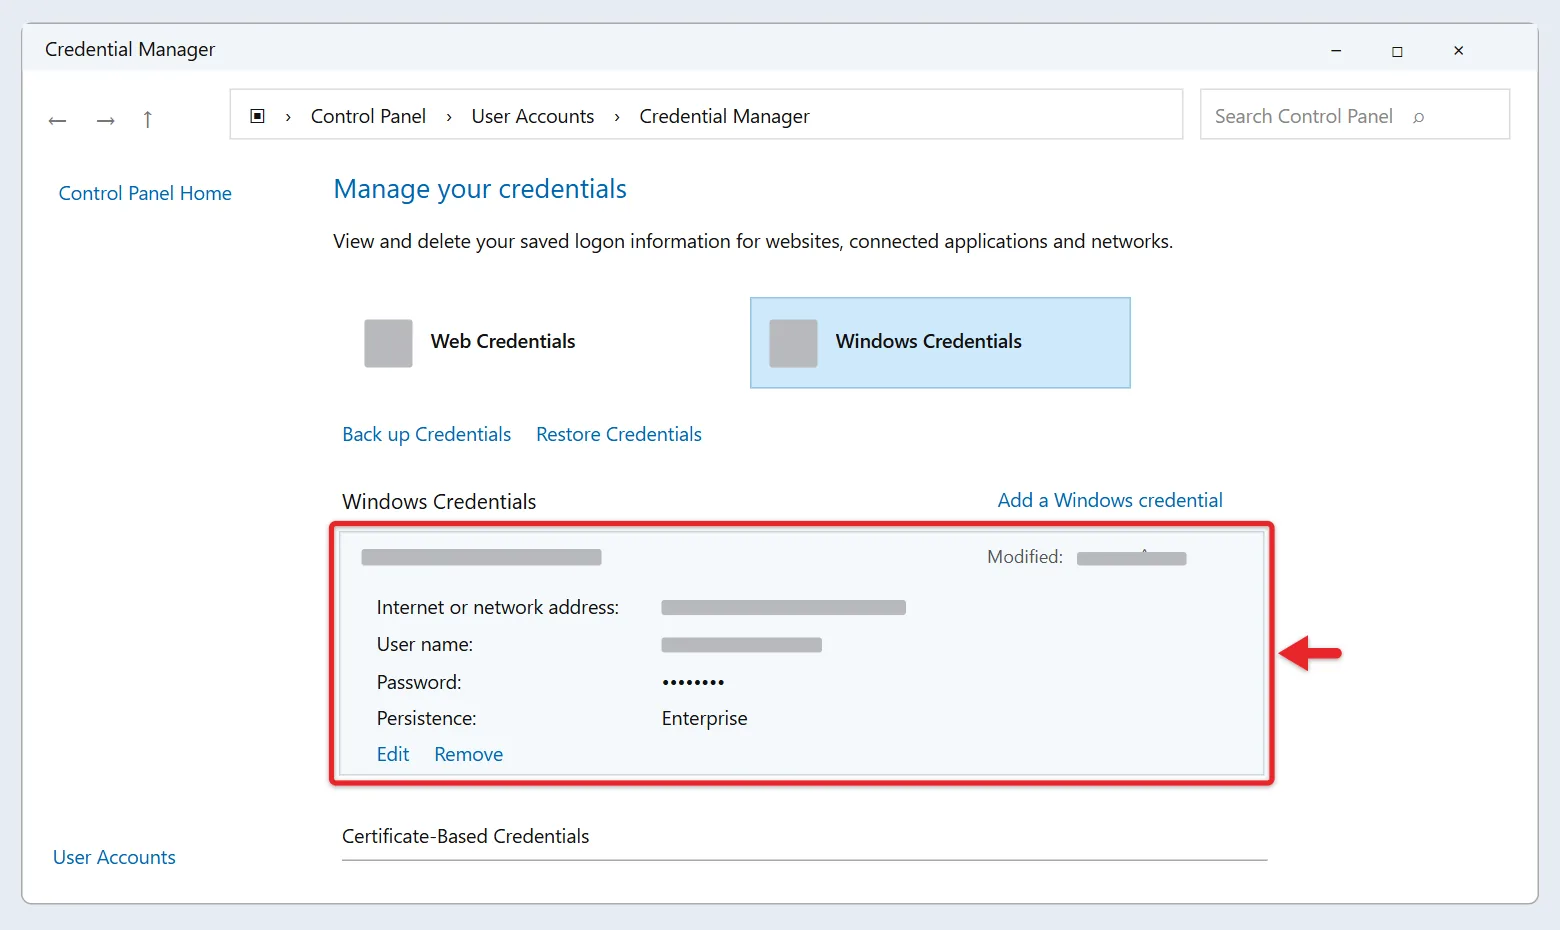
- Select Edit to type a new password, or Remove to delete the entry.
Windows Credentials entries don’t have a Show button, so the password stays hidden. Many Web Credentials entries do have Show, and Windows asks for your PIN or password before it reveals one. Microsoft’s Credential Manager help covers the basics.
You can get the same list from Terminal. Type cmdkey /list and press Enter. It prints each saved target and user name but never the password. Removing an entry deletes only the saved sign-in; the files on the other PC aren’t touched.
Find Your Wi-Fi Password Instead
If what you actually need is the Wi-Fi password, for a phone or a new laptop, you can see it on any Windows PC that has already joined that network.
- Open Settings and select Network & internet.
- Select Properties for the Wi-Fi network you’re connected to.
- Next to Wi-Fi network password, select Show.
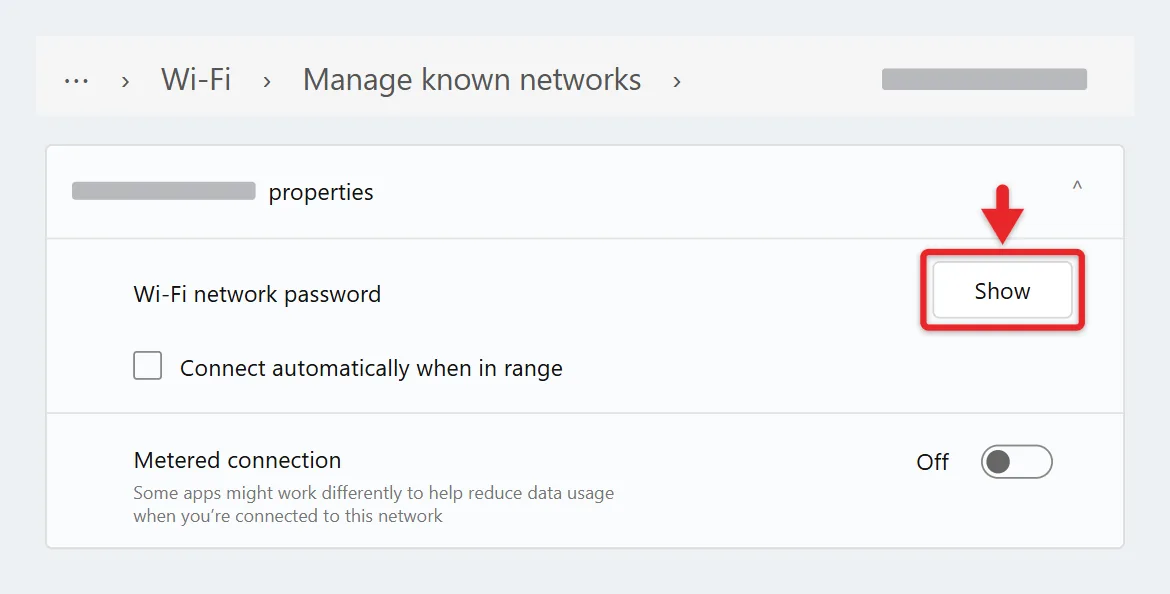
On Windows 11 version 23H2 and earlier, the setting is called View Wi-Fi security key and the button is View. For a network the PC joined before, go to Network & internet > Wi-Fi > Manage known networks, select the network and use the same button. Microsoft lists these paths in its Wi-Fi connection help.
On Windows 10, open Control Panel > Network and Internet > Network and Sharing Center, select your Wi-Fi name next to Connections, choose Wireless Properties, open the Security tab and check Show characters.
If no PC has joined the network yet, check the label on the router for the default password, or ask the person who manages the network. Windows keeps passwords in a few other places, listed in finding saved passwords on Windows 11.
How to Stop the Network Credentials Prompt
Use the correct account on the computer or NAS sharing the folder, then select Remember my credentials in the sign-in prompt and confirm with OK. Alternatively, save the account through Credential Manager > Windows Credentials > Add a Windows credential as described above. Reopen the share to check access.
If you open it by drive letter, check Connect using different credentials when you map the network drive in Windows 11. If the prompt returns after the account password changes, expand its saved entry and update it with the owner’s current credentials.
Keep password-protected sharing enabled. Turning it off does not reliably solve authentication errors, and guest access can be blocked by Windows or incompatible with required SMB signing. Check the share’s permissions and the resource name in the saved entry instead; a work or school administrator may control these settings. Saving credentials removes repeated typing, but does not grant access to folders the account is not allowed to use.
If the Prompt Keeps Rejecting Your Credentials
- Double-check the user name format. Try PCNAME\username for a local account, or the full email address for a Microsoft account.
- Make sure you’re typing the account password, not a PIN.
- Open Credential Manager and remove any old saved entry for that computer, then try again.
- Try the other PC’s IP address instead of its name, for example \\192.168.1.20.
- Set both PCs to a private network. Open Settings > Network & internet, select Wi-Fi or Ethernet, open the connected network and choose Private network.
- Make sure network discovery and file sharing are on for both PCs. Turning on network discovery shows where.
- Restart both computers, then try once more.
Error: multiple connections by the same user
If Windows says multiple connections to a server by the same user, using more than one user name, are not allowed, you already have an open connection to that PC under a different account. Close it before signing in again. In Terminal, type net use to list connections, then net use \\OFFICE-PC\SharedFolder /delete to close the one you no longer want, and reconnect.
Connect from Command Prompt
If the prompt keeps looping, you can sign in to the share directly. Open Terminal and run this, replacing the names with your own. Windows then asks for the password.
net use \\OFFICE-PC\SharedFolder /user:OFFICE-PC\janeWhen you see The command completed successfully, open File Explorer and type the share address in the address bar.
Frequently Asked Questions
Is it my Wi-Fi password?
No. The Wi-Fi password only connects you to the network. Network credentials sign you in to another computer on it.
Can I use my PIN?
No. PINs only work on the PC they were created on. Use the account password.
Why does Windows ask even for a public folder?
Password-protected sharing may be on for the other PC. Its owner can change that in Settings > Network & internet > Advanced network settings > Advanced sharing settings.
Can I view saved network credentials in Windows 11?
Partly. Open Credential Manager > Windows Credentials and expand the entry to see the saved user name. Windows doesn’t show the password for these entries; you can only edit or remove it. For passwords you can view, such as Wi-Fi and browser passwords, see the Wi-Fi section above.
Will removing a saved credential delete my shared files?
No. It only removes the sign-in Windows remembered. The next time you open the share, Windows asks for the user name and password again.
Is anything different on Windows 10?
The credentials box, Credential Manager and the commands work the same way. The Wi-Fi password is easiest to find through Control Panel, as described above. Windows 10 only gets security updates if the PC is enrolled in Extended Security Updates (ESU), so plan a move to Windows 11 where the PC supports it.

Matthew Burleigh is the founder, head writer, and editor of Solve Your Tech, which he launched in 2012. He has written technology tutorials since 2008 and worked in IT since 2003, including small-business support, IT management, and consulting. He holds Bachelor’s and Master’s degrees in Computer Science from Arizona State University.
Matthew writes practical guides for Windows, iPhone and iPad, Microsoft Office, Outlook, Google apps, and Android. Solve Your Tech’s guides are checked step by step against the device or app maker’s own documentation and tested on his own devices whenever he has the hardware or software, with clear steps, sources, and update dates.
Read more about Matthew and how Solve Your Tech writes and updates its guides, or report a correction.