To change the refresh rate in Windows 11, open Settings > System > Display > Advanced display, then pick a new value from the Choose a refresh rate menu and click Keep changes. These steps match current Windows 11 releases, including version 26H2, and the same page works on 24H2 and 25H2. Older 23H2 PCs use the same path with one small difference, covered below.
Refresh rate is how many times per second your screen redraws, in hertz (Hz). Higher rates, such as 144 Hz, look smoother; lower rates use less power. Windows often picks a safe 60 Hz even on monitors that can go higher.
Know Your Monitor’s Maximum Rate
- Know your monitor’s maximum rate. It’s printed on the box, the spec sheet or the maker’s product page (look for 75 Hz, 120 Hz, 144 Hz, 165 Hz, 240 Hz and so on).
- Use the right port. On a desktop with a separate graphics card, plug the monitor into the card’s ports, not the ones on the motherboard near the USB ports.
- Install a real graphics driver. If Device Manager shows only “Microsoft Basic Display Adapter,” Windows can’t offer the full list of rates.
- Nothing to download. The setting is built into Windows 11 and costs nothing to change.
Change the refresh rate in Settings
- Press Windows + I to open Settings. You can also right-click an empty spot on the desktop and choose Display settings, which drops you on step 3.
- Select System in the left column.
- Click Display. You’ll see brightness, scale and resolution options.
- If more than one screen is connected, click the numbered box at the top that matches the monitor you want to change. Click Identify if you aren’t sure which number belongs to which screen.
- Scroll down to Related settings and click Advanced display.
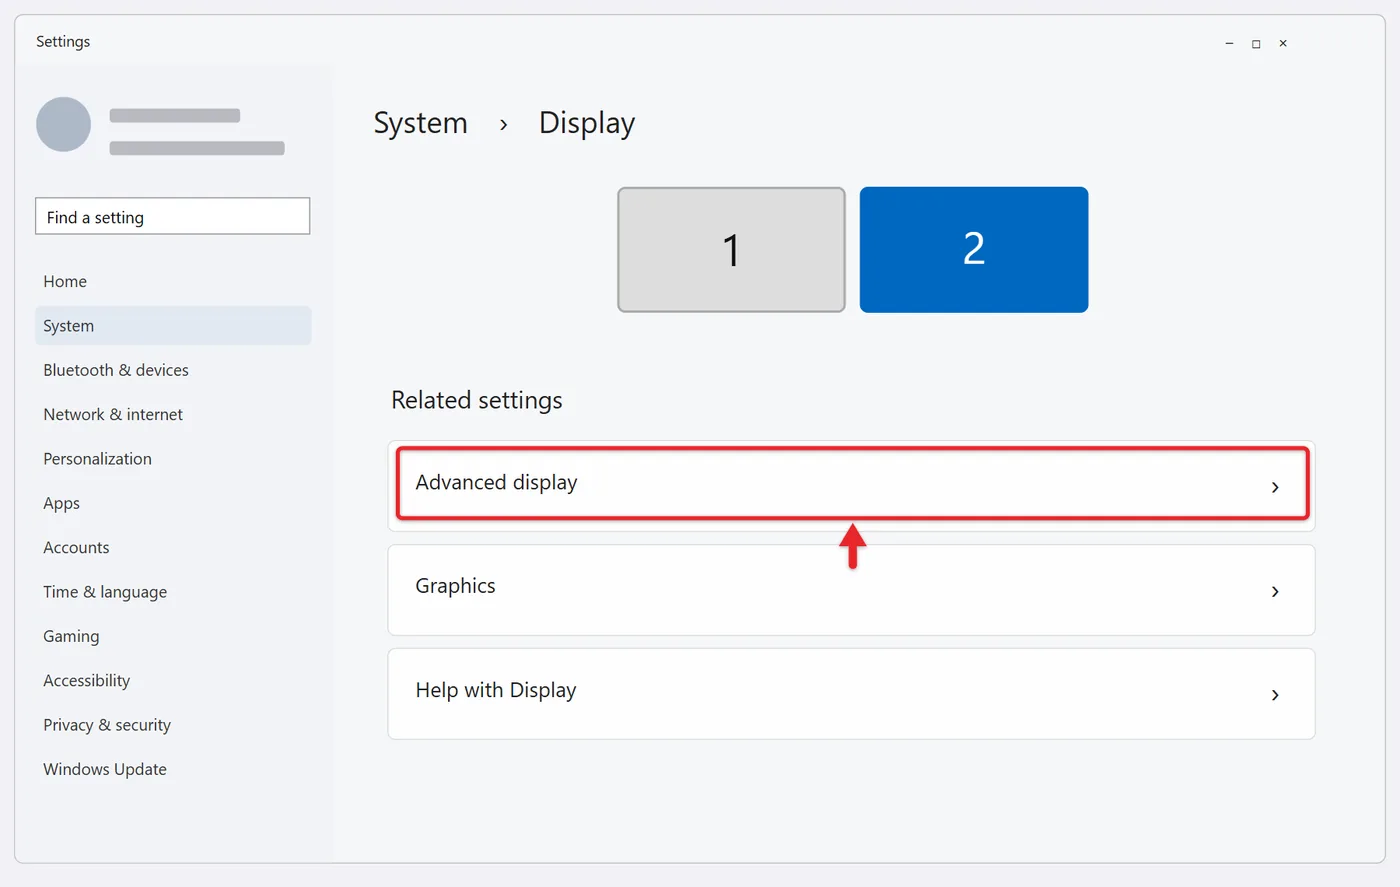
- Check the menu next to Select a display to view or change its settings at the top. It should name the monitor you picked.
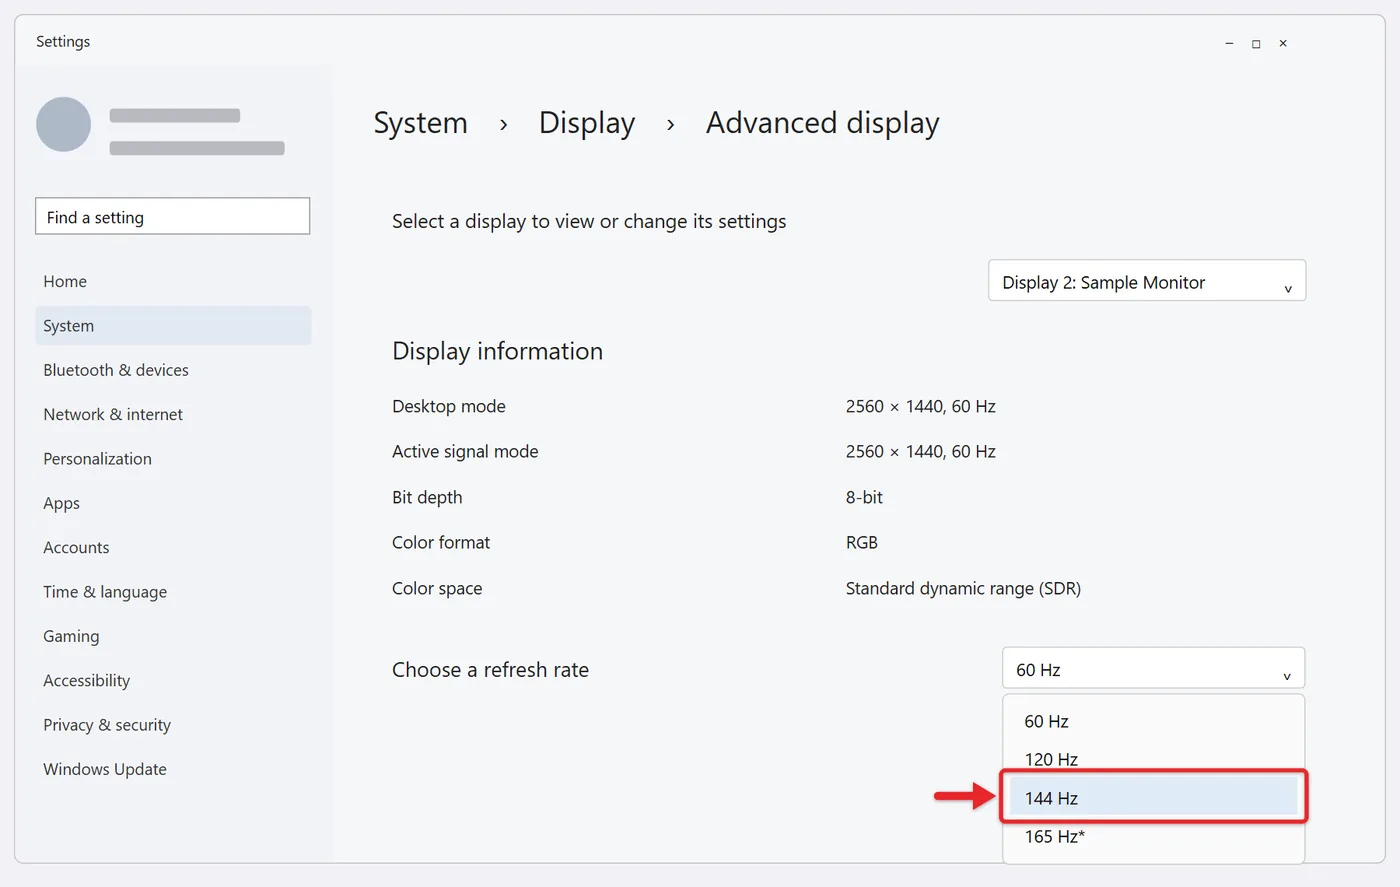
- Open the Choose a refresh rate menu and select the rate you want. The screen may go black for a second or two while it switches.
- A box titled Keep these display settings? appears. If the picture looks normal, click Keep changes. If something looks wrong, click Revert.
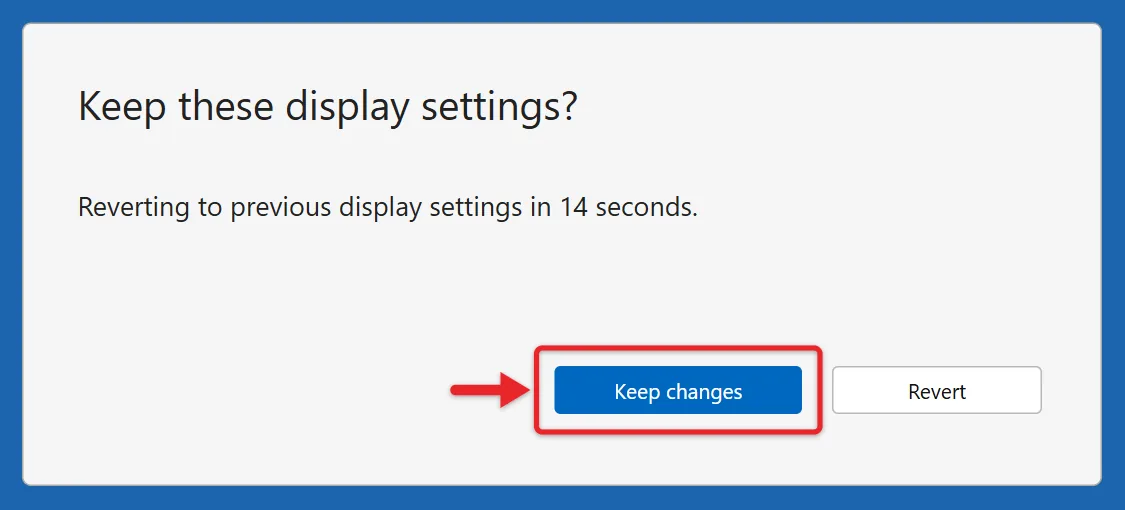
That’s the whole job for most people. If you don’t touch the confirmation box, Windows puts the old rate back after about 15 seconds. That timer is your safety net if the new rate leaves you with a blank screen.
Microsoft notes one detail in the menu that trips people up: a rate with an asterisk (*) next to it doesn’t work at your current resolution. If you pick it, Windows also changes the resolution to make that rate possible. Choose a rate without an asterisk if you want to keep your resolution as it is. Microsoft’s Change the refresh rate on your monitor in Windows page describes the same menu.
Changing more than one monitor
Every screen keeps its own refresh rate. A 144 Hz main monitor and a 60 Hz office monitor side by side is a normal setup, and changing one doesn’t change the other. Repeat the steps for each screen, picking it either from the numbered boxes on the Display page or from the Select a display menu on the Advanced display page. If your second screen isn’t set up yet, start with our guide to setting up multiple monitors on Windows 11.
Moving a window from a fast screen to a slow one makes motion look choppier on the slow one. That’s expected. The window takes on the rate of whichever screen it’s sitting on.
How to check the current refresh rate
Go to Settings > System > Display > Advanced display and look at the Display information section. It lists the selected screen’s current resolution, its refresh rate, and whether it supports variable refresh rate (VRR). Write the number down before you change anything so you can go back to it. If a frame-rate overlay is covering your screen, here is how to turn off the FPS counter in Windows 11.
Most gaming monitors can also show the rate they’re receiving in their own on-screen menu (the buttons on the monitor itself). If Windows and the monitor disagree, trust the monitor, since it reports what’s actually coming through the cable.
Turn Dynamic refresh rate on or off
Dynamic refresh rate (DRR) lets Windows raise and lower the rate by itself. It goes high when you scroll or write with a pen and drops lower when the screen is mostly still, such as when you’re reading a page. The idea is to get smooth motion when it’s noticeable without paying the battery cost all the time.
- Open Settings > System > Display > Advanced display.
- Find the Dynamic refresh rate toggle near the refresh rate menu.
- Turn it on, or off if you want one fixed rate.
On Windows 11 version 23H2 and earlier there’s no separate toggle. Instead, the Choose a refresh rate menu itself includes an entry with “Dynamic” in its name.
If you see neither, your hardware doesn’t qualify. Microsoft lists these requirements:
- A display that supports variable refresh rate (VRR).
- A refresh rate of at least 120 Hz.
- A graphics driver that supports DRR (Microsoft’s DirectX team described this as a WDDM 3.0 driver when the feature launched).
In practice, that means DRR mostly shows up on newer laptops with fast built-in screens. Microsoft also warns that DRR can cap the maximum rate in games that weren’t built for VRR. If a favorite game suddenly seems to run slower after you turn DRR on, turning it off is the recommended fix.
Use display adapter properties and List All Modes
The older adapter properties window still exists in Windows 11. It’s useful when the Settings menu looks odd or you want to see every mode the driver reports.
- Open Settings > System > Display > Advanced display and select the right screen at the top.
- Click Display adapter properties for Display 1 (the number matches the screen you picked).
- Open the Monitor tab and choose a rate from Screen refresh rate, then click Apply.
- To see every mode at once, open the Adapter tab and click List All Modes. Each entry combines a resolution, color depth and refresh rate, such as “2560 by 1440, True Color (32 bit), 144 Hertz.”
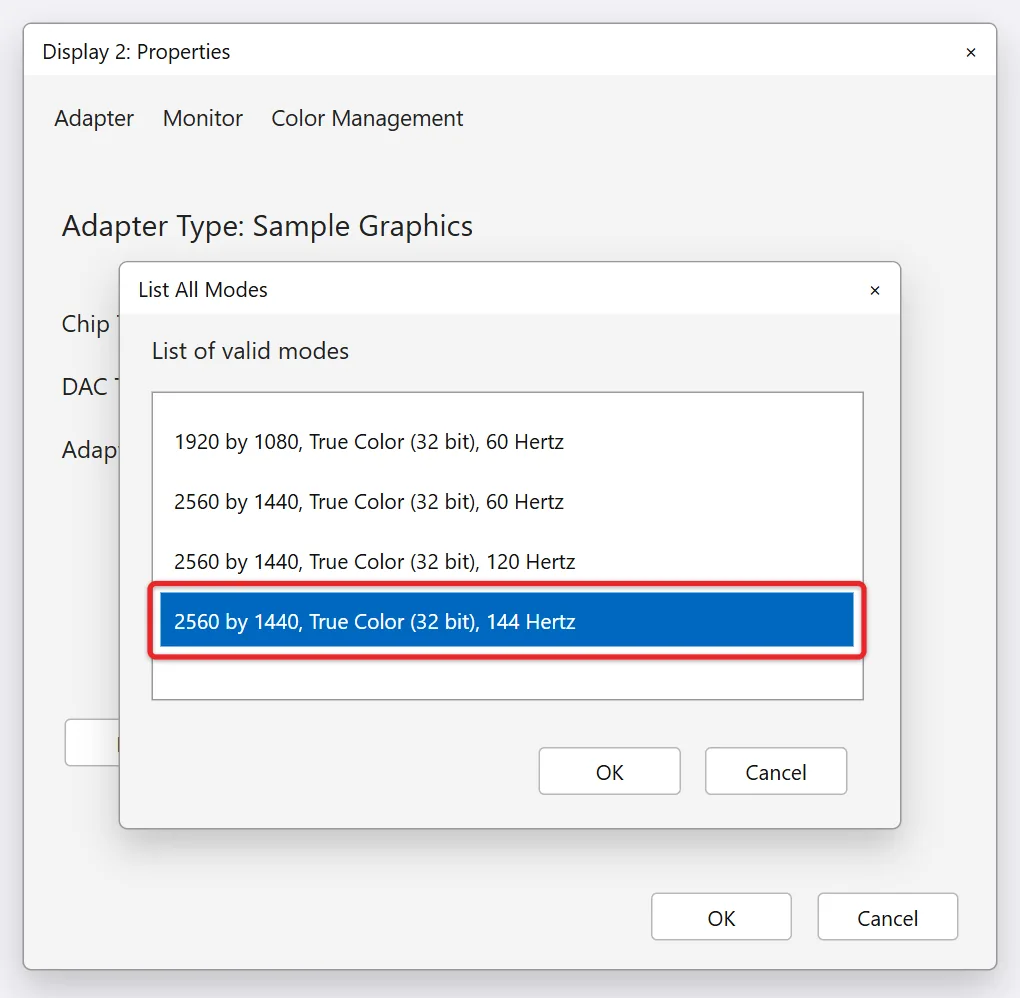
- Pick a mode, click OK, then Apply, and confirm with Keep changes.
List All Modes is a quick way to answer “does my PC even know about 144 Hz at this resolution?” If the rate isn’t in that list, the problem is the cable, port, driver or monitor setting, not the Settings app. Leave Hide modes that this monitor cannot display checked on the Monitor tab. Unchecking it lets you pick modes the screen can’t show, which is a fast route to a black screen.
Change it in the NVIDIA, AMD or Intel app
You don’t need your graphics maker’s software for this, but it works too, and some gamers prefer it.
- NVIDIA Control Panel: expand Display, click Change resolution, pick the screen, and choose a value from the Refresh rate list. NVIDIA’s refresh rate help page notes that with VRR turned on for a VRR-capable screen, the rate is set to the highest value automatically.
- AMD Software: Adrenalin Edition: the normal rate list comes from Windows, so use Settings. AMD’s app adds custom resolution profiles for advanced users. Stick to the values your monitor’s maker supports.
- Intel: on laptops with 10th Gen or newer Intel processors and a built-in screen, Intel Graphics Command Center has a Dynamic Refresh Rate Switching option under System > Power. For a fixed rate, use Windows Settings.
Why the rate you want isn’t in the list
The Settings menu only shows rates that your monitor, cable, port and driver all agree on at the current resolution. You can’t add a missing one from inside Settings. Work through these causes in order, since the first two explain most “stuck at 60 Hz” monitors.
The cable or port can’t carry it
Higher rates and higher resolutions both need more bandwidth, and older connections run out. As a rough guide:
| Connection | What it typically handles |
|---|---|
| HDMI 1.4 | 4K at 30 Hz, 1080p at up to about 120 Hz on many monitors |
| HDMI 2.0 | 4K at 60 Hz, 1440p at about 144 Hz |
| HDMI 2.1 | 4K at 120 Hz or higher |
| DisplayPort 1.2 / 1.4 | 1440p at 144 Hz and up; 4K at 60 Hz (1.2) or 120 Hz and up (1.4) |
| USB-C / Thunderbolt | Depends on the port; it must support DisplayPort video |
Exact limits vary by monitor, color settings and compression, so check the monitor’s manual for what each of its inputs supports. Many high refresh monitors only reach their top rate over DisplayPort, or over one specific HDMI input. Cheap adapters (DisplayPort to HDMI, USB-C hubs and docks) often cap the signal lower than either end could handle. Our guide to using HDMI on a Windows 11 PC covers picking the right input.
The resolution is set too high (or wrong)
A monitor may reach its top rate only at its native resolution, or only at a lower one over a limited cable. Set the screen to its recommended resolution first, then reopen Advanced display and check the list again. Here’s how to change the screen resolution if it’s not on the recommended value.
The graphics driver is missing or old
A basic or outdated driver often limits the list to 60 Hz. Install the current driver from NVIDIA, AMD or Intel, restart, and check again. Our guide on how to update your graphics driver in Windows 11 walks through each option. If the list shrank right after a driver update, rolling back to the previous driver is worth trying.
The monitor itself is limiting it
Some monitors have settings in their own menu that control the top rate, such as a DisplayPort version setting or a high refresh mode. Check the monitor’s manual. Also unplug and reconnect the cable with the PC on, which makes Windows read the monitor’s capabilities again.
Refresh rate and laptop battery life
Microsoft notes that lowering the refresh rate can save battery because the display uses less energy. On a laptop with a 120 Hz or 144 Hz screen, a sensible pattern is:
- On battery and traveling: drop to 60 Hz, or turn on Dynamic refresh rate if your laptop offers it.
- Plugged in: go back to the highest rate for smooth scrolling and games.
DRR is usually the easier choice because you don’t have to remember to switch. On a desktop, battery isn’t a factor, so a fixed high rate is simplest. For more ways to stretch a charge, see how to extend battery life in Windows 11.
Troubleshooting after a change
The screen went black
Don’t press anything. Wait about 15 seconds and Windows will revert to the previous rate on its own, because you never clicked Keep changes. If the screen stays black after that (for example, a forced rate from another tool), try these in order:
- Press Windows + Ctrl + Shift + B to restart the graphics driver.
- Connect the PC to a different screen or input that works, then set a lower rate from Advanced display.
- Boot into Startup Settings and choose Enable low-resolution video (press 3 or F3). Microsoft says this starts Windows at a low resolution and refresh rate so you can reset your display settings. You reach it from Troubleshoot > Advanced options > Startup Settings > Restart in the recovery environment.
The screen flickers or shows lines
Step down one rate (for example from 165 Hz to 144 Hz) and see if it stops. Flicker at a rate the monitor claims to support usually points to the cable or an adapter, so try a shorter, certified cable or a direct connection. If the flicker continues at every rate, our guide on how to fix screen flickering on Windows 11 covers driver and app causes.
The menu is grayed out or has only one choice
This almost always means a driver problem or a connection that only reports one mode, such as some docks, TVs, wireless displays and remote desktop sessions. Update the driver, connect directly without a dock, and check again.
Questions people ask about refresh rate
Is refresh rate the same as FPS?
No. FPS (frames per second) is how many images your PC or game produces. Refresh rate is how many times the monitor can show a new image. A game running at 144 FPS on a 60 Hz screen still only shows 60 updates a second, so you need both numbers to be high to see the benefit.
Do I need to change it for gaming?
Set the monitor to its highest supported rate once, and you’re usually done. Microsoft points out that if your display supports VRR, many popular games use it automatically to match the rate to the game, so fine-tuning per game isn’t necessary.
Can a higher refresh rate damage my monitor?
Rates that Windows lists in the menu are ones the monitor reports it can handle. Problems come from forcing rates the screen doesn’t advertise with custom resolution tools or monitor overclocking. If you only use the listed values, the worst case is usually a blank screen that reverts on its own.
Why did my refresh rate go back to 60 Hz?
Common triggers are a driver update, switching cables or ports, connecting through a dock, or changing the resolution. Windows treats a new connection as a new setup and may pick a safe default. Recheck Advanced display after any of those changes.
Can I open Advanced display directly?
Not quite. Press Windows + R, type ms-settings:display, and press Enter to jump to the Display page, then click Advanced display. Microsoft’s documentation says Windows 11 has no separate shortcut address for the Advanced display page itself.
Once your monitor is running at the right rate, it’s a good time to check the rest of the picture too. Our guide to changing or resetting display settings in Windows 11 covers scale, orientation and HDR in the same Settings area.

Matthew Burleigh is the founder, head writer, and editor of Solve Your Tech, which he launched in 2012. He has written technology tutorials since 2008 and worked in IT since 2003, including small-business support, IT management, and consulting. He holds Bachelor’s and Master’s degrees in Computer Science from Arizona State University.
Matthew writes practical guides for Windows, iPhone and iPad, Microsoft Office, Outlook, Google apps, and Android. Solve Your Tech’s guides are checked step by step against the device or app maker’s own documentation and tested on his own devices whenever he has the hardware or software, with clear steps, sources, and update dates.
Read more about Matthew and how Solve Your Tech writes and updates its guides, or report a correction.