To use Check In, open a conversation in Messages, tap the plus (+) button, tap More, tap Check In, then tap Edit. Choose When I Arrive or After a Timer, set the details, tap Done, and send it. Your friend is told automatically when you get there, and only sees your location if something goes wrong and you don’t respond. Check In needs iOS 17 or later on both iPhones, and these steps match iOS 27.
If you arrive or end it yourself, your friend gets a quick notice. If your phone stops making progress or runs past the timer, your friend gets the details you chose to share.
iOS 17 on Both iPhones
- iOS 17 or later on both iPhones. You and the person you send it to both need it. Check under Settings > General > Software Update.
- iMessage turned on for both of you. Check In travels over iMessage, so it only works in a blue-bubble conversation. If you see green bubbles, see how to turn on iMessage on iPhone.
- Your own Apple Account with two-factor authentication. Apple’s Check In privacy notice says both people must be signed in with their own Apple Account and have two-factor authentication turned on.
- Location access. A When I Arrive Check In tracks your progress, so leave Location Services on. If your iPhone asks whether Messages can use your location, allow it.
- A connection. Cellular data matters most on the road, since your phone has to report progress while you travel.
Apple also notes that location sharing isn’t supported in South Korea and may be unavailable in other regions because of local laws.
How to start a Check In on iPhone
- Open the Messages app.
- Open the conversation with the person you want to check in with, or tap the compose button and add them as a recipient.
- Tap the plus (+) button to the left of the text field, tap More, then tap Check In. A Check In card appears in the text field.
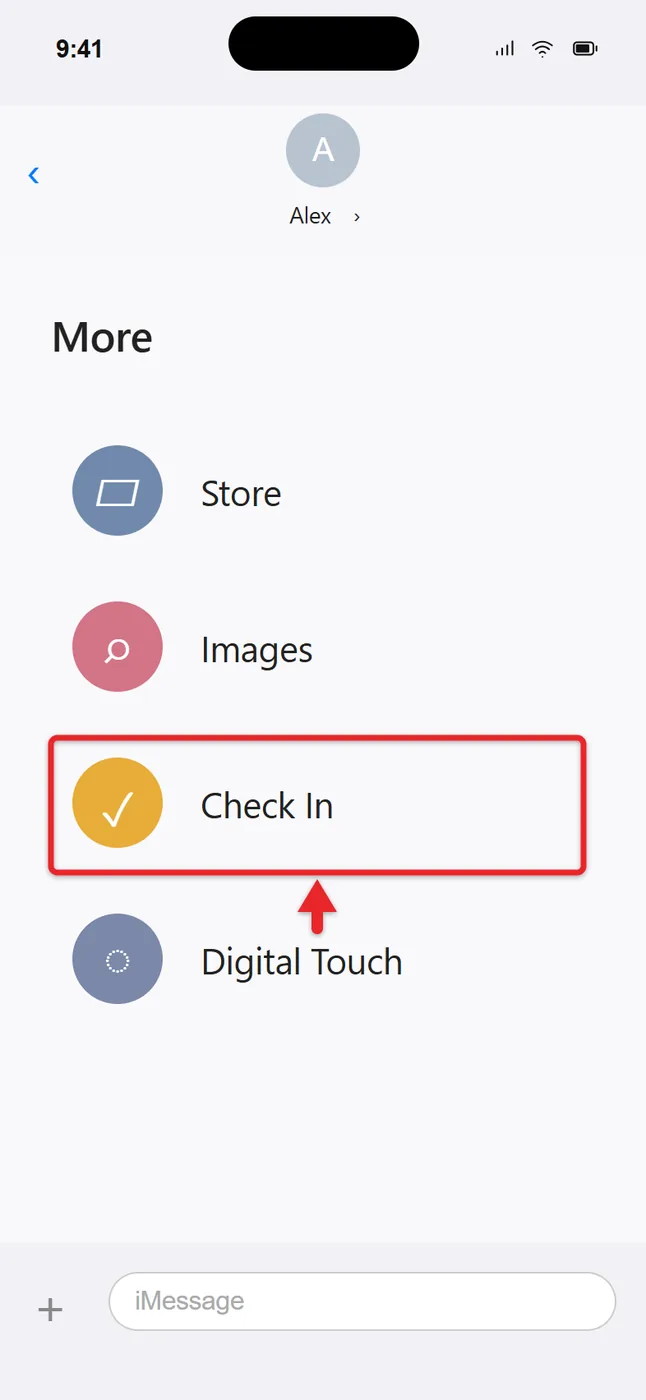
- The first time, you’ll see a few screens that explain the feature. Tap Continue through them, choose Limited or Full when asked what to share (explained below), then tap Send a Check In or Continue to reach the card.
- Tap Edit on the card.
- Pick When I Arrive or After a Timer at the top and fill in the details (see the next two sections).
- Tap Done, then tap the blue Send arrow.
The Check In now sits in the conversation like any other message. Your Lock Screen shows Check In: Unlock to view details while it runs. Unlocking and tapping it shows your destination or time remaining, who you’re checking in with, and whether Limited or Full data will be shared.
When I Arrive: for a trip to a place
Use this when you’re heading somewhere specific, like home from a late shift or to a friend’s apartment across town. Check In often suggests your Home address, so check it before you send.
- On the Edit screen, select When I Arrive.
- Tap Change and search for your destination.
- Tap Small, Medium, or Large to set the arrival area. Your friend gets the arrival notice once your iPhone enters that circle. A larger area suits a big place like a campus or a park.
- Choose Driving, Transit, or Walking. This sets the estimated arrival time, which updates for traffic and driving conditions.
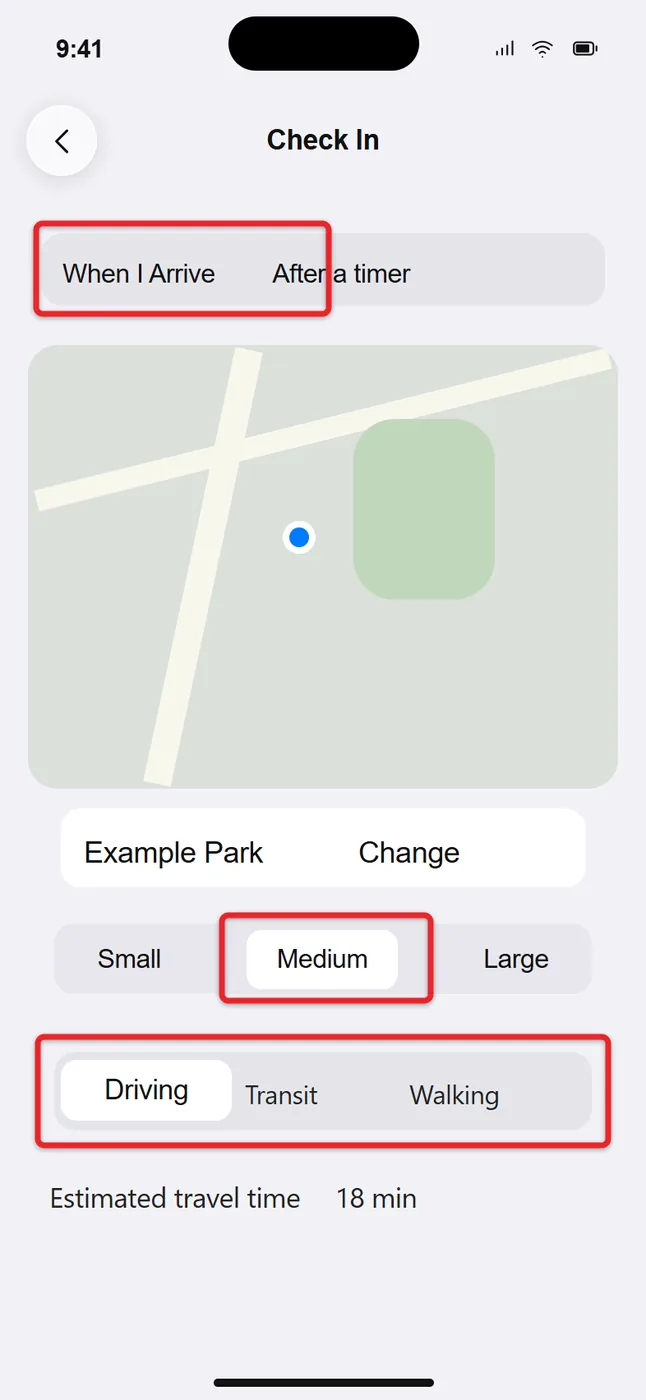
- Tap Add Time if you plan to stop along the way, then tap Done.
When your iPhone reaches the destination, the Check In ends by itself and your friend is told you arrived. You don’t need to touch anything.
After a Timer: for a block of time
Use a timer when there’s no destination to reach, such as a first date, meeting a stranger to buy something, or a solo hike that ends where it started. Apple’s Personal Safety guide suggests it any time you don’t feel safe where you are and want a trusted contact on standby.
- On the Edit screen, select After a Timer.
- Set how long the Check In should run.
- Tap Done and send it.
When the time is up, your iPhone asks you to end the Check In or add time. Ending it tells your friend you finished safely. A timer Check In shares no destination; your friend only sees when the timer started and when it ends.
Nothing beyond the basics is shared while things go to plan. This choice only controls what your friend can see if the Check In doesn’t finish as expected.
| Level | What your friend can see | Good fit for |
|---|---|---|
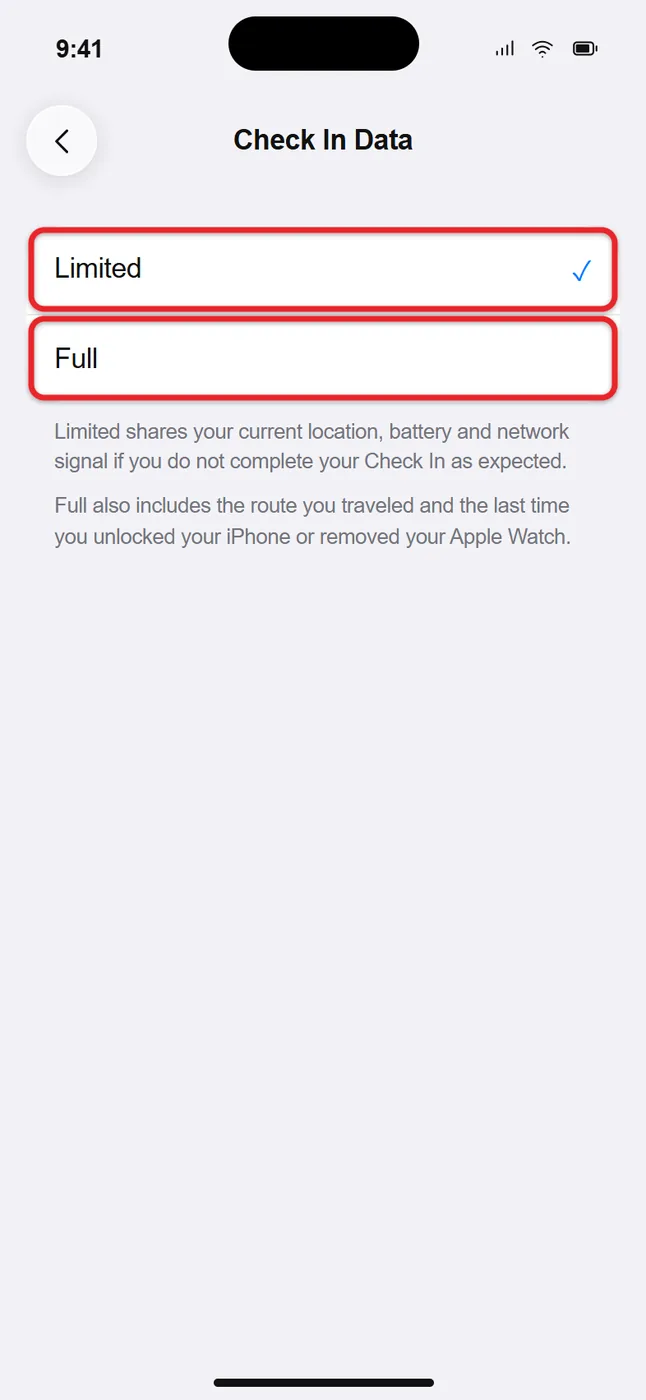
| Limited | Your current location, plus battery level and network signal for your iPhone and Apple Watch | Most everyday trips |
| Full | Everything in Limited, plus the route you traveled, where your iPhone was last unlocked, and where your Apple Watch was last removed | Long drives, hikes, or anywhere a last known path would help someone find you |
You pick a level the first time, and it becomes the default for every Check In after that. To change it:
- Open Settings, tap Apps, then tap Messages. On iOS 17, tap Messages in the main Settings list.
- Scroll down and tap Check In Data (just Data under a Check In heading on some versions).
- Choose Limited or Full.
What happens if you don’t arrive or respond
Check In doesn’t alert your friend the moment you’re late. It asks you first. Apple’s Personal Safety guide lists the cases where your friend is automatically sent a link to your shared details:
- Your iPhone doesn’t arrive at the destination.
- You’re badly delayed and don’t respond to the prompt to add time. When your iPhone stops making progress, you get a prompt and have 15 minutes to answer.
- Your timer ends and you don’t respond to the prompt.
- You place an Emergency SOS call and don’t respond to the follow-up Check In prompt. Apple’s privacy notice adds Crash Detection and Fall Detection events to this list.
Two cases surprise people. If your phone loses service or powers off, your friend may get an early or late notice and the option to view your details. And if your phone is lost during a Check In, your friend gets notices as if you weren’t responding. Your devices keep updating your friend for up to 24 hours after the event.
If a false alarm goes out, end the Check In and send your friend a quick message or call so they know you’re fine.
Add time or cancel a Check In
Running late but okay? Add time instead of letting the prompt expire.
- Open Messages and the conversation with the Check In.
- Tap Details on the Check In message.
- Tap Add Time and pick an option. At the end of a timer, the prompt offers 15, 30, or 60 more minutes.
Your friend receives the new end time. To stop a Check In early, for example because plans changed:
- Open the conversation in Messages.
- Tap Details on the Check In message.
- Tap Cancel Check In, then confirm.
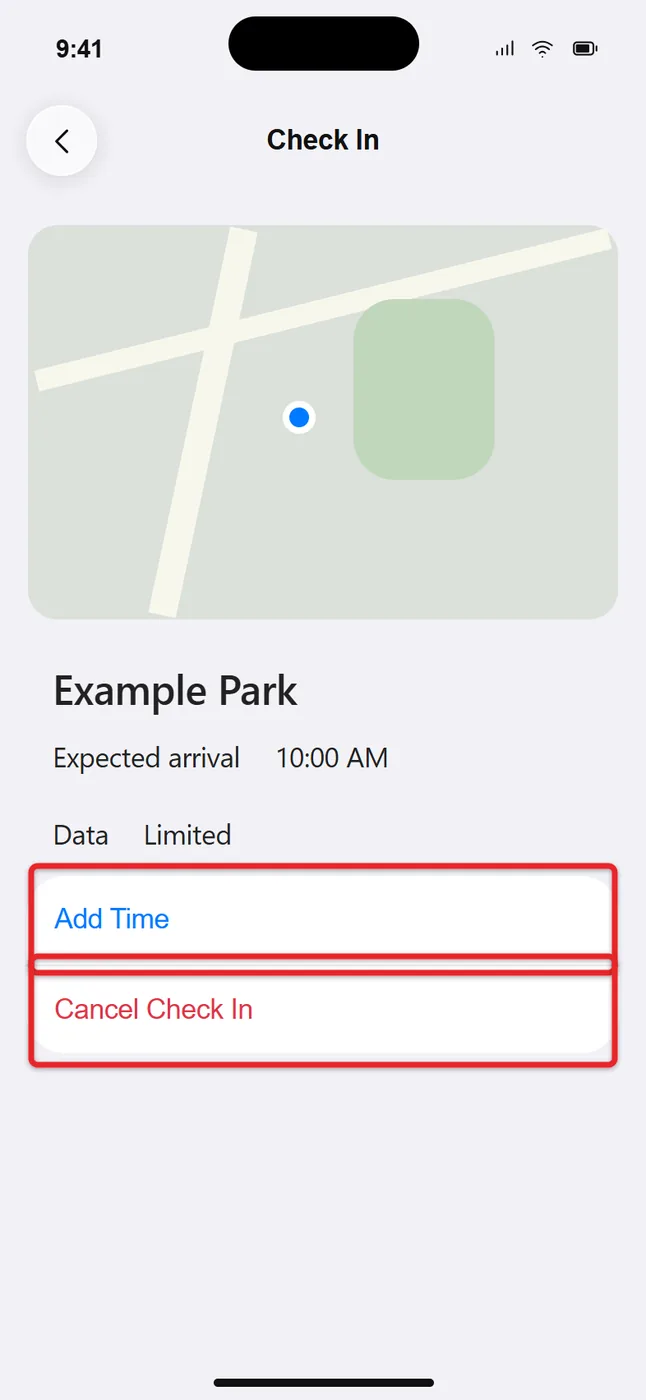
Your friend is told the session ended, and the Check In information is deleted. Both actions need an unlocked iPhone, so someone holding your locked phone can’t quietly cancel it.
What your friend sees
When you send a When I Arrive Check In, your friend sees your destination and approximate arrival time. For a timer, they see when it started and when it ends. Either way, they’re told what to expect if you don’t respond. The first time someone receives a Check In, their iPhone may ask to allow critical alerts, which can come through even when Silent mode or a Focus is on. Allowing them is worth it for a safety feature.
If you arrive, they get an arrival notice. If not, they get a message with a link to view the details you chose: your location, battery, cellular signal, and, with Full, your route. Apple says the downloaded information stays on both devices for up to seven days. To view it, they tap Details on the Check In in the conversation.
Want someone to follow you in real time instead? That’s Live Location, not Check In. See how to share your location on an iPhone through Find My or Messages.
Check In from an Apple Watch
Apple’s Apple Watch User Guide documents Check In on watchOS 11 or later. The watch has to be near its paired iPhone or connected to Wi-Fi or cellular. The recipient can use an iPhone with iOS 17 or later or an Apple Watch with watchOS 11 or later.
- From Messages: open Messages on the watch, start or pick a conversation, tap the plus (+) button, tap Check In, then tap Edit and choose When I Arrive or After a Timer. Tap Send.
- From a workout: open the Workout app, start a workout, swipe right, and tap Check In. Your friend is notified when the workout ends.
- Add time or cancel: open the Smart Stack from the watch face (turn the Digital Crown or swipe up), tap the Check In widget, scroll down, and tap Add Time or Cancel Check In.
The Limited or Full setting is managed on your iPhone. The watch steps are in Apple’s Use Check In on Apple Watch guide.
Is Check In private?
Yes. Apple’s Check In and Privacy notice says anything shared from a Check In session is end-to-end encrypted because it goes through iMessage. Apple can’t read your location or route. It keeps only limited data, such as whether you’re in an active session and what kind, for the length of the session plus 24 hours.
Your friend gets your destination and arrival time as soon as you start a When I Arrive Check In. Send it only to someone you trust with that information.
If Check In is missing or isn’t working
- No Check In in the plus menu. Tap More or swipe up on the app list, since Check In is often below the first few options. If it’s still missing, update to iOS 17 or later.
- It’s grayed out or won’t send. The conversation is probably SMS, MMS, or RCS (green bubbles), or the other person is on an older iOS version. Check In only works over iMessage, so ask them to update and turn on iMessage.
- You’re in a group conversation. Apple’s steps describe sending a Check In to one friend. If it isn’t offered in a group chat, open a one-on-one conversation with the person you want watching out for you.
- Arrival wasn’t detected. Make sure Location Services is on under Settings > Privacy & Security > Location Services. Our guide to iPhone Location Services settings shows where to check. A larger arrival area also helps for big destinations.
- Your friend got an early or late alert. A dead battery, Airplane Mode, or a no-signal stretch can trigger it. Charge before long trips, and end the Check In and message your friend if it was a false alarm.
- Your friend didn’t hear the alert. They should allow critical alerts for Check In when prompted, and check that notifications for Messages are on in Settings > Notifications > Messages.
Apple’s Use Check In on iPhone guide and its Personal Safety guide to Check In cover the same steps if you want the official wording.
For emergencies, it also helps to set up Medical ID on your iPhone so first responders can see your health details.
Common Check In questions
Can I send a Check In to someone with an Android phone?
No. Check In runs over iMessage, which Android phones don’t use, so the recipient needs an iPhone with iOS 17 or later or an Apple Watch with watchOS 11 or later.
Does my friend see my location the whole time?
No. During a normal Check In they see only the destination and ETA, or the timer’s start and end. Your location, battery, and signal details are sent only if the Check In doesn’t finish as expected.
Does Check In call 911?
No. It only notifies the friend you chose. Calling emergency services is a separate feature; our guide to Emergency SOS settings on iPhone explains how those shortcuts work. If you use Emergency SOS during a Check In and then don’t respond, your Check In contact is alerted too.
Can I end a Check In from the Lock Screen?
You can tap the Lock Screen notice, but you have to unlock your iPhone before you can cancel or add time. That’s deliberate, so a stranger can’t end it for you.
Before your next late drive home, try a short 15-minute timer Check In with a family member so you both know what the prompts and alerts look like.

Matthew Burleigh is the founder, head writer, and editor of Solve Your Tech, which he launched in 2012. He has written technology tutorials since 2008 and worked in IT since 2003, including small-business support, IT management, and consulting. He holds Bachelor’s and Master’s degrees in Computer Science from Arizona State University.
Matthew writes practical guides for Windows, iPhone and iPad, Microsoft Office, Outlook, Google apps, and Android. Solve Your Tech’s guides are checked step by step against the device or app maker’s own documentation and tested on his own devices whenever he has the hardware or software, with clear steps, sources, and update dates.
Read more about Matthew and how Solve Your Tech writes and updates its guides, or report a correction.