To roll back a Windows 11 update, go to Settings > Windows Update > Update history > Uninstall updates, select the update that caused the problem, and select Uninstall. To undo a bigger upgrade to a new Windows version, use Settings > System > Recovery > Go back, which is usually only available for 10 days after the upgrade.
These steps cover Windows 11 Home and Pro, including version 26H2 and earlier versions such as 25H2 and 24H2. Work and school PCs may hide some options.
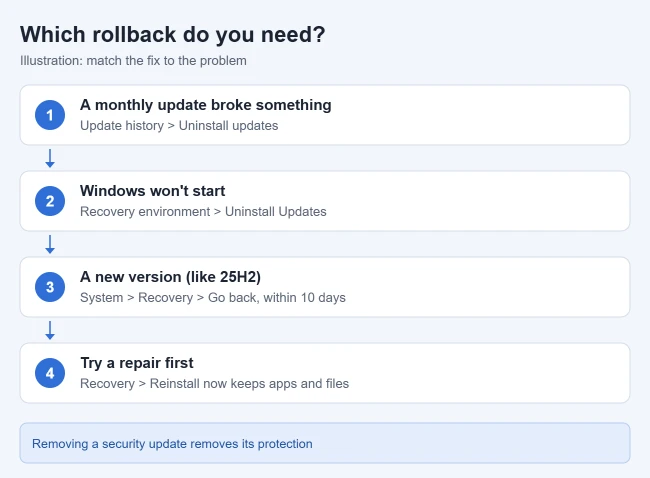
Which Method to Use
| Your situation | What to use |
|---|---|
| A monthly or security update caused a problem and Windows still starts | Uninstall updates in Settings |
| Windows won’t start, or crashes right after signing in | Uninstall Updates in the Windows Recovery Environment |
| You moved to a new Windows version in the last 10 days | Go back in Recovery settings |
| Windows Update keeps failing or system files seem damaged | Reinstall now (keeps apps and files) |
| A change in the last day or two broke Windows | Point-in-time restore |
Before You Roll Back
- Know the risk. Microsoft advises understanding the risks before removing a security update, because its protection goes with it.
- Try a repair first. On Windows 11, reinstalling your current version of Windows is worth trying before you uninstall an update (see below).
- Back up. Copy important files to separate storage and check that you can open the copies before recovery. For example, you can back up Windows 11 to an external hard drive. A system restore point is not a replacement for a personal-file backup or a Windows version rollback.
- Have your BitLocker recovery key. If your drive is encrypted, the recovery tools may ask for it.
- Plug in your laptop. A rollback can restart the PC several times, and losing power partway through can leave Windows unable to start.
Uninstall a Recent Windows 11 Update
Use this for a monthly cumulative update, security update, or other “quality” update that caused a problem.
- Open Settings and select Windows Update. The Windows Update page opens.
- Under More options, select Update history. A list of installed updates appears, grouped by type, with the date each one installed.
- Note the KB number of the update that arrived just before the problem started, then scroll to Related settings and select Uninstall updates.
- Find that update and select Uninstall, then confirm. Windows removes the update.
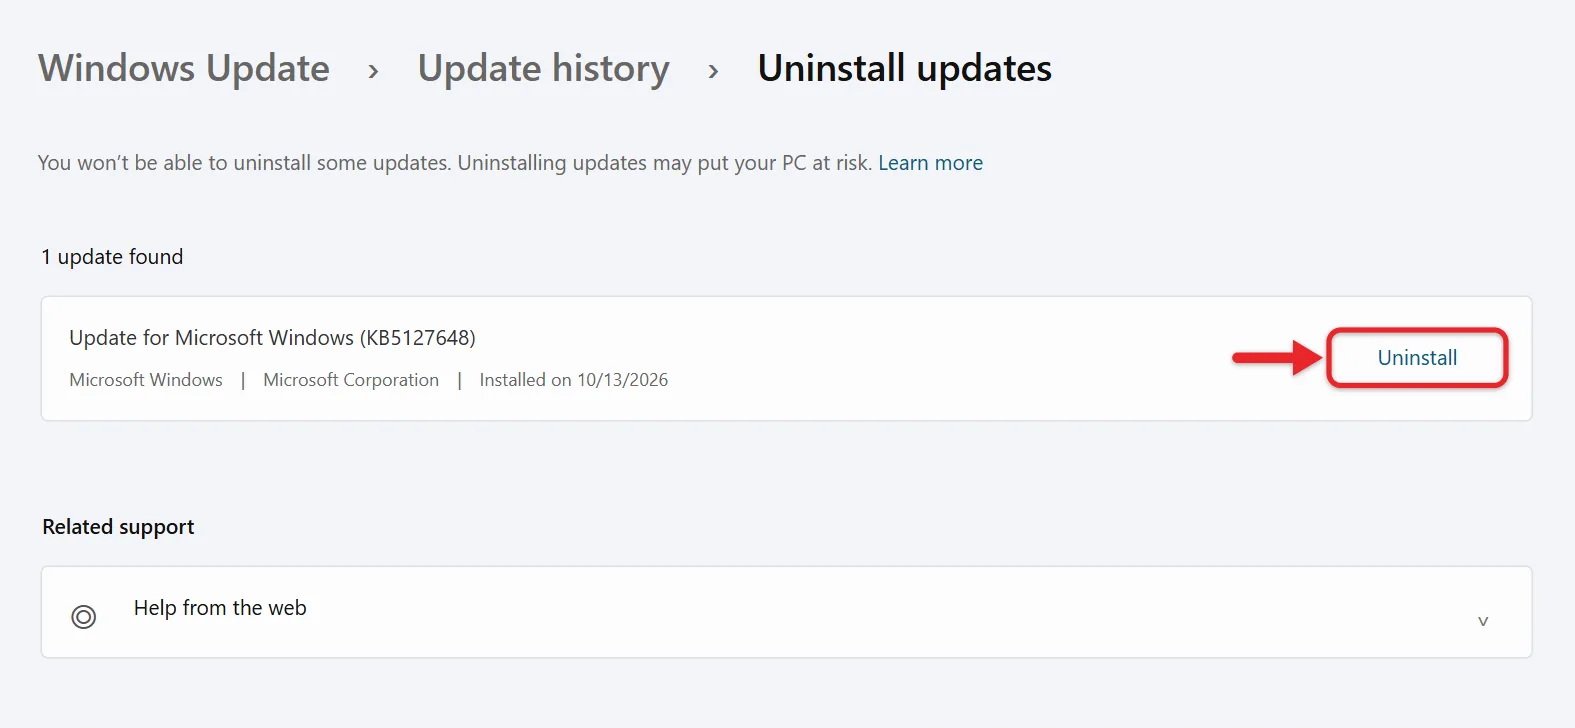
- Restart your PC when asked.
If several updates installed on the same day, remove one at a time and test after each restart. That way you know which update caused the problem. Some updates can’t be uninstalled, as the next section explains. Microsoft’s guide to uninstalling a Windows update has more detail.
Why an update has no Uninstall button
Servicing stack updates, which update Windows’ own update components, and updates already replaced by a newer cumulative update can’t be removed. A full version upgrade usually isn’t listed here; you undo it with Go back instead.
Roll Back if Windows Won’t Start
If an update leaves your PC unable to start, you can remove it from the Windows Recovery Environment (Windows RE), a set of repair screens that runs outside normal Windows. The same screens can also start Windows in Safe Mode while booting.
- Open the Windows Recovery Environment. If Windows fails to start twice in a row, it usually opens on its own. A blue “Choose an option” screen appears.
- Select Troubleshoot > Advanced options > Uninstall Updates.
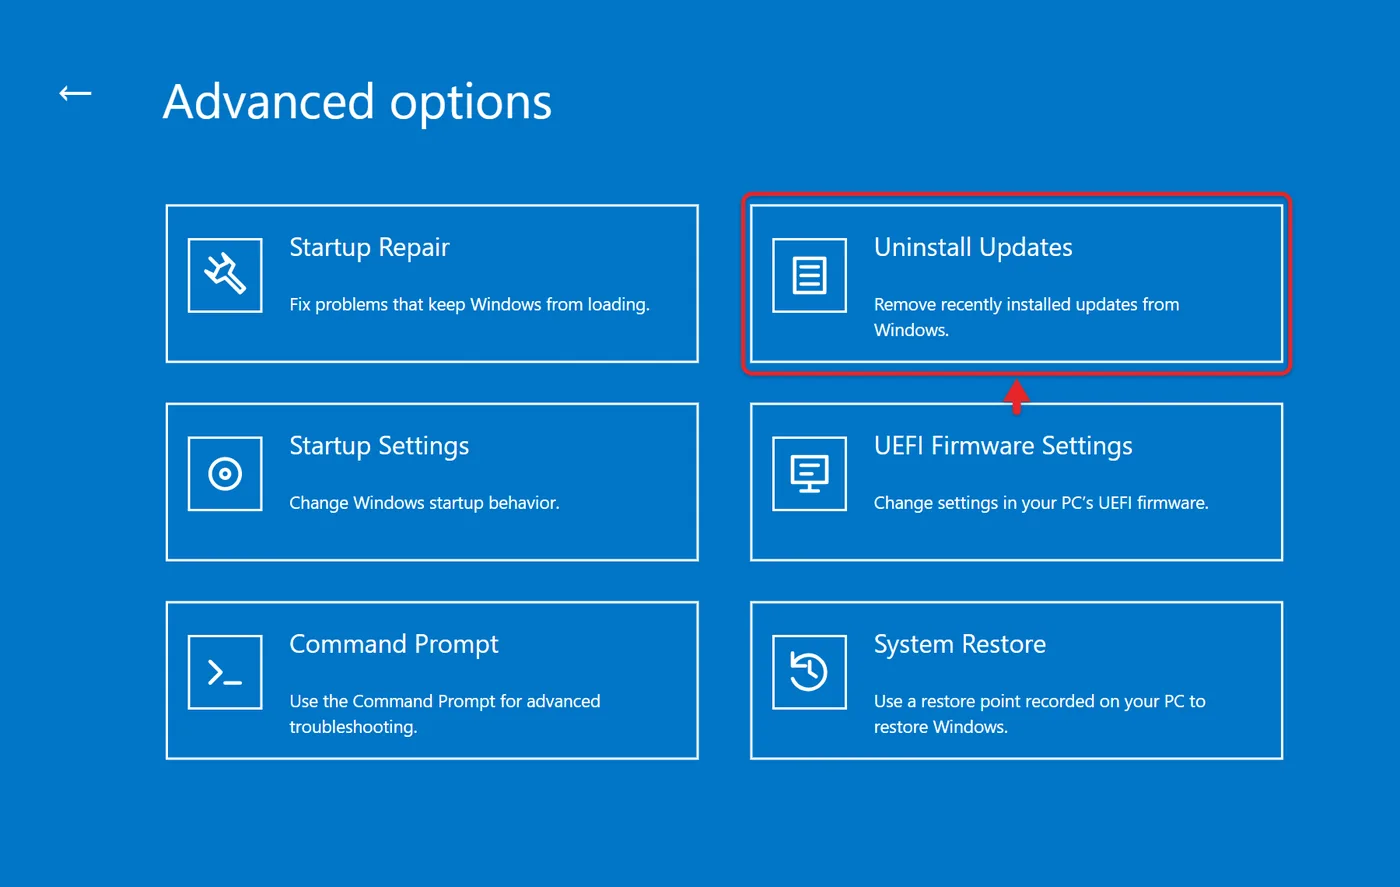
- Choose Uninstall latest quality update for a monthly update, or Uninstall latest feature update for a version upgrade. Windows removes the update and restarts.
If Windows starts but is unstable, you can reach the same screen from Settings > System > Recovery > Advanced startup > Restart now, or hold Shift while you select Power > Restart on the sign-in screen. There are also other ways to boot into recovery mode in Windows 11. If the recovery screen never appears, start the PC from a Windows 11 recovery USB made on another PC.
If removing the update doesn’t help and you have a restore point from before the problem, you can do a System Restore on Windows 11 to roll back system files and drivers.
Use point-in-time restore for very recent changes
Newer Windows 11 PCs also offer Point-in-time restore in Windows RE. It returns the whole system drive to a snapshot that Windows saves automatically, by default about once a day, and keeps for up to 72 hours. Warning: anything on the system drive created or changed after that snapshot is lost, including new files, apps, settings, and passwords. Files in OneDrive aren’t affected.
- In Windows RE, select Troubleshoot > Point-in-time restore.
- Enter your BitLocker recovery key if asked.
- Pick a restore point from before the update, review the details, and select Continue.
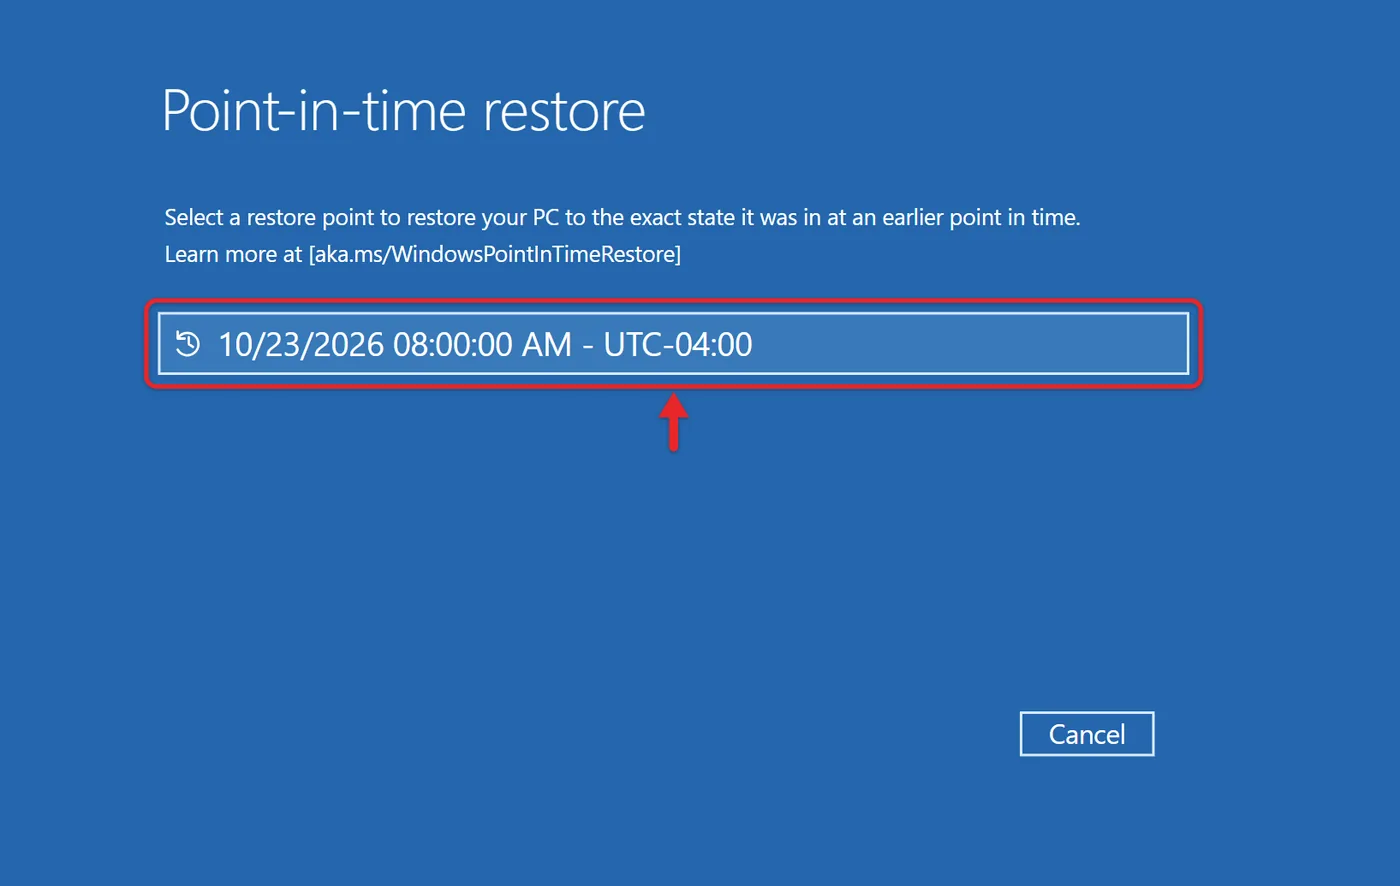
- Confirm and select Restore. Keep the PC plugged in until it finishes.
This can also undo recent security updates, so check Windows Update afterward. See Microsoft’s point-in-time restore page for how to turn it on under Settings > System > Recovery.
If Windows removed the update for you
After repeated startup failures, Windows can uninstall recent driver and quality updates on its own and show “We removed some recently installed updates to recover your device from a startup failure.” Windows then blocks those updates for 30 days before trying again, as explained in Microsoft’s startup failure article. You don’t need to uninstall anything yourself in that case.
Go Back to the Previous Version of Windows
After a feature update, such as moving to a new yearly version or from Windows 10 to Windows 11, you can return to the version you had before, for a limited time.
- Go to Settings > System > Recovery. The recovery options appear.
- Select Go back. If you don’t see it, the time limit has passed or the files it needs are gone.
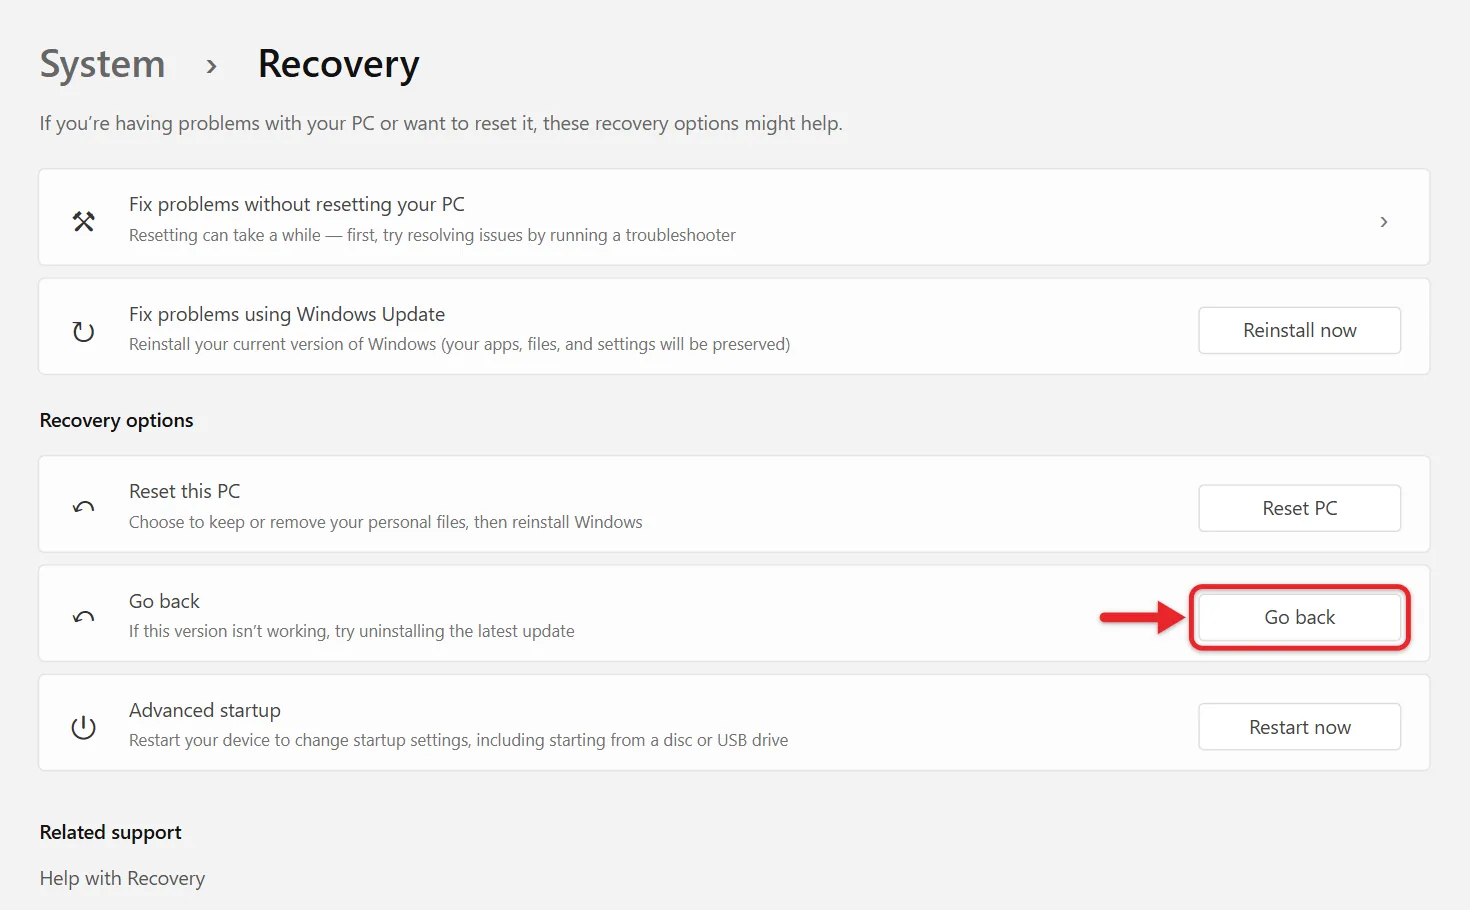
- Choose a reason and select Next. Windows offers to check for updates first; select No, thanks to continue.
- Read the notes, select Next, then select the final Go back button. The PC restarts and returns to the previous version.
Microsoft says this keeps your personal files but removes apps and drivers installed after the upgrade, along with settings changes. It works only if you haven’t removed the windows.old and $windows.~bt folders, you remove any user accounts added after the upgrade, and you have the USB drive you upgraded with, if you used one. You may also need the password you used on the older version.
Go back only returns to the one version you had right before the upgrade. You can’t use it to skip back two versions. If you’re in the Windows Insider Program, going back doesn’t remove you from it, and the next preview build installs when it’s ready.
How long you have
In most cases you have 10 days. After that, Windows deletes the old files to free up space. Running Reset this PC or deleting the previous Windows installation in Disk Cleanup or Storage settings also removes the option early.
If you decide to keep the new version instead, you can delete the Windows.old folder yourself to get that space back.
If you just upgraded and want more time to decide, an administrator can extend the window to up to 60 days with DISM /Online /Set-OSUninstallWindow /Value:60 in an elevated Terminal, per Microsoft’s DISM documentation. It only works while Go back is still available.
Return to Windows 10 When Go Back Is Missing
Go back returns to Windows 10 only if you upgraded from it and the rollback period hasn’t ended. Otherwise, getting Windows 10 back means a clean install with Microsoft’s Windows 10 Media Creation Tool, which erases the drive, and Windows 10 standard support ended on October 14, 2025.
Try This First: Reinstall Your Current Version
If Windows Update is misbehaving or a problem appeared after an update, Microsoft’s Fix problems using Windows Update option reinstalls the same version of Windows, repairs system files, and keeps your apps, files, and settings.
- Go to Settings > System > Recovery.
- Under Fix problems using Windows Update, select Reinstall now.
- Choose whether the PC can restart automatically 15 minutes after the installation finishes, then select OK. Windows downloads and installs a repair version of your last successful update.
Keep the PC plugged in and online. The option may be missing on work or school PCs. See Microsoft’s reinstall guide for details.
Stop the Update From Coming Back
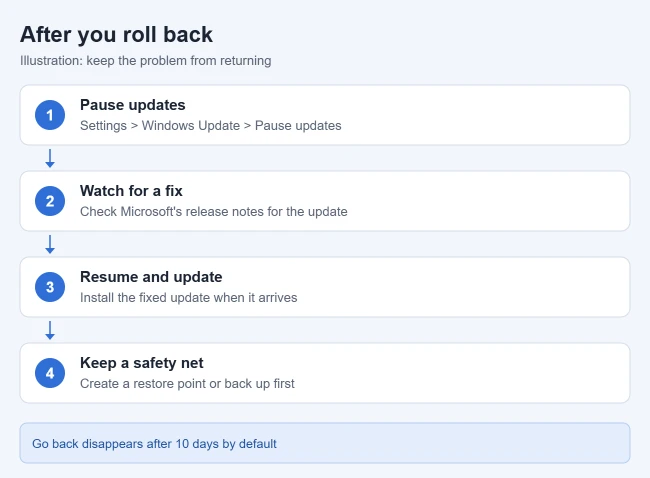
Windows may try to reinstall an update you removed. Go to Settings > Windows Update and select a Pause updates period to give Microsoft time to release a fix. Then resume updates so you get the corrected version and current security fixes. The steps for canceling or pausing a Windows 11 update cover pausing in more detail.
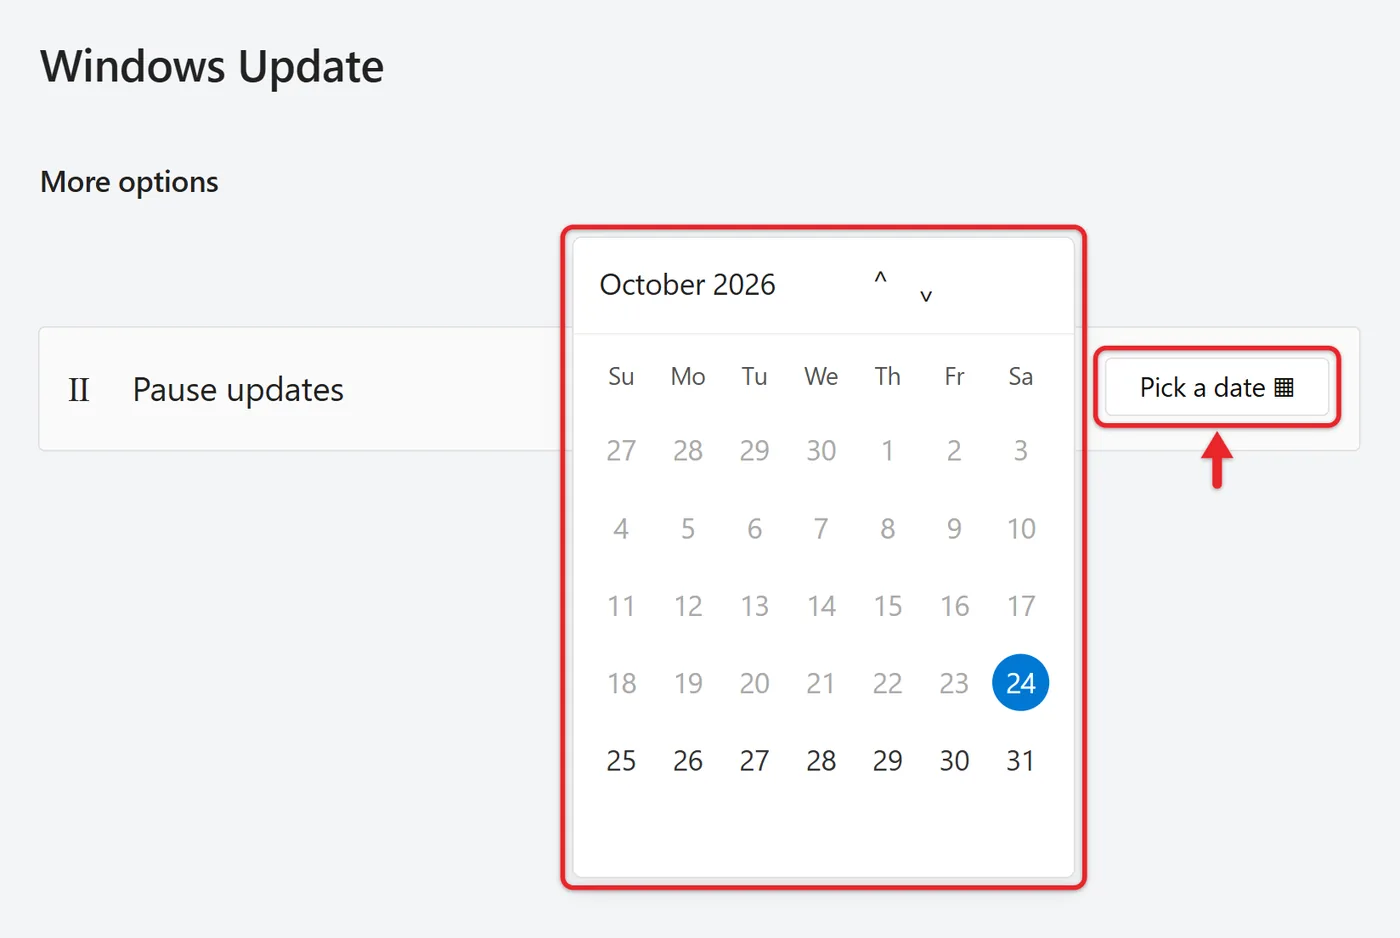
For every supported way to hold updates back, including active hours and a metered connection, read about stopping automatic updates in Windows 11.
Check That the Rollback Worked
- After uninstalling an update: open Uninstall updates again. The KB number you removed should no longer be listed.
- After Go back: open Settings > System > About and check the Version under Windows specifications. It should show your earlier version.
- Either way: test the app, printer, game, or device that stopped working. If it still fails, the update probably wasn’t the cause.
Troubleshooting
- Go back is missing: the rollback period may have expired or required files may have been removed. Uninstalling a monthly update doesn’t change Windows 11 into Windows 10, and Reset this PC doesn’t install an older version either.
- Go back is grayed out: remove any user accounts you added after the upgrade, then check again.
- Uninstall fails: restart and try again, or try the Recovery Environment method.
- Asked for a BitLocker recovery key: find it in your Microsoft account online from another device.
- Problem continues after removing the update: the update may not be the cause. Try Reinstall now, or get the latest driver for the affected device from your PC maker’s support site. You can also check your drivers on Windows 11.
Frequently Asked Questions
What if the update failed to install?
A failed update usually doesn’t need to be uninstalled. Instead, fix failed updates in Windows 11.
Will uninstalling an update delete my files?
No. It removes the update, not your personal files. Going back to a previous version also keeps your files, though it removes apps installed after the upgrade. Point-in-time restore is the exception, since it can remove files created after its snapshot.
Can I roll back from Windows 11 to Windows 10?
Go back can return to Windows 10 if that was your previous installation and rollback is still available. Otherwise you need a clean install, which erases the drive, so back up your files first.
Is there a time limit for removing a monthly update?
Not a fixed one. You can remove a monthly update as long as it appears in the Uninstall updates list. It drops off once a newer cumulative update replaces it.
Is it safe to remove a security update?
It’s possible, but you lose that update’s protection. Remove it only when it’s clearly causing a problem, and reinstall a fixed update as soon as one is available.

Matthew Burleigh is the founder, head writer, and editor of Solve Your Tech, which he launched in 2012. He has written technology tutorials since 2008 and worked in IT since 2003, including small-business support, IT management, and consulting. He holds Bachelor’s and Master’s degrees in Computer Science from Arizona State University.
Matthew writes practical guides for Windows, iPhone and iPad, Microsoft Office, Outlook, Google apps, and Android. Solve Your Tech’s guides are checked step by step against the device or app maker’s own documentation and tested on his own devices whenever he has the hardware or software, with clear steps, sources, and update dates.
Read more about Matthew and how Solve Your Tech writes and updates its guides, or report a correction.