To convert a HEIC photo to JPG on Windows 11, open it in the Photos app, click the See more (three dots) menu, select Save as, choose .jpg as the file type, and click Save. Photos needs Microsoft’s HEIF and HEVC extensions to open iPhone HEIC files. If you have a lot of photos to convert, change your iPhone’s transfer setting or download them from iCloud in the Most Compatible format so they arrive as JPGs.
These steps apply to Windows 11 version 26H2, and to 24H2 and 25H2. The Photos, Paint and GIMP methods also work on Windows 10, which stopped getting free security updates on October 14, 2025. Every method saves a new JPG and leaves your original HEIC file untouched.
What You Need First
HEIC is the High Efficiency Image format iPhones use by default. It keeps photos smaller than JPG at similar quality, but many websites, forms and older programs won’t accept it.
Windows reads HEIC files through two add-ons from the Microsoft Store:
- HEIF Image Extensions, which is free. It lets Windows apps read and write the HEIF container format.
- HEVC Video Extensions, which costs $0.99 in the Microsoft Store and comes preinstalled on some PCs. iPhone HEIC photos are compressed with HEVC, so the HEIF Image Extensions listing notes that Windows needs this package to view .heic files.
If the Store won’t open on your PC, follow these steps to fix or reinstall the Microsoft Store first.
To check, double-click a HEIC file. If it opens in Photos and shows the picture, you already have both. If Photos shows an error or a link to the Store, install the missing extension from the Microsoft Store app, then try again. Once both are installed, File Explorer also shows thumbnails for HEIC files instead of blank icons. If you don’t want to buy the HEVC extension, there are free ways to open HEIC files on Windows 11.
Renaming photo.heic to photo.jpg doesn’t convert it. The file is still HEIC inside, and most apps will reject it or show an error. To learn when renaming is safe and when it isn’t, read about changing a file extension in Windows 11.
Which Method Should You Use?
| Your situation | Best method |
|---|---|
| One or a few photos already on the PC | Photos app or Paint |
| Photos still on your iPhone | iPhone transfer setting set to Automatic |
| Photos in iCloud Photos | iCloud.com download as Most Compatible |
| A folder of HEIC files on the PC | ImageMagick |
| You can’t install the Store extensions | GIMP |
Convert HEIC to JPG With the Photos App
- Open File Explorer and find your HEIC photo.
- Right-click the file, select Open with, and choose Photos. The picture opens in the Photos viewer.
- Click the See more button (three dots) in the toolbar at the top of the window.
- Select Save as. A save window opens.
- Open the Save as type drop-down and choose .jpg.
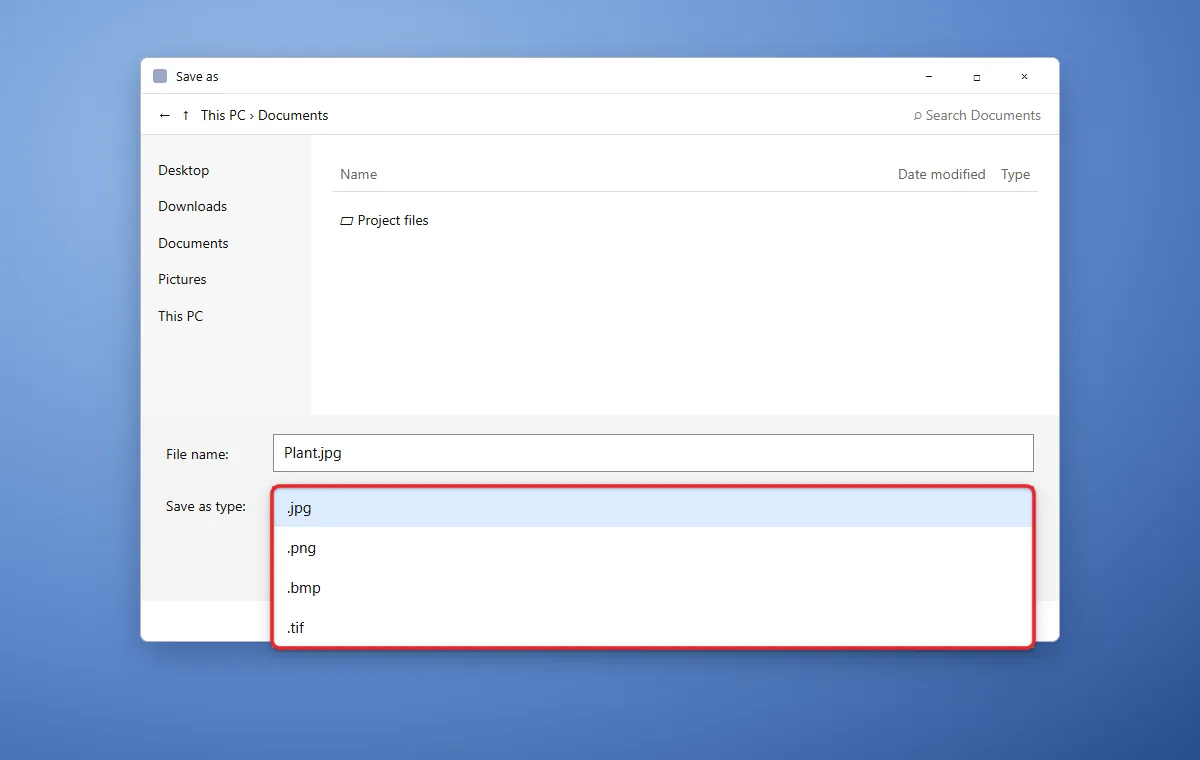
- Change the file name if you like, choose a folder, and click Save.
Photos saves a JPG copy in the folder you picked, and the HEIC file stays where it was. To confirm, right-click the new file in File Explorer, select Properties, and check that Type of file says JPG. Repeat these steps for each photo.
Convert HEIC to JPG With Paint
Paint is built into Windows 11 and works the same way once the extensions above are installed.
- Right-click the HEIC file in File Explorer, select Open with, and choose Paint. If Paint isn’t listed, click Choose another app and find it there.
- Click File at the top left.
- Point to Save as and select JPEG picture.
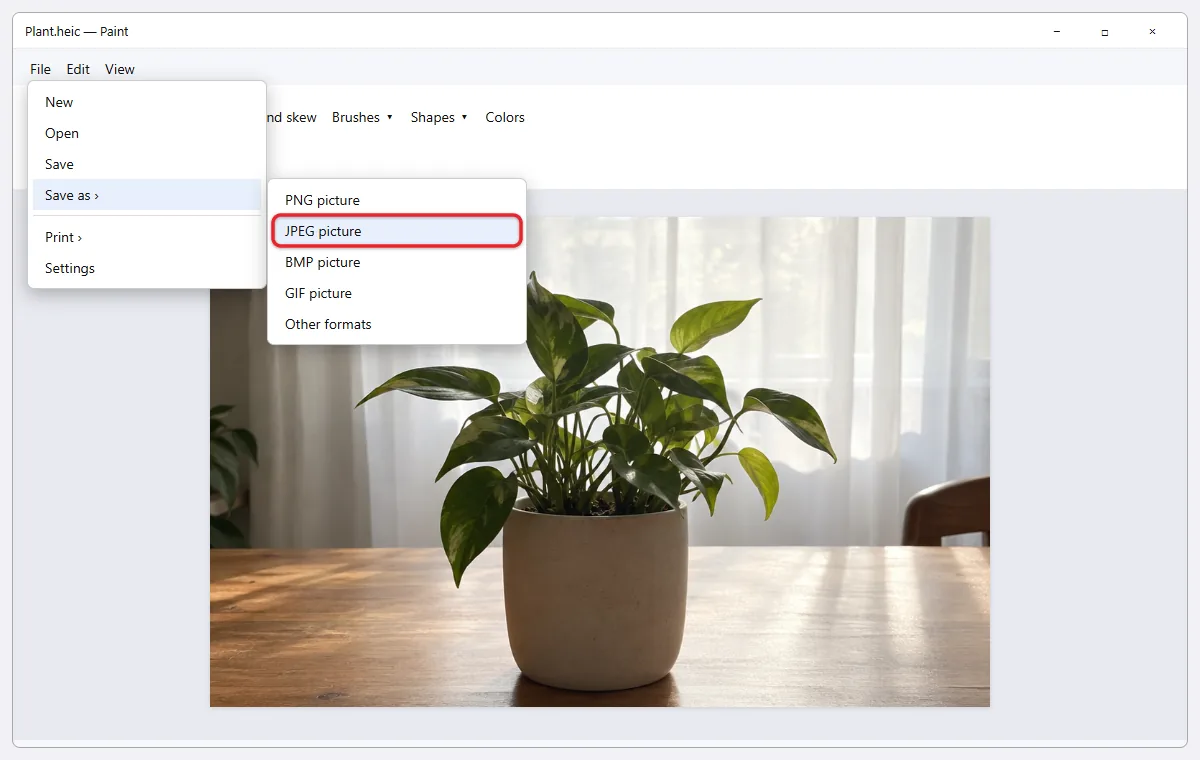
- Pick a folder, give the file a name, and click Save.
Paint is handy if you want to crop or resize the photo before saving it. Use Image > Crop or Resize and skew before step 2.
Convert Many Photos at Once
Photos and Paint convert one picture at a time. If you have dozens or hundreds of iPhone photos, it’s faster to get them as JPGs in the first place.
Have Your iPhone Send JPGs to the PC
When you copy photos from an iPhone to a Windows PC with a USB cable, the iPhone can convert them to JPG during the transfer.
- On the iPhone, open Settings.
- Tap Apps, then Photos. On iOS 17 and earlier, tap Photos directly in Settings.
- Scroll down to Transfer to Mac or PC and tap Automatic.
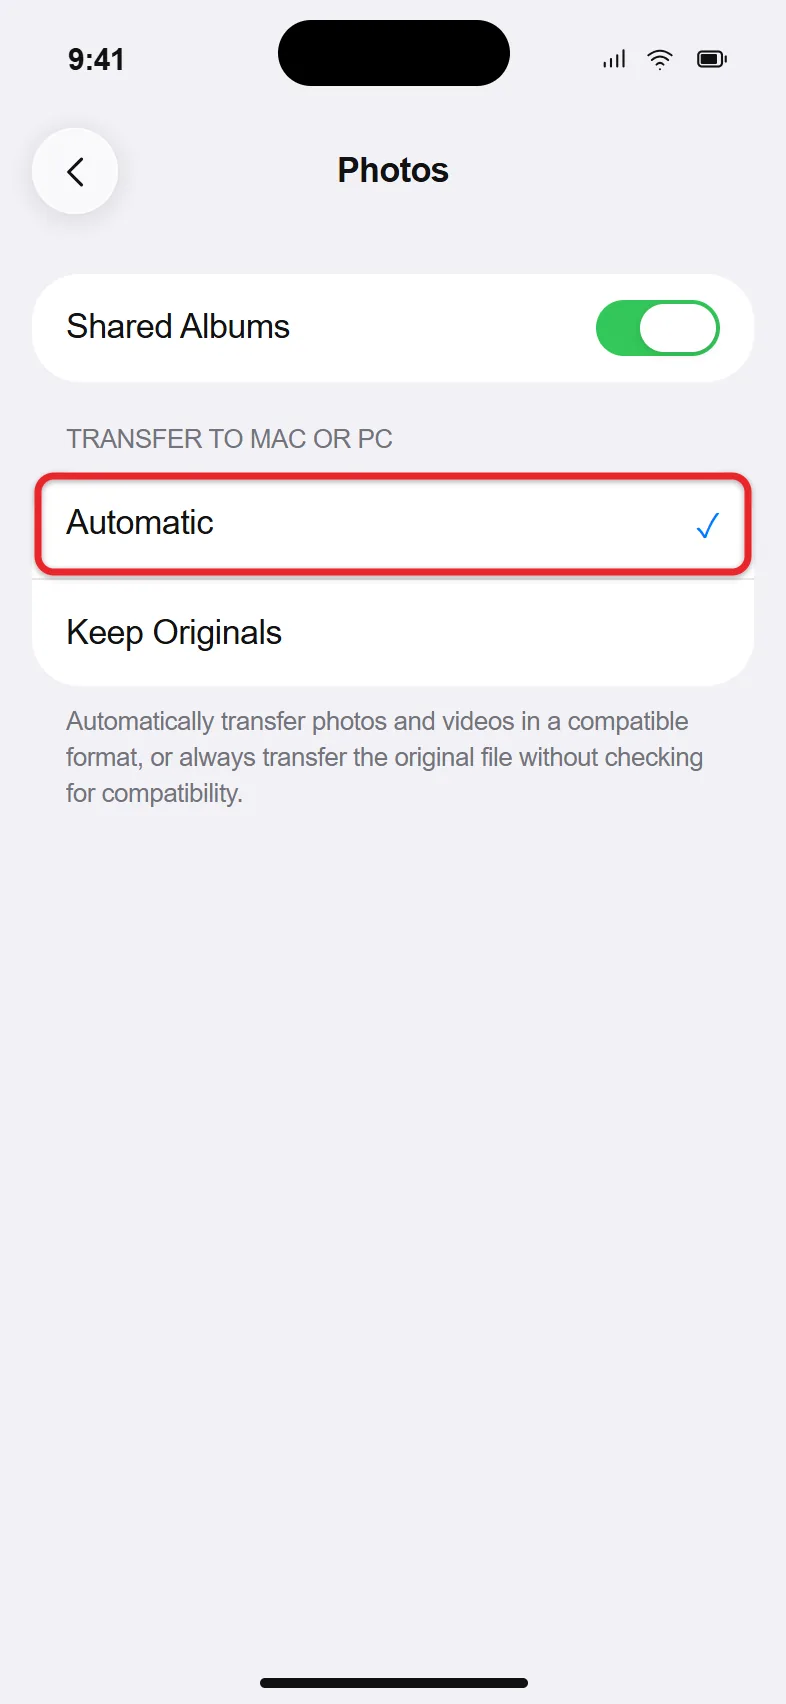
- Connect the iPhone to your PC, unlock it, and tap Trust if asked.
- Import the photos with the Windows Photos app’s Import button, or copy them from the iPhone’s DCIM folder in File Explorer.
The photos arrive on your PC as JPG files. Apple’s HEIF and HEVC support article says media imported to a PC might be converted to JPEG, and that Keep Originals is the setting that keeps them as HEIC. For more detail on the import itself, read about transferring iPhone photos to a Windows PC.
Download From iCloud as JPG
If your photos are in iCloud Photos, you can download JPG copies in a browser without connecting the phone.
- Go to icloud.com/photos in your browser and sign in with your Apple Account.
- Select the photos you want. Hold Ctrl to pick several.
- Click the More button (three dots), then select More Download Options.
- Click Download next to Most Compatible.
Apple’s iCloud download guide says Most Compatible photos are usually JPEG when possible, while Unmodified Originals and Highest Resolution can keep the HEIC format. The files land in your Downloads folder.
If you use the iCloud for Windows app instead, open it, click the arrow next to iCloud Photos, and look for the optional Download High-Efficiency format photos and videos box described in Apple’s iCloud for Windows Photos setup guide. Leave it unchecked if you want photos in a more compatible format, then click Done.
Take New Photos as JPG
To stop new photos from being saved as HEIC at all, open Settings > Camera > Formats on the iPhone and choose Most Compatible. New pictures are saved as JPG and new videos as H.264. Existing photos don’t change, and JPG files take up more storage on the phone. To convert photos on the phone itself, follow the steps for converting iPhone photos to JPG.
Batch Convert HEIC Files Already on Your PC
For HEIC files already on your computer, the free command-line program ImageMagick can convert a whole folder. Its format list shows HEIC as a format it can read and write through the libheif library. After installing it from the official ImageMagick download page:
- Put the HEIC files in one folder and copy that folder for safety.
- Open the folder in File Explorer, right-click an empty area, and select Open in Terminal.
- Type magick -version and press Enter. If you see version details, ImageMagick is installed. If Windows says the command isn’t recognized, close the Terminal, reopen it, and try again.
- Type magick mogrify -format jpg *.heic and press Enter.
ImageMagick creates a JPG next to each HEIC file and leaves the originals in place. When the prompt comes back, the conversion is done. If you’d rather not use a command line, open the files one by one in Photos instead.
Convert With GIMP
GIMP is a free image editor that reads HEIC files without the Microsoft Store extensions, which helps if you can’t install them.
- Download and install GIMP from the official GIMP download page.
- Open GIMP, choose File > Open, select your HEIC file, and click Open.
- Choose File > Export As, or press Ctrl + Shift + E.
- In the Name box, change the ending to .jpg, for example beach.jpg, choose a folder, and click Export. Make sure you replace .heic rather than adding .jpg after it.
- In the JPEG options window, leave Quality at its default or lower it for a smaller file, then click Export.
Use Export As, not Save or Save As. GIMP’s save commands only write its own XCF project format. GIMP’s Export As documentation explains how to pick the format by its file name ending or from the Select File Type list.
Troubleshooting
Photos says it can’t open the file or asks for an extension. Install HEIF Image Extensions and HEVC Video Extensions from the Microsoft Store, close Photos, and open the file again.
HEIC files show blank icons in File Explorer. That’s the same missing-extension problem. After you install both extensions, restart File Explorer or sign out and back in so the thumbnails redraw.
There’s no Save as option in Photos. Update the Photos app from the Microsoft Store library, then look under the three-dot See more menu again. If it’s still missing, use the Paint method.
JPG isn’t listed as a file type. Check that you’re in Save as, not a share or print menu. In Paint, choose JPEG picture, which is the same format.
iCloud downloads still come as HEIC. You probably clicked the plain Download button or picked Unmodified Originals. Use More Download Options and choose Most Compatible.
ImageMagick says it can’t find any .heic files. Make sure the Terminal opened in the folder that holds your photos. If your files end in an uppercase .HEIC, type magick mogrify -format jpg *.HEIC instead.
The JPG looks washed out or the colors changed. Some iPhone photos are captured in HDR. Converting to a standard JPG can flatten the highlights. This is normal, and the HEIC original still has the full range.
A website still rejects the file. Right-click the file, select Properties, and check that Type of file says JPG. If it says HEIC, the file was renamed rather than converted, so convert it with one of the methods above.
Frequently Asked Questions
Are JPG and JPEG the same?
Yes. They’re two file endings for the same image format.
Does converting HEIC to JPG lower the quality?
Slightly. JPG uses lossy compression, so some detail is lost, but at normal quality settings the difference is hard to see. The JPG is also usually larger than the HEIC file. Keep the HEIC if you might edit the photo later.
Is there a free way to convert HEIC on Windows 11?
Yes. If your PC already has HEVC Video Extensions, Photos and Paint are free. Otherwise use GIMP, ImageMagick, iCloud.com’s Most Compatible download, or the iPhone’s Automatic transfer setting, none of which need the paid extension.
Should I use an online HEIC converter?
You can, but it means uploading your photos to someone else’s server. Photos can include location data, so the offline methods above are the safer choice for personal pictures.
Can I keep the photo’s location and date?
Usually, yes, but it depends on the tool. After converting, right-click the JPG, select Properties > Details, and check the Date taken and GPS fields. If a tool strips them, keep the HEIC original or try another method.

Matthew Burleigh is the founder, head writer, and editor of Solve Your Tech, which he launched in 2012. He has written technology tutorials since 2008 and worked in IT since 2003, including small-business support, IT management, and consulting. He holds Bachelor’s and Master’s degrees in Computer Science from Arizona State University.
Matthew writes practical guides for Windows, iPhone and iPad, Microsoft Office, Outlook, Google apps, and Android. Solve Your Tech’s guides are checked step by step against the device or app maker’s own documentation and tested on his own devices whenever he has the hardware or software, with clear steps, sources, and update dates.
Read more about Matthew and how Solve Your Tech writes and updates its guides, or report a correction.