To use Night light in Windows 11, press Windows key + A to open Quick Settings and select the Night light button, or go to Settings > System > Display and turn on the Night light switch. Your screen shifts to warmer colors right away. These steps match current Windows 11 releases, including version 26H2, and earlier supported versions such as 25H2 and 24H2, on Home and Pro.
Night light cuts back the blue light your display gives off and replaces it with a yellow-orange tint. Microsoft’s description is simple: blue light is the kind you see during the day, and warmer colors in the evening are easier on your eyes and may help you get to sleep.
Turn On Night Light From Quick Settings
Quick Settings is the small panel that opens from the network, volume and battery icons at the right end of the taskbar. It’s the fastest route when you just want the tint on or off.
- Press Windows key + A, or select the Network or Speakers icon near the clock.
- Look for the Night light button (a sun-and-moon style icon). Quick Settings can hold more buttons than fit on one page, so if you don’t see it, use the small down arrow on the right side of the panel to scroll to the next page.
- Select Night light. The button turns your accent color and the screen warms up immediately.
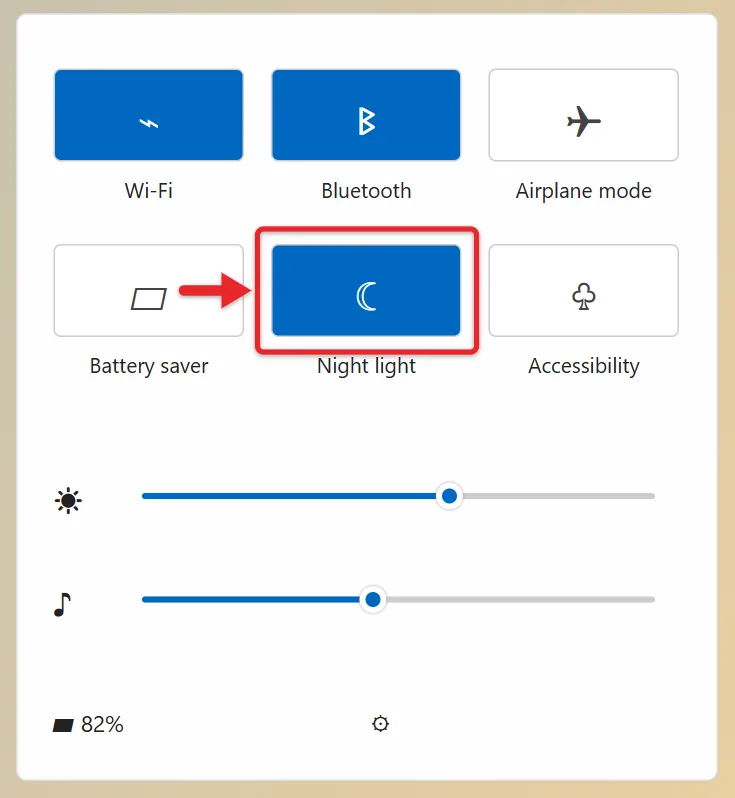
- Select it again whenever you want normal colors back.
No Night light button at all? It may have been removed. Select the pencil icon (Edit quick settings) at the bottom of the panel, choose Add, pick Night light, and then select Done. While you’re in edit mode you can also drag the button to the first page so it’s always in reach. If Night light isn’t in the Add list, your PC’s display driver probably doesn’t support it (see the troubleshooting section).
Turn On Night Light in the Settings App
Use Settings when you also want to change the strength or set a schedule, since those options aren’t in Quick Settings.
- Press Windows key + I, or right-click the Start button and choose Settings. Here are other ways to open Settings on Windows 11 if those don’t work for you.
- Select System in the left column, then Display.
- Under Brightness & color, flip the Night light switch to On.

- To see more options, select the words Night light or the arrow beside the switch (not the switch itself). That opens the Night light page described next.
There’s also a shortcut straight to that page: press Windows key + R, type ms-settings:nightlight, and press Enter.
Pick a Comfortable Strength
The Night light page (Settings > System > Display > Night light) has three controls: a Turn on now or Turn off now button, a Strength slider, and the Schedule night light switch.
- Open the Night light page and select Turn on now if it isn’t on already, so you can see the effect as you adjust it.
- Drag the Strength slider right for a warmer, more orange screen, or left for a lighter tint. Changes apply as you drag, and there’s no Save button.

A tip on choosing a level: set it in the evening with the room lights at their usual nighttime level. At midday a strong setting looks alarmingly orange, but in a dim room your eyes adjust quickly. If you can’t tell white from cream anymore, or text starts to look muddy, slide it back a bit. Strength is a single setting for all your screens; Windows doesn’t offer a separate level per monitor.
Schedule Night Light to Run Every Evening
A schedule saves you from remembering to tap the button each night. On the Night light page, turn on Schedule night light, then choose one of the two options.
Sunset to sunrise
Windows works out local sunset and sunrise times and follows them as the seasons change, so the tint comes on earlier in winter and later in summer. To calculate those times, Windows needs to know where you are, which means location services must be on. If they’re off, Sunset to sunrise can’t work out your times, so turn location on first.
- Go to Settings > Privacy & security > Location.
- Turn on Location services. You need to be an administrator on the PC to see this switch.
- On a desktop PC without Wi-Fi, select Set default next to Default location and enter your town, so Windows has something to work with. Microsoft recommends a default location for desktops and devices without Wi-Fi.
- Return to the Night light page and choose Sunset to sunrise. The times Windows will use appear under the option.
Microsoft’s location service and privacy page explains what these switches share, if you’d like to check before turning them on.
Set hours
Pick this if you’d rather not use location, or if you want the tint tied to your routine instead of the sun (for example, on at 9:00 PM and off at 7:00 AM).
- Select Set hours.
- Select the time next to Turn on, choose the hour, minute and AM or PM, and confirm with the check mark.
- Do the same for Turn off.

How to Turn Night Light Off
There’s a difference between turning it off for now and stopping it for good:
- Just for now: select the Night light button in Quick Settings, or select Turn off now on the Night light page. If a schedule is set, it still turns on again at the next start time. This is handy when you’re editing photos or picking colors in the evening.
- Permanently: turn off the Night light switch on the Display page, then open the Night light page and turn off Schedule night light. Without that second step, the schedule will keep bringing it back each evening.
When Night Light Doesn’t Behave
The switch is grayed out or missing
Night light depends on your graphics driver. Microsoft notes that it isn’t available with certain drivers, like DisplayLink or Basic Display, and that a grayed-out toggle may mean you need to update your display driver. Work through these in order:
- Check which driver you have. Right-click Start, choose Device Manager, and expand Display adapters. If the only entry is Microsoft Basic Display Adapter, Windows is using a generic fallback driver and the real one for your Intel, AMD or NVIDIA graphics isn’t installed.
- Get the proper driver. Run Settings > Windows Update > Check for updates first, since Windows Update delivers most graphics drivers. You can also right-click the adapter in Device Manager and choose Update driver, or download the driver from your PC or graphics card maker. Our guide on how to update your graphics driver in Windows 11 walks through each option. Microsoft’s guide to updating drivers through Device Manager covers updating, reinstalling and rolling back.
- Roll back a bad update. If Night light stopped working right after a driver update, open the adapter’s Properties, go to the Driver tab, and select Roll Back Driver if it’s available.
- Look at how the screen is connected. Monitors plugged into a USB dock or USB display adapter often run through DisplayLink software, which Night light doesn’t support. Connecting that monitor directly to your PC’s HDMI, DisplayPort or USB-C video port usually brings the feature back for it.
- Restart. After any driver change, restart the PC before checking the switch again.
Using Remote Desktop? When you’re connected to another PC through Remote Desktop, that session uses a virtual display rather than the remote PC’s real graphics driver, so Night light may be grayed out or have no visible effect. Turn Night light on for the screen you’re actually looking at (the PC you’re connecting from) instead. If it works once you sign in at the remote PC itself, nothing is broken.
The schedule doesn’t turn on or off
- Check the clock. Go to Settings > Time & language > Date & time and make sure the time and time zone are right. A wrong time zone shifts both Sunset to sunrise and Set hours.
- Check location for Sunset to sunrise. If location services were turned off after you set the schedule, Windows can’t work out sunset. Turn location back on, or switch to Set hours.
- Toggle the schedule. Turn Schedule night light off and on again, re-pick your option, and restart. This clears a schedule that has gotten stuck.
- Remember sleep. A PC that’s asleep or shut down at the start time can’t change the screen until you wake it, so check the tint after the PC is back on rather than judging by the moment you open the lid.
The colors are stuck orange or look red
- Open the Night light page and select Turn off now. If the button says Turn on now and the screen is still warm, Night light isn’t the cause; check the monitor’s own menu for a warm or “low blue light” color preset, and see whether a graphics app (such as the Intel, AMD or NVIDIA control panel) has a color setting applied.
- Turn off the schedule if the tint keeps returning every evening and you don’t want it.
- HDR displays. Microsoft documents that on HDR-capable devices, Night light can make colors look over-saturated with a red tint, depending on the strength. Drag the Strength slider left, or turn Night light off while HDR is on. Its HDR settings page lists this workaround.
- Restart if the tint won’t clear after turning it off. A restart reloads the display driver and its color settings.
Some guides also suggest checking that the Connected Devices Platform Service is running (in the Services app) if Night light won’t respond at all. It’s worth a look as a last step, but update the driver first, since that solves most cases.
Night Light, Dark Mode, HDR and Color Filters Compared
These four settings get mixed up because they all change how the screen looks, but each does a different job:
| Setting | What it changes | Where to find it |
|---|---|---|
| Night light | The color temperature of everything on screen, making it warmer and less blue | Settings > System > Display |
| Dark mode | App and Windows backgrounds, from white to dark gray or black; colors themselves stay the same | Settings > Personalization > Colors |
| HDR | The brightness and color range on HDR-capable displays, for supported games and video | Settings > System > Display > HDR |
| Color filters | Accessibility filters such as grayscale, inverted, or color-blindness filters | Settings > Accessibility > Color filters |
Night light and dark mode work well together at night: one warms the colors, the other replaces large white areas with dark ones. If you want both, here’s how to turn on dark mode in Windows 11. Neither one lowers the backlight, so for a dimmer screen you’ll also want to adjust brightness on Windows 11. HDR is the one to watch, since combining it with a strong Night light setting is where the red-tint problem shows up.
Questions People Ask About Night Light
Does Night light work on a second monitor?
Yes, in most setups it warms every connected display at the same strength. The exception is a monitor driven through DisplayLink, such as many USB docks, which Night light doesn’t support.
Will Night light show up in my screenshots or screen recordings?
No. Night light changes how the display shows the picture, not the image Windows produces, so screenshots and recordings keep their normal colors. That’s also why it can’t be used to tint a video for someone else.
Should I turn it off for photo editing or design work?
Yes. The warm tint changes how every color looks, so edits you make with it on will look too cool once it’s off. Select Turn off now while you work; your schedule picks up again the next evening. If colors still seem off with Night light off, see how to change monitor color in Windows 11 with calibration and color profiles.
Does it save battery?
Not in any meaningful way. The backlight stays at the same level, and the backlight is what uses the power. Lowering brightness or using energy saver helps battery life far more.
Do I still need a separate blue-light app?
For most people, no. Night light covers the basics (a strength slider and a sunset or custom schedule) without installing anything. A separate app only makes sense if you want extras Windows doesn’t offer, like different levels for different times of night.
Is the setting the same for everyone who uses my PC?
No. Night light, its strength and its schedule are saved per user account, so each person who signs in sets their own. Location services, which Sunset to sunrise relies on, is a device-wide switch controlled by an administrator.
Once you’ve found a strength you like, set a schedule so you never have to think about it again. Microsoft’s display brightness and color page has the official Night light steps if you ever want to double-check a menu name.

Matthew Burleigh is the founder, head writer, and editor of Solve Your Tech, which he launched in 2012. He has written technology tutorials since 2008 and worked in IT since 2003, including small-business support, IT management, and consulting. He holds Bachelor’s and Master’s degrees in Computer Science from Arizona State University.
Matthew writes practical guides for Windows, iPhone and iPad, Microsoft Office, Outlook, Google apps, and Android. Solve Your Tech’s guides are checked step by step against the device or app maker’s own documentation and tested on his own devices whenever he has the hardware or software, with clear steps, sources, and update dates.
Read more about Matthew and how Solve Your Tech writes and updates its guides, or report a correction.