To reload Windows 11 without a USB drive, open Settings > System > Recovery, select Reset PC next to Reset this PC, choose Keep my files or Remove everything, then pick Cloud download or Local reinstall and confirm. Your Windows 11 laptop has turned sluggish and crash-prone after months of installs, and you want a clean start without hunting for a USB stick. Reset this PC does exactly that, and the sections below cover the other things “reload” can mean.
Which Kind of Reload Do You Need?
People use “reload” for several very different jobs, from refreshing a frozen screen to wiping the whole drive. Picking the right one saves you hours of reinstalling apps you never needed to lose. Find your situation in the table, then jump to that section.
| What you want | What it does to your stuff | Where to look |
|---|---|---|
| Refresh a window or the desktop, or restart the computer | Nothing is removed | Refresh the Screen or Restart Instead |
| Undo a bad update or a change from the last few days | Files usually stay; recent changes roll back | Lighter Fixes to Try Before a Reset |
| Repair Windows itself but keep files, apps and settings | Keeps files, apps and settings | Lighter Fixes to Try Before a Reset |
| Start fresh but keep documents and photos | Keeps personal files; removes apps and settings | Reset This PC From Settings (Keep my files) |
| Wipe everything, for example before selling the PC | Removes files, apps and settings | Remove everything below, or the full wipe and reinstall walkthrough |
| Windows will not start at all | Depends on the option you choose | Reset Windows 11 When It Won’t Start |
| Install from a USB drive or ISO file | Depends on the option you choose | Reload From Installation Media |
For a slow, crash-prone laptop like the one in the opening, Reset this PC with Keep my files is usually the right first move. It replaces Windows and clears out the apps and settings that piled up, but leaves your documents where they are.
Get Ready Before You Reset
A reset is safe when you prepare for it and stressful when you don’t. Spend ten minutes on these checks first.
- Back up your files, even if you plan to keep them. Microsoft recommends backing up before any reset. Copy the Documents, Desktop, Pictures and Downloads folders to an external drive or make sure OneDrive has finished syncing them. A full backup of Windows 11 to an external hard drive is the safest version of this step.
- List your apps. Both reset options remove the apps you installed. Write down the programs you rely on, and note where their license keys or sign-in details live.
- Find your BitLocker recovery key. If the drive is encrypted with BitLocker or device encryption, Microsoft says you may need the recovery key to finish a reset. Many personal PCs store it in the Microsoft account you signed in with. Look it up and write it down before you start, because you can’t easily look it up from a PC that is halfway through a reset.
- Plug in the laptop. Keep the device connected to power for the whole reset. A battery that dies midway is one of the few ways a reset can go badly.
- Know your Microsoft account password. You will sign in again during setup, and that sign-in is also how Windows reconnects to its digital license.
If you would rather have a bootable backup option in the drawer before you begin, you can also make a Windows 11 recovery USB. It is not required for any method in this section.
Reset This PC From Settings
This is the main reload method on a PC that still starts and lets you sign in. Older instructions send you to Update & Security and a Get started button; that was Windows 10. On Windows 11 the reset lives under System.
- Select Start, then Settings (or press Windows key + I).
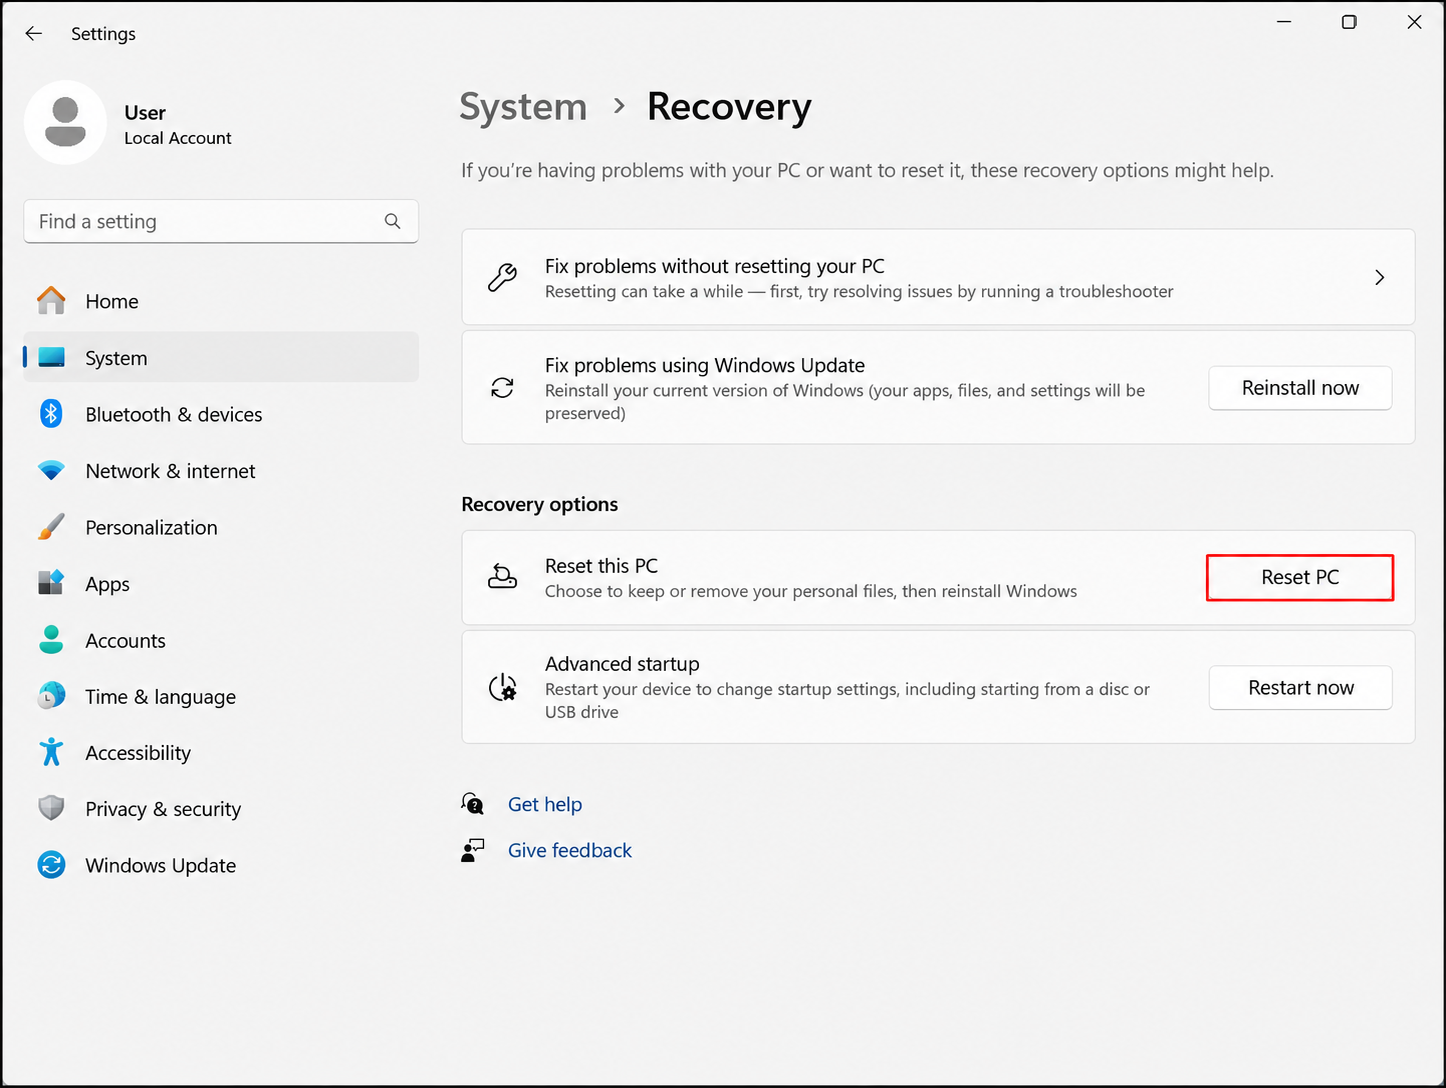
- Select System in the left pane, then scroll down and select Recovery.
- Under Recovery options, find Reset this PC and select Reset PC.
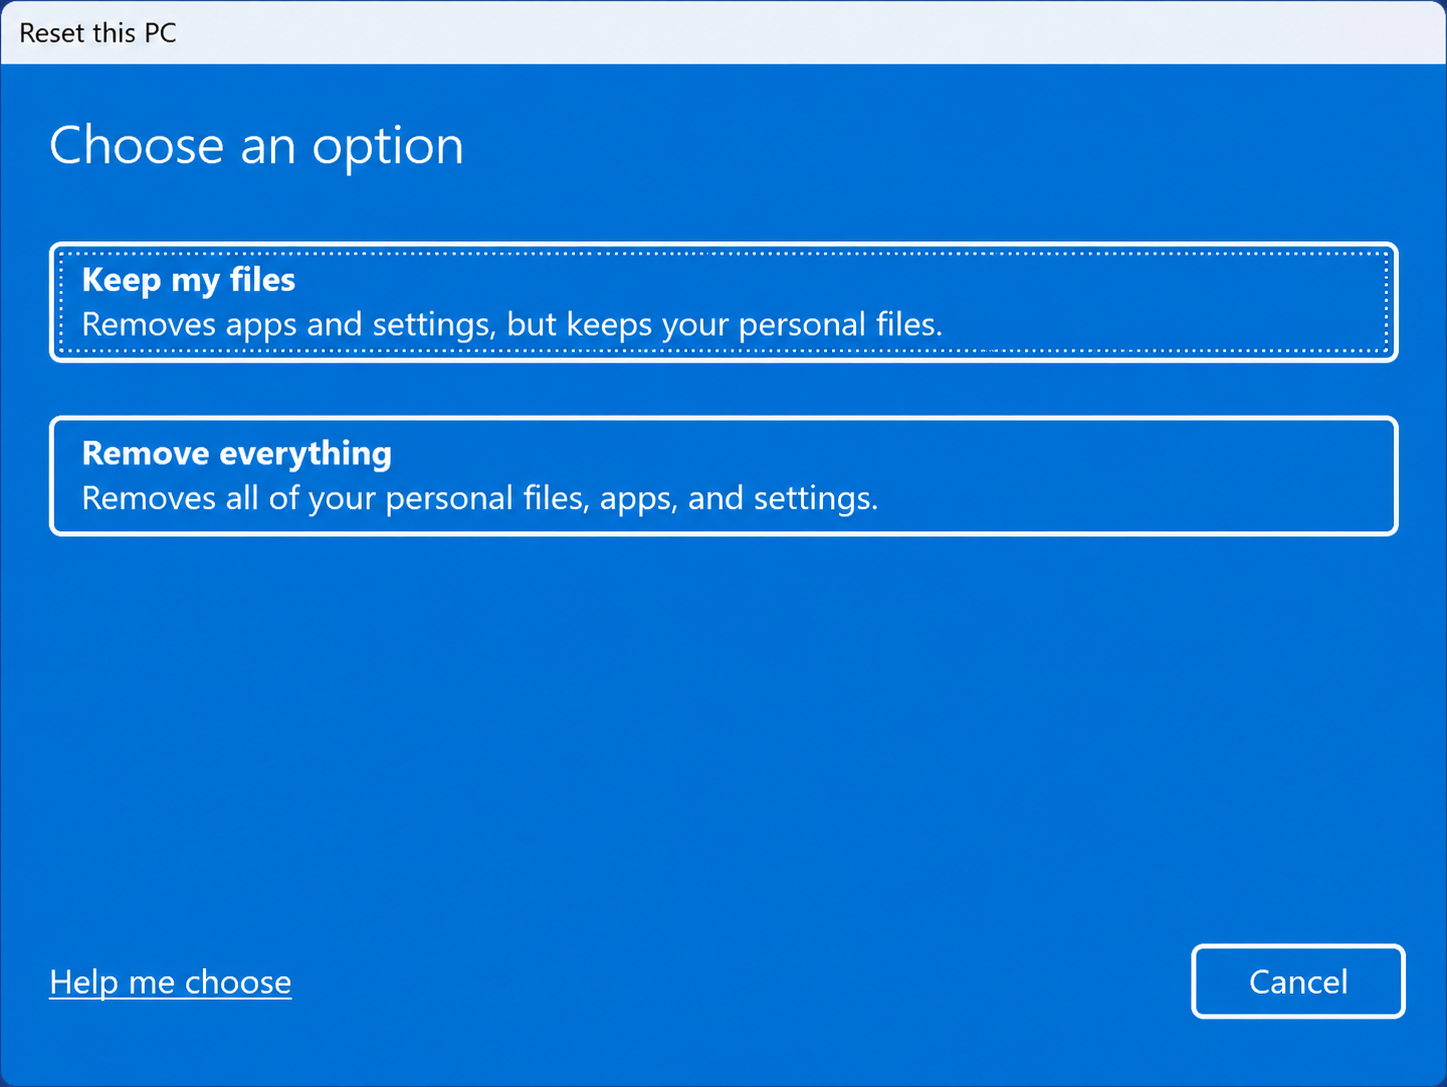
- Choose Keep my files or Remove everything. The next section explains the difference.
- Choose Cloud download or Local reinstall as the source for the new copy of Windows.
- Review the summary of your choices. You can change the extra options here (such as restoring preinstalled apps or cleaning the drive) before you continue.
- Read the final list of what will happen, then select Reset.
The PC restarts and works on its own from there. Microsoft notes that the screen may stay black for more than 15 minutes during the process. Don’t restart the computer manually while that happens; let it finish. When it is done you land in the normal Windows setup screens (region, keyboard, network and sign-in), just like a new PC.
Keep My Files or Remove Everything
This is the choice that matters most, and the old wording of many guides gets it wrong. Neither option keeps your apps or your settings. The only difference is your personal files.
| Keep my files | Remove everything | |
|---|---|---|
| Personal files (documents, photos) | Kept | Removed |
| Apps you installed | Removed | Removed |
| Changes to settings | Removed | Removed |
| Extra option | Restore preinstalled apps | Clean data |
| Good for | A slow or unstable PC you will keep using | Selling, donating or giving the PC to someone else |
Restore preinstalled apps appears with Keep my files. When it is on, Windows reapplies the PC maker’s customizations, which usually include its preinstalled apps such as a support tool. Turn it off if you want a cleaner system without that software.
Clean data appears with Remove everything. It erases the drive more thoroughly so recovering old files is harder, and Microsoft recommends it when you are giving the PC away. It takes noticeably longer. Microsoft also points out that this is consumer-grade erasure, not a government or industry data-sanitization standard.
A worked example: Priya’s laptop crashes when she opens her photo editor and takes ages to boot. She wants to keep three years of family photos and her tax documents, so she picks Keep my files and turns off Restore preinstalled apps. After the reset she reinstalls only the photo editor and her browser, and the clutter that built up from old trial programs is gone.
Cloud Download or Local Reinstall
After you choose what to keep, Windows asks where to get the new copy of itself.
- Cloud download fetches a fresh copy of Windows from Microsoft, including the latest updates. Choose it when you have a reliable connection, or when you suspect the Windows files on the PC are damaged, since a local reinstall reuses them.
- Local reinstall rebuilds Windows from files already on the PC. Microsoft says it can be faster on a slow internet connection, but the result may not include the latest updates, so plan to run Windows Update afterward.
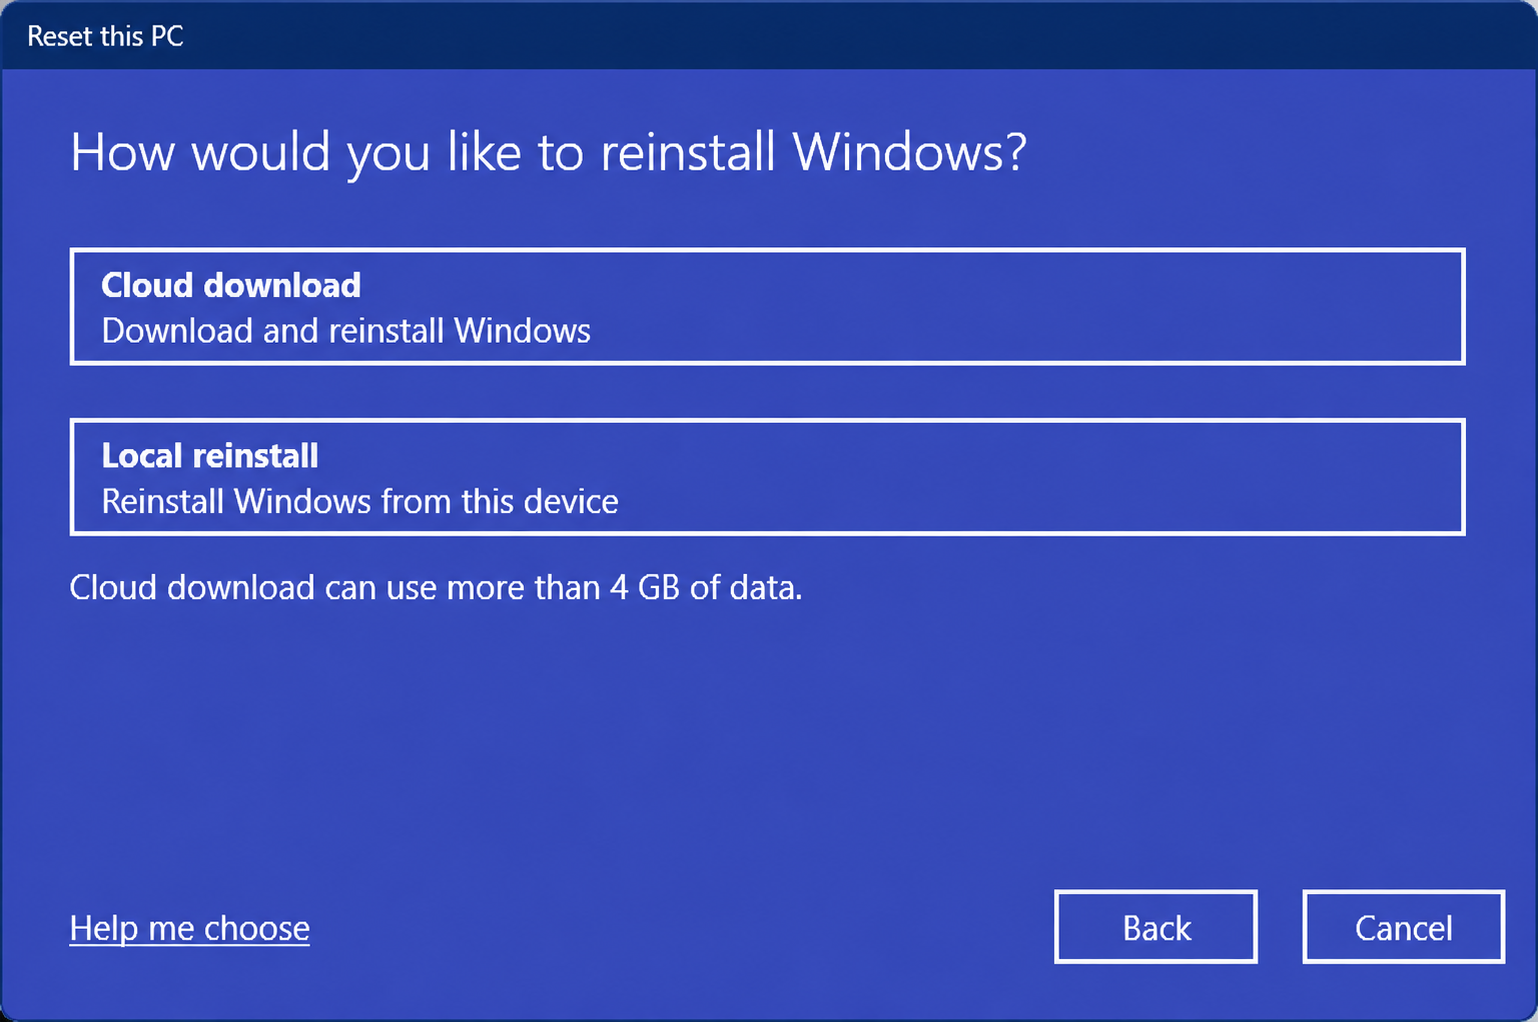
If you aren’t sure, Cloud download is the safer pick on a home connection. It is a sizeable download, so avoid it on a metered mobile hotspot.
Rebuild the PC From the Cloud
Newer Windows 11 builds add a second cloud option called Cloud rebuild. Microsoft’s support page says it needs Windows 11 with the October 2026 Windows non-security update or later, an internet connection and the PC plugged in. If you don’t see it on your Recovery page, your PC doesn’t have it yet; use Reset this PC instead.
- Back up anything you want to keep. Cloud rebuild removes your files.
- Open Settings > System > Recovery.
- Next to Rebuild this PC, select Rebuild PC.
- Choose Remove files if you are keeping the PC, or Remove & sanitize if it is leaving your hands. With Remove & sanitize you then choose Windows disk only or All disks and select Sanitize and install.
- Follow the prompts and leave the PC on power until setup appears.
If Cloud rebuild stops with error 0xc1900200, Microsoft says this usually means the TPM is turned off. Turn it on in the PC’s firmware settings, where it may be called PTT, fTPM or Security Device, then try again. The full requirements are on Microsoft’s Cloud rebuild support page.
Reset Windows 11 When It Won’t Start
If the PC crashes before you can reach Settings, use the Windows Recovery Environment (WinRE), a separate set of repair tools that loads outside normal Windows. There are three ways in, depending on how far the PC gets.
- From the sign-in screen or Start menu: hold the Shift key while you select Power > Restart.
- From Settings: go to System > Recovery and select Restart now next to Advanced startup.
- When Windows can’t load: interrupt startup twice in a row (Microsoft describes turning the PC off as it starts). On the third start, Windows opens Automatic Repair; select Advanced options.
Once you see the blue Choose an option screen:
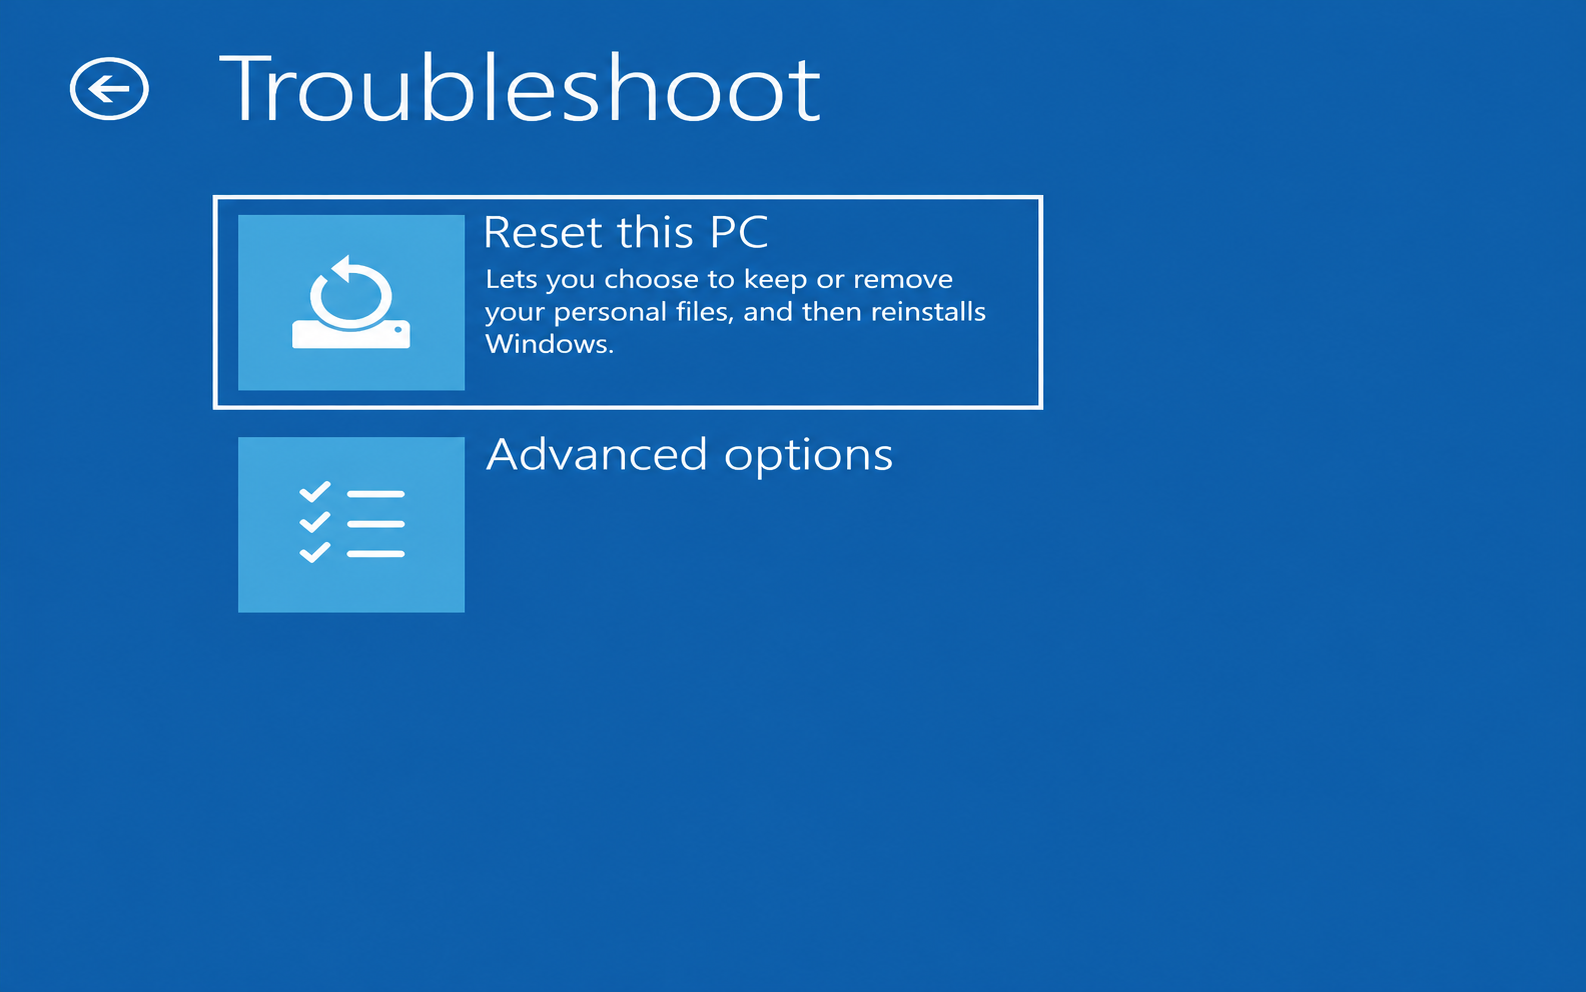
- Select Troubleshoot.
- Select Reset this PC.
- Choose Keep my files or Remove everything, then the download source, exactly as in the Settings method.
- Enter your BitLocker recovery key if asked, then confirm the reset.
There is more detail on each entry route in this walkthrough on how to boot into recovery mode in Windows 11. Microsoft’s own Windows Recovery Environment page lists the same entry methods.
Lighter Fixes to Try Before a Reset
A reset costs you an afternoon of reinstalling apps. If your problem started recently, one of these smaller tools from Microsoft’s recovery options in Windows may fix it with far less disruption.
- Reinstall Windows (keep everything). On Windows 11 version 22H2 or later, Microsoft offers a repair that reinstalls the current version of Windows through Windows Update while keeping your files, apps and settings. Look for the Windows Update repair option on the Settings > System > Recovery page. It is the closest thing to “reload Windows without losing anything.”
- Uninstall updates. If trouble began right after an update, WinRE has Troubleshoot > Advanced options > Uninstall updates, which removes the most recent quality or feature update.
- Point-in-time restore. On Windows 11 version 24H2 or later, Microsoft lists point-in-time restore, which rolls the PC back to a restore point from up to the last three days.
- Go back to the previous version. For 10 days after a Windows version upgrade, Microsoft lets you return to the version you had before.
- Reset settings only. If the PC is fine but a pile of tweaks made it awkward to use, you can reset settings in Windows 11 without touching the operating system.
As a rule of thumb: problems that started on a specific day point to these lighter tools, while months of gradual slowdown, repeated crashes across many apps or suspected leftover junk point to a full reset.
Reload From Installation Media
Sometimes Reset this PC fails or the recovery files on the drive are damaged. Then the fallback is a USB drive or ISO file made with Microsoft’s tools. Microsoft describes two routes on its reinstall with installation media page:
- In-place reinstall from inside Windows. Open setup.exe on the media, select Change what to keep, and choose Keep personal files and apps, Keep personal files only or Keep nothing, then select Install.
- Clean install by booting from the USB drive. This deletes everything on the drive you install to. Microsoft recommends linking your digital license to your Microsoft account first, and choosing the same edition (Home or Pro) that the PC was licensed for.
A clean install takes more work than a reset, including deleting partitions and picking the right drive. If that is the route you need, the wipe and reinstall walkthrough linked in the table at the top covers the full USB process. Some PC makers also include their own factory recovery tools; check the support site for your model if Windows recovery options are missing.
Refresh the Screen or Restart Instead
If “reload” to you means making the screen catch up, you don’t need any of the tools above.
- Refresh a window or the desktop: press F5, or right-click an empty area of the desktop or a File Explorer window and choose Refresh (on the Windows 11 desktop it may sit under Show more options).
- Reload the taskbar and desktop: press Ctrl + Shift + Esc to open Task Manager, find Windows Explorer in the list, select it and choose Restart. The taskbar disappears for a moment and comes back.
- Restart the PC: select Start > Power > Restart. A restart clears memory and finishes pending updates, and it fixes more glitches than people expect. See the different ways to reboot Windows 11 if the Start menu itself is stuck.
After the Reset: Updates, Drivers and Apps
Windows is fresh, but a few jobs finish the reload properly.
- Run Windows Update. Open Settings > Windows Update and select Check for updates. Repeat until nothing new appears. This matters most after a Local reinstall.
- Check optional driver updates. In the same area, under Advanced options, look for optional updates that include drivers for your hardware. If something like the touchpad or Wi-Fi misbehaves, get the driver from your PC maker’s support site.
- Confirm activation. Open Settings > System > Activation. A PC that was activated before a reset normally reactivates automatically once it is online.
- Reinstall apps from trusted sources. Use the Microsoft Store or each developer’s own site. This is a good moment to skip anything you never used.
- Restore your files. If you chose Remove everything, copy your backup back or let OneDrive sync. With Keep my files, your documents should already be in place; open a few to confirm.
How do you know it worked? The PC boots to a clean desktop, Settings shows Windows as activated, Windows Update reports you are up to date, and the crashes that sent you here have stopped. If the same crash returns with a clean system and only one or two apps installed, the cause may be hardware or a driver rather than Windows itself.
Questions About Reloading Windows 11
Do I need a product key after resetting?
Usually not. Windows 11 PCs typically use a digital license tied to the hardware and often to your Microsoft account, so Windows reactivates once it gets online. If you do a clean install from media and the product key screen appears, Microsoft’s page says you can select “I don’t have a product key” and pick the edition that was installed before.
How long does a reset take, and can I stop it?
It depends on the drive speed, how much data you keep, your download speed and whether you turned on Clean data, which adds a lot of time. You can still back out on the confirmation screens, before you select Reset. Once the reset starts, Microsoft says not to restart the device manually, even if the screen stays black for a long while.
Is Reset this PC the same as a clean install?
Close, but not identical. Remove everything gives you a fresh Windows with no personal files or installed apps, but it keeps the drive’s existing layout, and with Local reinstall it rebuilds from files already on the PC. A clean install from USB lets you delete the partitions on the drive and start from Microsoft’s installation files.
What if the reset asks for a BitLocker key I don’t have?
Sign in to your Microsoft account on another device and look up the recovery keys listed there; the key ID on the PC’s screen tells you which one to use. On a work or school PC, the organization’s IT team holds the key. If you are setting things up ahead of time, you can also read about how to turn off BitLocker in Windows 11, but having the key is the simpler safety net.
Will a reset remove viruses?
Try a cleanup first: you can remove malware from Windows 11 with Windows Security scans and Microsoft Defender Offline, which often avoids a reset entirely. If the infection keeps coming back, Remove everything replaces Windows and deletes your files, while Keep my files keeps your documents, so a malicious file hiding among them would survive. Microsoft’s recovery options page suggests reinstalling Windows from installation media when you suspect malware and other fixes fail. Scan your backup before you copy it back, and change passwords from a clean device afterward.
Pick Your Reload and Start
For most slow or crash-prone Windows 11 PCs, the order is simple: back up, note your BitLocker key, then run Reset this PC with Keep my files and Cloud download. Save Remove everything for a PC that is changing hands, and reach for installation media only when the built-in tools fail.

Matthew Burleigh is the founder, head writer, and editor of Solve Your Tech, which he launched in 2012. He has written technology tutorials since 2008 and worked in IT since 2003, including small-business support, IT management, and consulting. He holds Bachelor’s and Master’s degrees in Computer Science from Arizona State University.
Matthew writes practical guides for Windows, iPhone and iPad, Microsoft Office, Outlook, Google apps, and Android. Solve Your Tech’s guides are checked step by step against the device or app maker’s own documentation and tested on his own devices whenever he has the hardware or software, with clear steps, sources, and update dates.
Read more about Matthew and how Solve Your Tech writes and updates its guides, or report a correction.