To clear the cache in Windows 10, open Start > Settings > System > Storage, click Temporary files, check the cache categories you want gone, and click Remove files. Your web browser keeps its own cache, so clear that separately in Edge, Chrome, or Firefox, and run ipconfig /flushdns if websites won’t load after a network change.
There’s no single button that empties every cache. This guide covers the ones that fix most problems: temporary files, browser cache, DNS cache, the Microsoft Store cache, and location history.
The steps are for Windows 10 version 22H2, which no longer gets regular security updates. On Windows 11, see the steps for deleting temp files in Windows 11.
Which Cache Should You Clear?
A cache is a set of saved copies that helps Windows and apps load things faster. Each problem points to a different one:
- Low on disk space: clear temporary files with Settings or Disk Cleanup.
- A website looks broken or out of date: clear your browser’s cached images and files.
- Websites won’t load, or a site moved to a new server: flush the DNS cache.
- The Microsoft Store won’t open or download: reset the Store cache.
- You want to remove where your PC has been: clear location history.
Cache files are rebuilt as you use your PC, so clearing them fixes a specific problem but won’t make a computer permanently faster.
Before you start, save your work and close the apps you don’t need. Files that an open app is using can’t be deleted, so closing apps lets the cleanup remove more.
Clear Temporary Files in Settings
- Click Start, then the gear icon to open Settings. You can also press Windows key + I.
- Click System, then Storage in the left column.
- Under your (C:) drive, click Temporary files. If you don’t see it, click Show more categories. Windows takes a few seconds to measure each category.
- Check the boxes you want to remove. Temporary files, Temporary Internet Files, Thumbnails, Delivery Optimization Files, and DirectX Shader Cache are all safe cache categories.
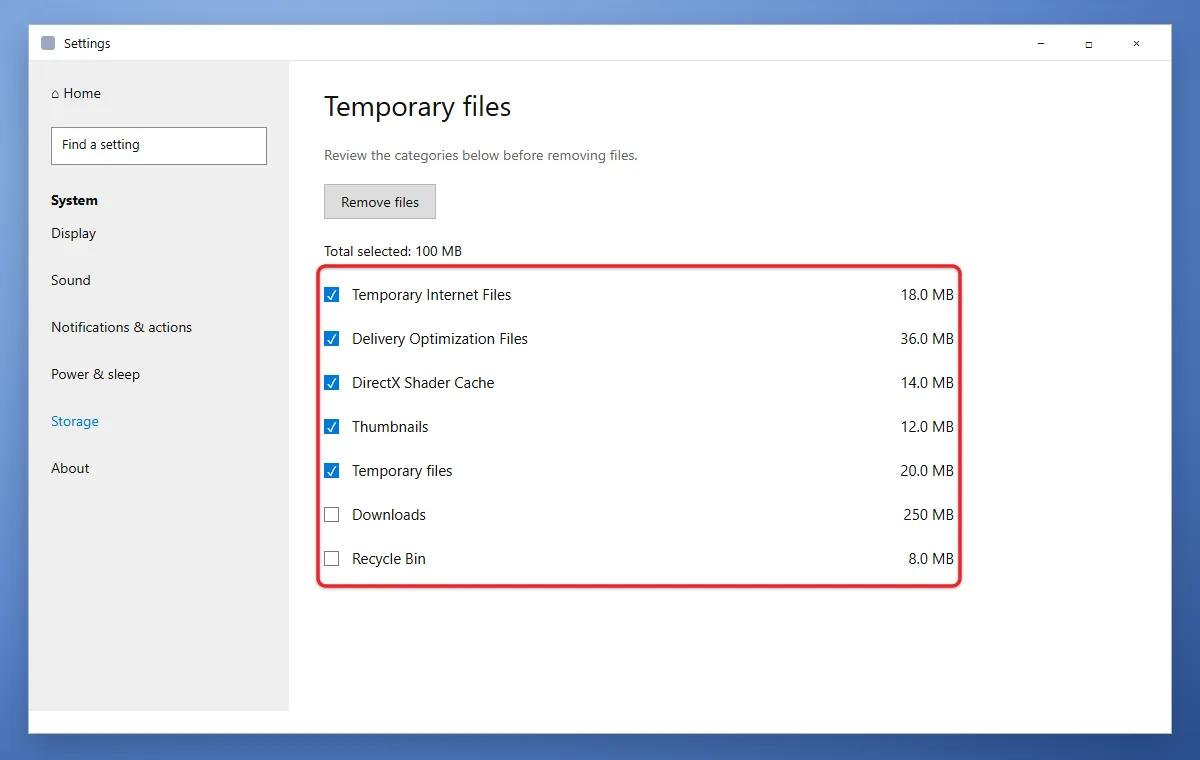
- Click Remove files at the top of the list and wait for Windows to finish. On a full drive this can take several minutes, and the page may look stuck while it works. Let it finish.
Before you click Remove files, look at three boxes that hold more than cache:
- Downloads deletes everything in your Downloads folder, including documents and installers you saved on purpose.
- Recycle Bin permanently deletes the items in it.
- Previous Windows installation(s) deletes the files that let you go back to an earlier version of Windows. Microsoft notes this can’t be undone.
Leave those unchecked unless you’ve looked at what’s in them.
To confirm it worked, go back to Storage. The Temporary files number should be much smaller. It won’t reach zero, because Windows and open apps create new temporary files right away.
Use Disk Cleanup Instead
Disk Cleanup is the older tool, and it’s still in Windows 10. It’s useful when you want to clear system files from one window.
- Click the search box on the taskbar, type Disk Cleanup, and press Enter. You can also press Windows key + R, type cleanmgr, and click OK.
- Choose the (C:) drive if asked and click OK. Windows calculates how much space you can free.
- Check the categories to delete, such as Temporary Internet Files, Temporary files, and Thumbnails. Click a category name to read what it holds.
- For Windows Update leftovers, click Clean up system files, choose (C:) again, and check Windows Update Cleanup. This step asks for administrator permission.
- Click OK, then Delete Files to confirm.
The same warnings apply here. Leave Downloads and Previous Windows installation(s) unchecked unless you’re sure.
Empty the Temp Folder by Hand
If Settings and Disk Cleanup leave temporary files behind, you can delete your user Temp folder directly. This folder holds working files that apps create and often forget to remove.
- Press Windows key + R, type %temp%, and press Enter. File Explorer opens your Temp folder.
- Press Ctrl + A to select everything in it.
- Press Delete. If Windows asks for permission, click Continue.
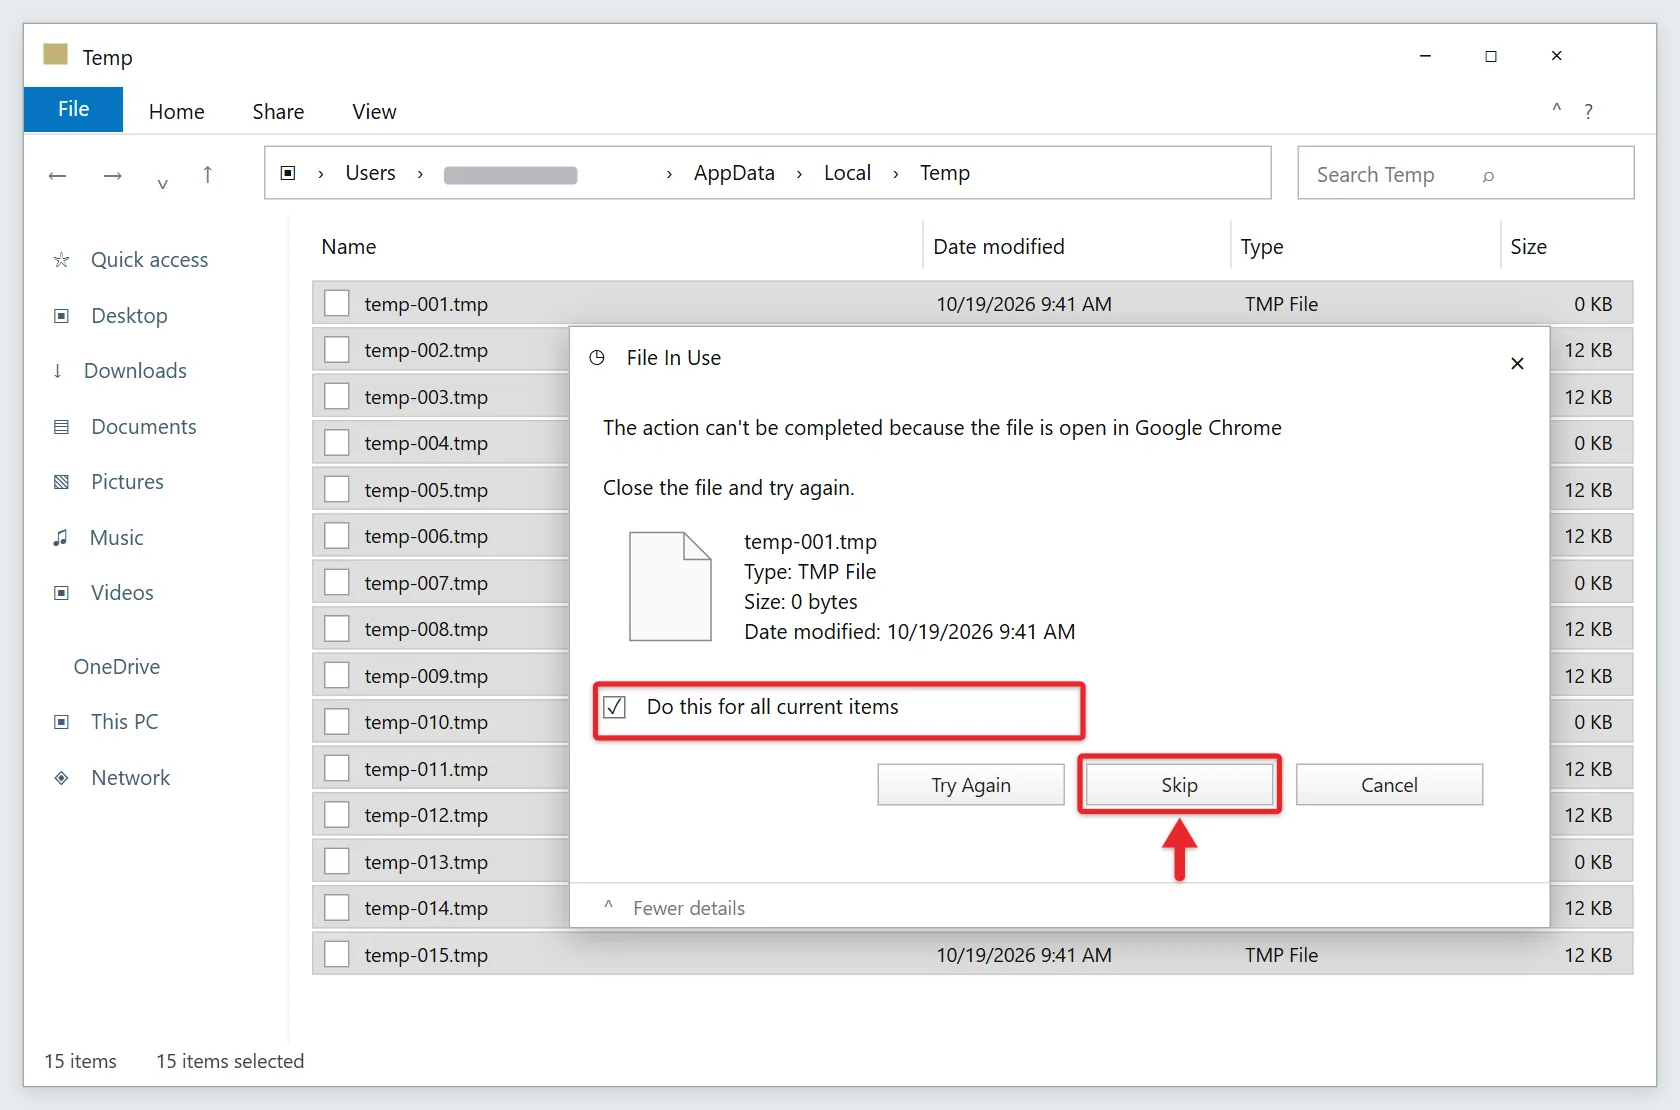
- If you see File In Use, check Do this for all current items and click Skip. Those files belong to open apps.
Only delete the contents of this folder, not the folder itself. Empty the Recycle Bin afterward to get the space back.
Clear the Browser Cache
The browser cache stores copies of images and page files so sites load faster. Clearing only the cache keeps you signed in to websites. If one page looks wrong, try a hard refresh first by pressing Ctrl + F5 while the page is open.
Microsoft Edge
- Open Edge and press Ctrl + Shift + Delete. The Clear browsing data window opens. You can also get there from Settings and more (the three dots) > Settings > Privacy, search, and services > Choose what to clear.
- Set Time range to All time.
- Check Cached images and files and uncheck the other boxes if you want to keep your history, cookies, and saved passwords.
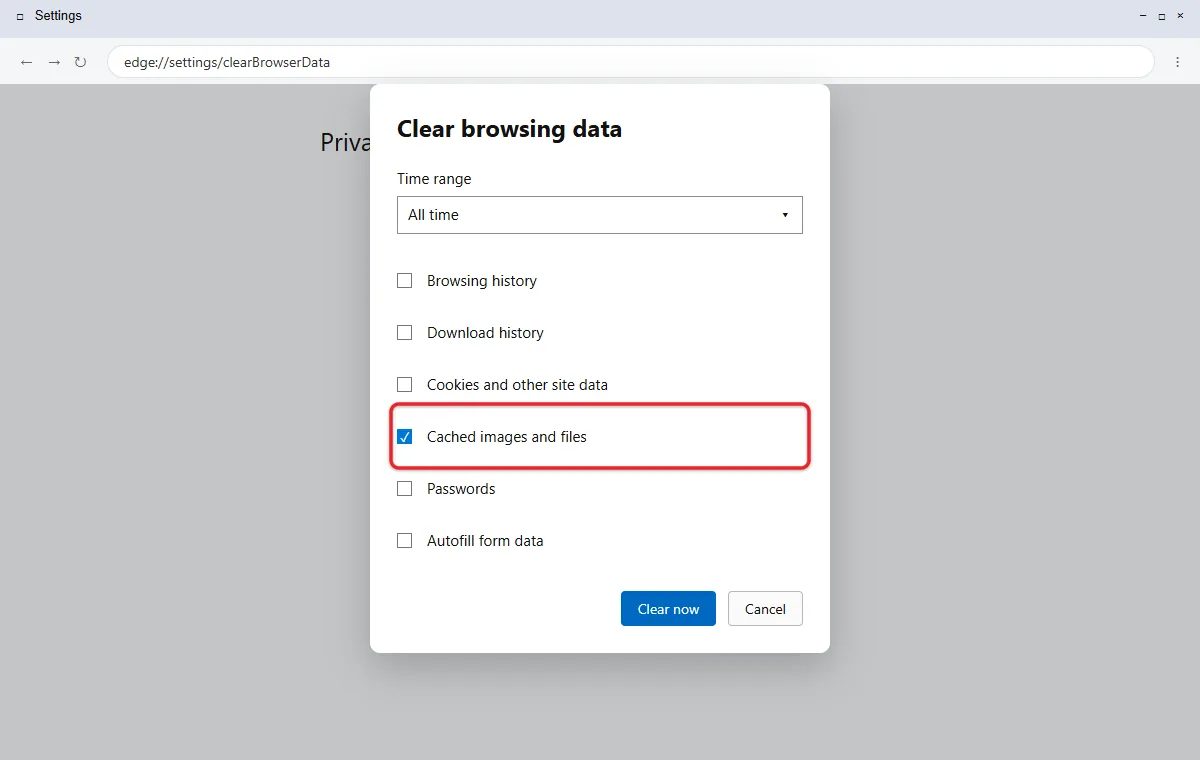
- Click Clear now.
Microsoft covers these options in its guide to deleting browsing history in Microsoft Edge. It also notes that if sync is on, the data you clear is removed on all your synced devices. For more options, read about clearing the cache in Microsoft Edge.
Google Chrome
- Open Chrome and press Ctrl + Shift + Delete. The Delete browsing data window opens.
- Set Time range to All time.
- Check Cached images and files and uncheck anything you want to keep.
- Click Delete data, then reload the page that was giving you trouble.
Google’s clear browsing data help page explains what each category removes. Clearing cookies as well signs you out of most websites.
Mozilla Firefox
- Click the menu button (three lines) and choose Settings.
- Click Privacy & Security on the left.
- In the cookies and browsing data section, click Clear Data.
- Check only Temporary cached files and pages, choose Everything if a time range appears, and click Clear.
Mozilla’s guide to clearing the Firefox cache shows the same steps. If only one site misbehaves, you can delete cookies from one site in Firefox instead.
Flush the DNS Cache
DNS is the system that turns a website name into the address your PC connects to. Windows remembers those addresses in its DNS cache. If a site changed servers or your network settings changed, an old entry can stop the page from loading.
- Click the search box on the taskbar and type cmd.
- Click Command Prompt in the results.
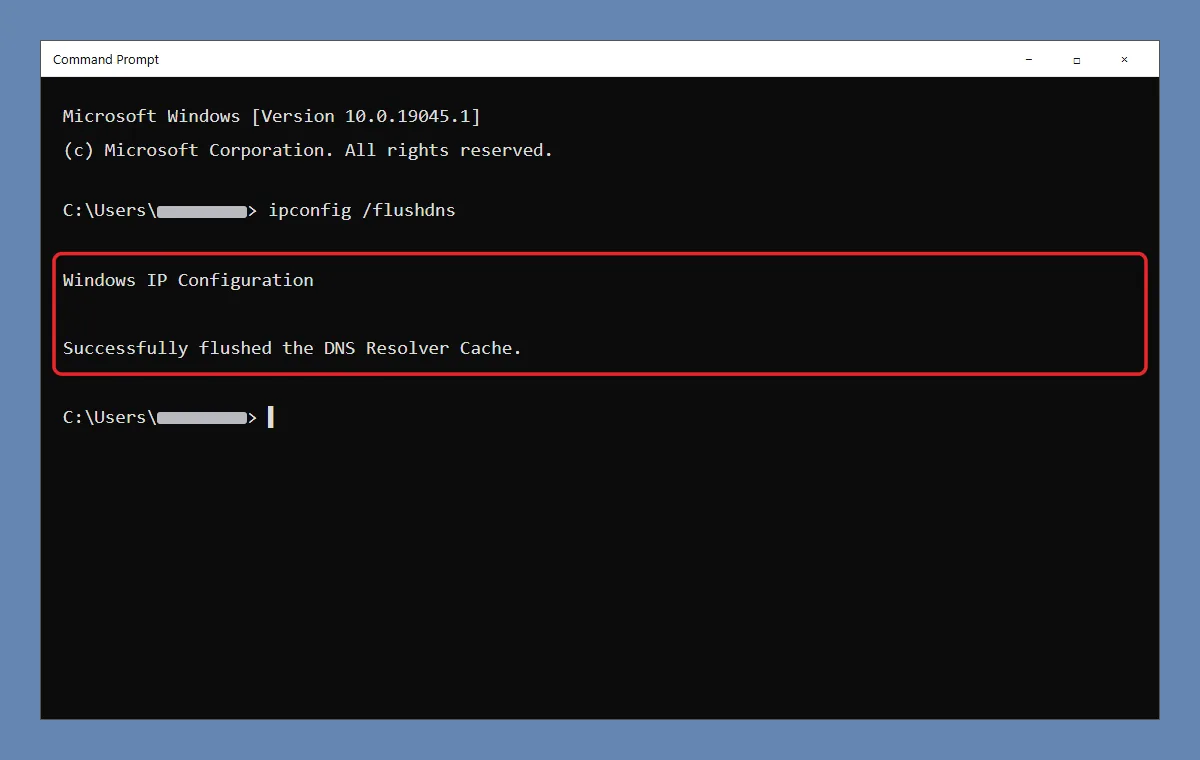
- Type ipconfig /flushdns and press Enter.
- Windows replies with Successfully flushed the DNS Resolver Cache. Close the window and try the website again.
The command doesn’t change any network settings. If you get a message that the operation requires elevation, right-click Command Prompt in the search results, choose Run as administrator, and run the command again. Microsoft’s ipconfig reference describes what it does. To see or change which DNS servers your PC uses, follow the steps to find your primary and secondary DNS servers.
Flushing DNS is also the last step after you edit the hosts file in Windows 11 or Windows 10.
Reset the Microsoft Store Cache
- Press Windows key + R to open the Run box.
- Type wsreset.exe and click OK.
- A blank window opens and closes after about ten seconds, then the Store opens on its own. Don’t close the blank window while it runs.
This doesn’t remove your installed apps. It’s also the first fix to try when the Microsoft Store doesn’t open.
Clear Location History
Windows keeps a short location history that apps with permission can use. Microsoft’s location privacy page says Windows 10 keeps it on the device for 24 hours.
- Open Start > Settings > Privacy.
- Click Location on the left.
- Under Location history, click Clear.
This only clears the history on this PC. Location activity saved to your Microsoft account is managed separately in your account’s privacy settings.
Clear the Cache Automatically With Storage Sense
Storage Sense deletes temporary files on a schedule so you don’t have to.
- Open Start > Settings > System > Storage.
- Switch Storage Sense to On, then click Configure Storage Sense or run it now.
- Under Run Storage Sense, choose how often it runs.
- Check Delete temporary files that my apps aren’t using.
- Set the Recycle Bin and Downloads options. Choose Never for Downloads if you keep files there.
- To clean right away, scroll down and click Clean now.
Microsoft’s Storage Sense guide notes that it only works on the system drive, usually C:, runs only while you’re signed in, and applies only to your user account. If you use OneDrive, the same page can make unused files online-only, which frees space without deleting them. To fix OneDrive itself, clear the OneDrive cache.
Caches You Don’t Need to Clear by Hand
Some guides tell you to empty folders such as Prefetch or SoftwareDistribution, or to clear the “RAM cache.” You can skip those:
- Prefetch helps apps start faster. Windows manages that folder on its own and refills it as you open apps, so emptying it gives no lasting benefit.
- SoftwareDistribution holds Windows Update files. Use Windows Update Cleanup in Disk Cleanup instead of deleting the folder.
- Memory (RAM) is emptied when you restart the PC. You don’t need a tool for it.
If Cleanup Doesn’t Work
- Temporary files stay large. Restart the PC, then run the cleanup again before opening other apps.
- Disk Cleanup or Settings seems frozen. Give it several minutes, especially on an older hard drive.
- A website is still broken. Try it in an InPrivate or Incognito window. If it works there, clear that site’s cookies too.
- wsreset.exe does nothing. Restart the PC and try again. If the Store still won’t open, follow the rest of Microsoft’s Store troubleshooting steps.
- Options are greyed out on a work PC. Your organization may manage these settings. Ask your IT department.
Windows 10 Cache Questions
Is it safe to clear the cache in Windows 10?
Yes. Temporary files, thumbnails, and browser cache are rebuilt as needed. The only risk is checking boxes that hold personal files, such as Downloads or Recycle Bin.
Will clearing the cache delete my files or passwords?
No, as long as you only check cache categories. Your documents, photos, and apps stay put, and clearing only Cached images and files in a browser keeps your passwords and logins.
Why do some temp files stay after I clear them?
Files that a running app is using can’t be deleted. Restart the PC and run the cleanup again to remove more of them.
How often should I clear the cache?
Only when you need space or something isn’t working. Clearing it every day makes browsers and File Explorer rebuild those files, which can briefly slow things down. Storage Sense can handle routine cleanup for you.
Does clearing the cache speed up my computer?
It can help when your drive is nearly full or a cache file is corrupted. On a PC with plenty of free space, you probably won’t notice a difference.
Does clearing the cache still matter now that Windows 10 support has ended?
Yes, the steps work the same. Clearing cache doesn’t add security updates, though, so plan to enroll in Extended Security Updates or move to Windows 11 if your PC can run it.

Matthew Burleigh is the founder, head writer, and editor of Solve Your Tech, which he launched in 2012. He has written technology tutorials since 2008 and worked in IT since 2003, including small-business support, IT management, and consulting. He holds Bachelor’s and Master’s degrees in Computer Science from Arizona State University.
Matthew writes practical guides for Windows, iPhone and iPad, Microsoft Office, Outlook, Google apps, and Android. Solve Your Tech’s guides are checked step by step against the device or app maker’s own documentation and tested on his own devices whenever he has the hardware or software, with clear steps, sources, and update dates.
Read more about Matthew and how Solve Your Tech writes and updates its guides, or report a correction.