To make your screen as dim as possible in Windows 11, drag the brightness slider in Quick Settings (Windows key + A) all the way down, then turn on Night light and dark mode. To go below Windows’ lowest level, lower the gamma with Windows’ built-in Calibrate display color tool or lower brightness in your graphics control panel.
These steps cover current Windows 11 releases on laptops, tablets and desktop PCs. External monitors work differently, and there’s a separate section for them below.
The steps follow Microsoft’s article on changing display brightness and color and its PowerToys Power Display documentation.
Which Method Should You Use?
| Your goal | Best option |
|---|---|
| Turn the backlight all the way down | Brightness slider or brightness keys |
| Stop Windows from brightening the screen | Turn off content-based and light-sensor brightness |
| Make a dark room more comfortable | Night light and dark mode |
| Go darker than the slider’s lowest point | Calibrate display color (gamma) or your graphics app |
| Dim an external monitor | The monitor’s own buttons or PowerToys Power Display |
Set Brightness to the Minimum
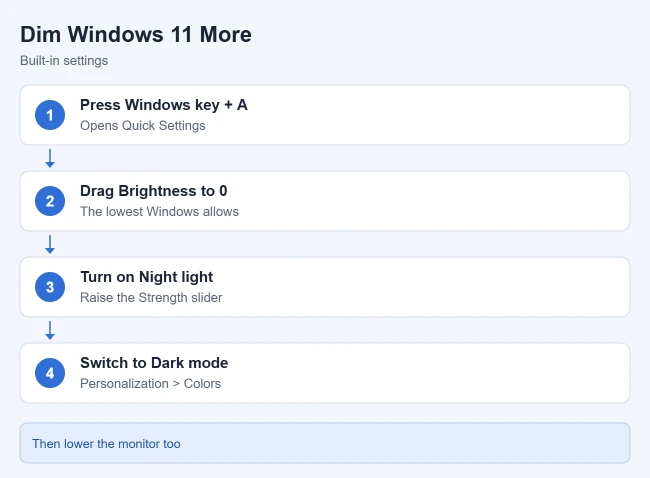
- Press Windows key + A, or select the Network icon on the right side of the taskbar, to open Quick Settings.
- Drag the Brightness slider (the sun icon) all the way to the left.
The screen drops to the lowest backlight level your display supports through Windows. On most screens, 0 still leaves the backlight on, so you can still see the picture.
You can also go to Settings > System > Display and drag the Brightness slider under Brightness & color. On most laptops, the brightness keys (usually function keys with a sun icon) do the same thing. If they don’t respond, hold Fn while you press them. There are several more ways to adjust brightness on Windows 11.
Let Energy saver dim the screen on battery
On a laptop, Energy saver can lower brightness for you when the battery runs low.
- Go to Settings > System > Power & battery.
- Select Energy saver to expand it.
- Turn on Lower screen brightness when using energy saver.
- Choose a level next to Turn energy saver on when battery level is at, or turn on Always use energy saver.
Older Windows 11 builds call this feature Battery saver. It only works on battery power.
Stop Windows From Raising the Brightness
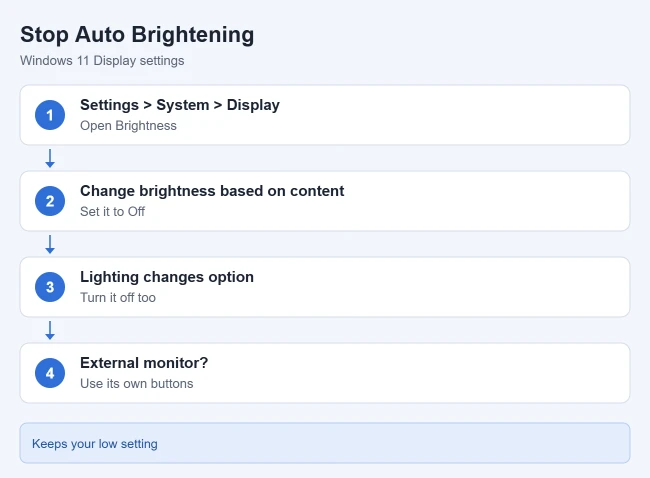
Windows 11 can change brightness by itself, which can undo your low setting.
- Go to Start > Settings > System > Display and select Brightness to expand it.
- Set Change brightness based on content to Off. The other choices are Always and On Battery Only.
- If your PC has a light sensor, also turn off Change brightness automatically when lighting changes.
Brightness stays where you set it instead of rising with bright content or room light. Microsoft notes that turning off content-based brightness may shorten battery life, since that feature exists to save power. On some PCs, the content option appears as a check box labeled Help improve battery by optimizing the content shown and brightness instead.
Make the Screen Look Dimmer
Turn on Night light
Night light shifts colors warmer and cuts blue light, which makes the screen feel less harsh in a dark room.
- Go to Settings > System > Display > Night light.
- Turn it on, then move the Strength slider to the right for a warmer screen.
- To run it automatically, turn on Schedule night light and choose Sunset to sunrise or Set hours.
You can also turn Night light on or off from Quick Settings. If the Night light switch is grayed out, try updating your display driver. It isn’t available with some drivers, such as DisplayLink docks or the Microsoft Basic Display Adapter.
Switch to dark mode
Go to Settings > Personalization > Colors and set Choose your mode to Dark. Menus, Settings and many apps switch to dark backgrounds, so there’s far less white on the screen. For more detail, here’s how to turn on dark mode in Windows 11. A dark desktop background under Personalization > Background helps too.
Try a color filter
Press Windows key + U, select Color filters, turn on the Color filters switch, and pick a filter. Grayscale removes color, which some people find calmer at night. It doesn’t lower the backlight, so use it alongside the brightness slider, not instead of it. Microsoft’s color filters guide has the details.
Check HDR
If your screen supports HDR and it’s on, the brightness slider behaves differently. Go to Settings > System > Display > HDR. On an external HDR monitor, move the SDR content brightness slider left to dim normal apps and the desktop. On a built-in HDR screen, regular brightness controls everyday content, and turning HDR off can make the slider easier to predict. For what each slider does, read HDR settings in Windows.
How to Go Below the Minimum Brightness
When the slider is already at 0, you can darken the image itself. This lowers the light the pixels let through, not the backlight, so blacks and dark grays can blend together. Make small changes.
Use Calibrate display color (built in)
- Press Windows key + R, type dccw, and press Enter. You can also search the Start menu for Calibrate display color.
- Select Next until you reach Adjust gamma.
- Drag the gamma slider down a little. The whole screen gets darker as you move it.
- Select Next, then Skip brightness and contrast adjustment, since those pages use the monitor’s own buttons.
- On the last page, select Finish to keep the change. Uncheck the ClearType option first if you don’t want to retune text.
To undo it, run dccw again and move the gamma slider back, or select Cancel before Finish.
Use your graphics app
Graphics drivers can also lower the brightness of the image. Write down your original values first so you can restore them.
- Open your graphics app from the Start menu: NVIDIA Control Panel, AMD Software, or Intel Graphics Command Center.
- Go to the color settings. In NVIDIA Control Panel, open Display > Adjust desktop color settings and select Use NVIDIA settings. In AMD Software, open the Display tab and turn on Custom Color. In Intel Graphics Command Center, open Display > Color.
- Lower Brightness (or Gamma in NVIDIA and Intel) a little at a time until the screen is dim enough.
- To undo it, return to the same screen and restore your original values.
Menu names change between driver versions, so look for a color or brightness page if yours differs. Use either this method or dccw, not both, so you know which one to reset.
Use the Monitor’s Own Menu
On a PC with an external monitor, you might not see the brightness slider at all. In that case, use the buttons on the monitor. Open its on-screen menu and lower Brightness first, then Contrast. Many monitors also have an eco or low-blue-light picture mode that’s dimmer than the standard mode. These settings stay with the monitor, whichever PC you plug in.
If you use a second monitor, you can change brightness on a second monitor separately.
If that screen’s text and apps also look the wrong size, here’s how to adjust screen size on a second monitor.
Control external monitors with PowerToys
Microsoft’s free PowerToys app includes Power Display, which puts brightness, contrast and other monitor controls in a single flyout. It talks to monitors over DDC/CI, a standard that lets a PC send settings to a monitor through the video cable, so you can lower an external monitor’s brightness from Windows instead of using its buttons. If nothing happens, check that DDC/CI is turned on in the monitor’s menu.
DDC/CI can be unreliable on some monitors, and on a small number of monitors with faulty capability data, reading it can trigger a Windows crash. Power Display then turns itself off until you turn it back on. Try it carefully, and use the monitor’s buttons if it misbehaves.
Troubleshooting
- The brightness slider is missing. On a desktop with an external monitor, that’s expected. On a laptop, open Device Manager in Windows 11, expand Display adapters (a yellow warning icon there points to a driver problem), right-click your graphics adapter and choose Update driver. If it says Microsoft Basic Display Adapter, install the driver from your PC maker or graphics vendor, then restart.
- The brightness keys do nothing. Hold Fn, or install your laptop maker’s keyboard or hotkey app from its support site.
- Brightness changes by itself. Turn off both automatic options under Settings > System > Display > Brightness, and check whether Energy saver turned on.
- The screen is too dark after calibration. Run dccw again, or reset your graphics app’s color settings to the defaults.
Frequently Asked Questions
Why is the brightness slider missing?
External monitors often don’t let Windows control brightness. Use the monitor’s buttons or PowerToys Power Display. On a laptop, a missing slider usually points to a display driver problem.
Why does my brightness keep changing?
Content-based or light-sensor brightness is probably on. Turn both off in Settings > System > Display > Brightness. Energy saver can also dim the screen when the battery runs low.
Does Night light lower brightness?
Not technically. It changes the color, not the backlight, but the warmer tone looks dimmer and is easier on your eyes at night.
Can I turn the screen completely black?
Not with the slider, since 0 still leaves some backlight. If you want the screen off while the PC keeps running, set a short time under Settings > System > Power & battery > Screen, sleep & hibernate timeouts.
Does lower brightness save battery?
Yes. The screen is one of a laptop’s biggest power users, so a lower setting helps the battery last longer.

Matthew Burleigh is the founder, head writer, and editor of Solve Your Tech, which he launched in 2012. He has written technology tutorials since 2008 and worked in IT since 2003, including small-business support, IT management, and consulting. He holds Bachelor’s and Master’s degrees in Computer Science from Arizona State University.
Matthew writes practical guides for Windows, iPhone and iPad, Microsoft Office, Outlook, Google apps, and Android. Solve Your Tech’s guides are checked step by step against the device or app maker’s own documentation and tested on his own devices whenever he has the hardware or software, with clear steps, sources, and update dates.
Read more about Matthew and how Solve Your Tech writes and updates its guides, or report a correction.