To use Text to Columns in Excel, select the column you want to split, go to Data > Text to Columns, choose Delimited, check the character that separates your data (such as Comma or Space), pick a Destination cell, and click Finish. Excel moves each piece of text into its own column, using the cells to the right of the starting point.
These steps cover the Convert Text to Columns Wizard in Excel for Microsoft 365, Excel 2024, 2021, 2019 and 2016 on Windows, and the same wizard in Excel for Mac. Excel for the web works differently, and that’s covered in its own section below. Microsoft’s Convert Text to Columns Wizard page is the source for the basic menu path.
Before you split anything
Text to Columns rewrites cells, so a minute of setup saves cleanup later.
- Work with one column at a time. Your selection can be as many rows as you like, but Microsoft notes it can’t include more than one column.
- Make room on the right. The split pieces land in the columns next to your data and replace whatever is there. Insert empty columns first, or send the results to a blank area with the Destination box.
- Keep a copy. If the original text matters, copy the column to another sheet before you start. Ctrl+Z (Command+Z on a Mac) undoes a split right after you make it, but a backup is safer.
- Know your delimiter. A delimiter is the character that marks where one piece ends and the next begins, like the comma in “Austin, TX” or the space in “Alex Rivera.”
If all you need is a quick split of one cell, our guide on how to split a cell in Excel compares every method side by side. This page goes deeper into the wizard itself.
How to split text with the Convert Text to Columns Wizard
- Select the cells. Click the first cell with text and drag down, or click the column letter to select the whole column. Leave out the header if you don’t want it split.
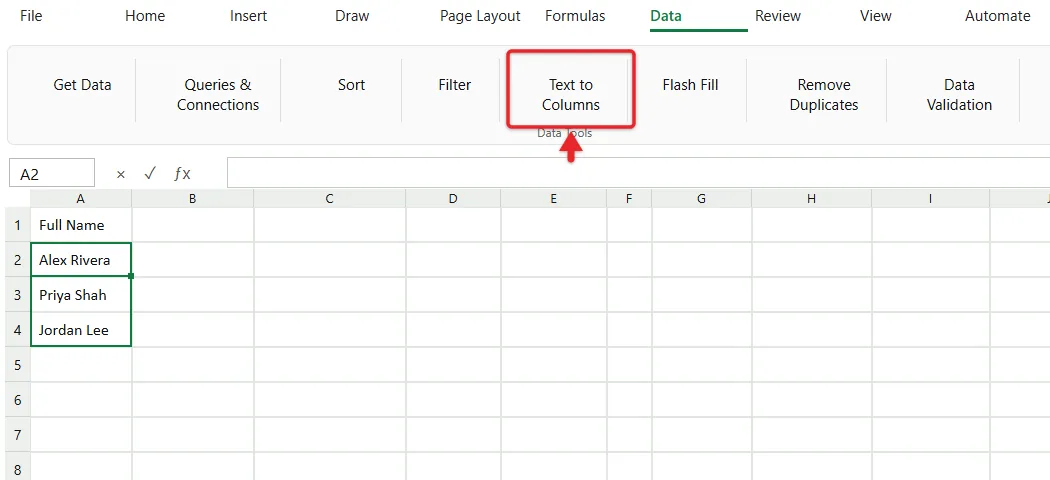
- Open the wizard. On the Data tab, in the Data Tools group, click Text to Columns. On Windows you can also press Alt, then A, then E. A window titled Convert Text to Columns Wizard – Step 1 of 3 opens.
- Choose the data type. Select Delimited if a character such as a comma, space or tab separates the parts. Select Fixed width if every part is the same number of characters. Click Next.
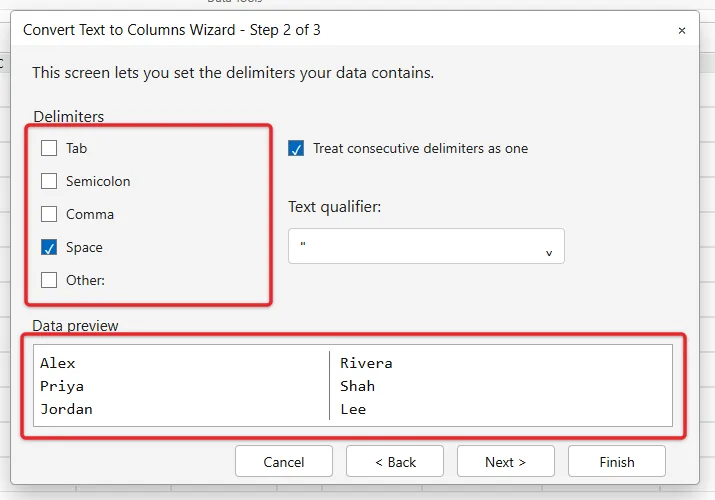
- Pick the delimiter. In Step 2, check the box that matches your data, such as Comma or Space, and clear any boxes you don’t need (Tab is often checked by default). The Data preview at the bottom draws lines where each split will happen. Click Next.
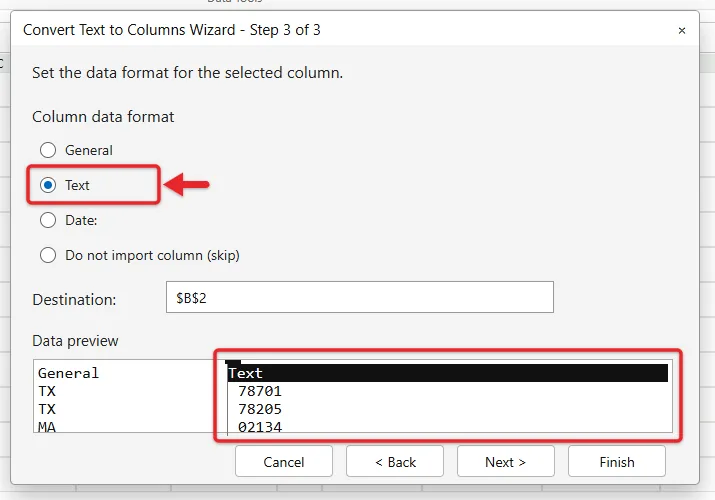
- Set each column’s format. In Step 3, click a column in the Data preview, then choose General, Text, Date or Do not import column (skip). The next section explains when each one matters.
- Choose where the results go. The Destination box shows the top-left cell for the output. Leave it as is to split in place, or type a cell such as $C$2 to keep the original column untouched.
- Click Finish. Excel fills the new columns. If those cells already hold data, Excel asks whether you want to replace it. Click OK only if you’re sure, or Cancel to go back.
To check the result, click a few of the new cells and look at the formula bar. Each cell should hold one clean piece of text with no stray commas or leading spaces. If something looks wrong, press Ctrl+Z right away and run the wizard again with different options.
Delimited or Fixed width?
Most data people split is delimited: names with spaces, addresses with commas, exports with tabs or semicolons. Pick Delimited whenever you can point to a character that sits between every piece.
Pick Fixed width when there’s no separator but the positions never change. Product codes like NY20261026A, where the first two letters are always a state and the next eight digits a date, are a good fit. In Step 2 of a fixed-width split, the Data preview shows a ruler:
- Add a break: click the ruler or preview at the position where a new column should start. A vertical line appears.
- Move a break: drag the line left or right.
- Remove a break: double-click the line.
Excel sometimes suggests break lines on its own. Check them against a few rows before you continue, because a suggestion that fits the first row can cut a longer entry in half. If your entries vary in length, Fixed width is the wrong tool. Use Delimited instead, or a formula.
What the delimiter options do
Step 2 of a delimited split has five checkboxes and two extra settings. You can check more than one box at once.
- Tab: for text copied from web pages, other programs or tab-separated files.
- Semicolon: common in exports from regions that use the comma as a decimal mark.
- Comma: for CSV-style lists and “Last, First” names.
- Space: for names and short phrases. Be careful, because every space counts, including the one inside “San Antonio.”
- Other: type any single character in the box, such as
-,/,|or@(handy for splitting an email address into a user name and a domain).
Treat consecutive delimiters as one stops Excel from creating empty columns when two delimiters sit side by side. Turn it on when your data has double spaces, or when you check both Comma and Space for text like “Austin, TX” (the comma and the space after it would otherwise leave a blank column between the city and the state).
Text qualifier tells Excel which character wraps a value that should stay together. The default is the double quotation mark. Microsoft’s Text Import Wizard page, which describes the same options, gives the example of “Dallas, Texas” in quotation marks: with a comma delimiter and the quotation mark as the qualifier, it stays in one cell. Set the qualifier to {none} and it splits into two cells.
Column data formats: keep ZIP codes, IDs and dates intact
Step 3 is easy to skip, and skipping it causes most Text to Columns surprises. Excel applies the format you choose to each new column as it’s created.
| Format | What it does | Use it for |
|---|---|---|
| General | Numbers become numbers, date-like text becomes dates, everything else stays text | Names, quantities, prices |
| Text | Keeps the characters exactly as they appear | ZIP codes, phone numbers, account numbers, part codes like 3-4 |
| Date | Reads the text as a date in the order you pick (MDY, DMY, YMD and others) | Dates stored as text, or dates from another country’s format |
| Do not import column (skip) | Leaves that piece out entirely | Middle initials or extra fields you don’t need |
With General, the ZIP code 02134 turns into 2134 and a code like 3/4 can turn into a date. Choosing Text for those columns prevents both. If dates and vanishing numbers are a regular headache for you, read why Excel keeps changing numbers to dates for the other fixes.
The Advanced button in Step 3 lets you set the decimal and thousands separators your text uses, and tell Excel that a trailing minus sign (as in 150-) means a negative number. That’s useful for reports exported from accounting systems.
Worked examples with sample data
Split full names into first and last names
Column A holds full names, and column B is empty.
| A (before) | A (after) | B (after) |
|---|---|---|
| Alex Rivera | Alex | Rivera |
| Priya Shah | Priya | Shah |
| Jordan Lee | Jordan | Lee |
- Select A2:A4 and click Data > Text to Columns.
- Choose Delimited, click Next, check Space only, and turn on Treat consecutive delimiters as one in case of double spaces.
- Click Next, leave both columns as General, and click Finish.
A name with a middle name, like “Mary Ann Brooks,” produces three columns, so leave an extra empty column or check those rows afterward. To put the names back together later, follow the steps to combine first and last names in Excel.
Split city, state and ZIP code
Addresses mix two delimiters, and some cities have spaces in their names. Two short passes handle that cleanly.
| A (before) | City | State | ZIP |
|---|---|---|---|
| Austin, TX 78701 | Austin | TX | 78701 |
| San Antonio, TX 78205 | San Antonio | TX | 78205 |
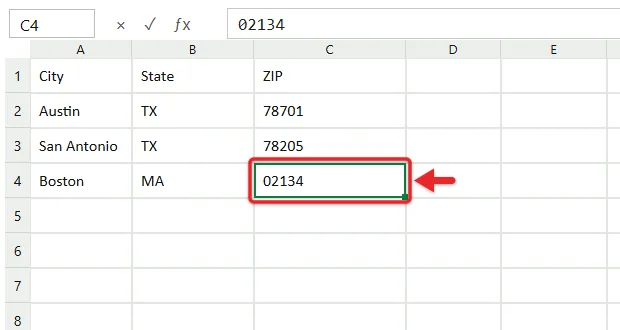
| Boston, MA 02134 | Boston | MA | 02134 |
- First pass, comma only. Select the addresses, open Text to Columns, choose Delimited, and check only Comma. Click Finish. The city lands in column A and ” TX 78701″ in column B.
- Second pass, space. Select column B, open Text to Columns again, check Space and Treat consecutive delimiters as one, then click Next.
- Protect the ZIP code. In Step 3, click the ZIP column in the preview and choose Text, so 02134 keeps its leading zero. Click Finish.
Splitting on comma and space in a single pass would break “San Antonio” into two columns and push the state and ZIP out of line for that row.
Split dates, or turn text dates into real dates
To pull a date apart into month, day and year, use Delimited with Other set to /.
| A (before) | Month | Day | Year |
|---|---|---|---|
| 10/26/2026 | 10 | 26 | 2026 |
| 3/4/2026 | 3 | 4 | 2026 |
This is most reliable when the cells hold text, such as dates pasted from another program. If Excel already treats them as real dates (they align to the right and change when you apply a different date format), use the MONTH, DAY and YEAR functions instead, for example =MONTH(A2), which read the date value directly.
The opposite job is just as common. Exports sometimes store dates as text like 20261026, which Excel can’t sort or calculate with. Select the column, open Text to Columns, choose Delimited, clear every delimiter box, and click Next. In Step 3, choose Date and pick YMD from the list, then click Finish. Excel converts each entry into a real date that you can format however you like.
Other ways to split text: TEXTSPLIT and Flash Fill
Text to Columns gives you a one-time, static result. If the original text changes, the split columns don’t. Two other tools handle different situations.
TEXTSPLIT is a formula, so its results update when the source changes. Microsoft’s TEXTSPLIT function page lists it for Excel for Microsoft 365 (Windows and Mac) and Excel 2024. A few examples:
=TEXTSPLIT(A2," ")splits a name at each space, across columns.=TEXTSPLIT(A2,{","," "},,TRUE)splits at commas and spaces and ignores the empty values that double delimiters would create.=TEXTSPLIT(A2,,",")splits at commas down rows instead of across columns, which Text to Columns can’t do.
The results “spill” into the neighboring cells. If any of those cells hold data, you get a #SPILL! error instead of overwriting anything, which is a nice safety net. To freeze the results as plain text, copy them and use Paste Values.
Flash Fill works from an example. Type the first result you want next to your data (for example “Alex” beside “Alex Rivera”), move down one cell, and press Ctrl+E. It’s good for messy text with no consistent delimiter. Our separate guide on how to use Flash Fill in Excel covers the details and its quirks.
| Tool | Updates automatically | Best for |
|---|---|---|
| Text to Columns | No | Large, consistent data; fixing formats like text dates and leading zeros |
| TEXTSPLIT | Yes | Data that changes, splitting into rows, Excel for the web |
| Flash Fill | No | Irregular text where showing an example is easier than setting rules |
Text to Columns in Excel for the web and Excel for Mac
Excel for Mac has the same three-step wizard. Select the column, click the Data tab, and click Text to Columns. The options, including Treat consecutive delimiters as one, the text qualifier and the column formats, match the Windows version. Use Command+Z to undo.
Excel for the web doesn’t have the full Convert Text to Columns Wizard. Microsoft’s distribute cell contents page describes a simpler web version instead: select the cells, go to Data > Data Tools > Split Text to Columns, check the delimiters you want, and select Apply. You don’t get the text qualifier, column data formats or Destination box, so protect ZIP codes by formatting the target columns as Text first. If you don’t see that option, use TEXTSPLIT in the browser, or open the workbook in the desktop app with Editing > Open in Desktop App.
When Text to Columns doesn’t behave
- “Do you want to replace” message: the output range overlaps cells with data. Click Cancel, insert empty columns to the right of your data or change the Destination to a blank area, and run the wizard again.
- Numbers turned into dates: pieces like 3-4 or 1/2 were read as dates under General. Undo, then set those columns to Text in Step 3.
- Leading zeros disappeared: the column used General. Undo and pick Text. A number format applied afterward can’t bring back zeros that are already gone.
- The Text to Columns button is grayed out: press Esc in case you’re still editing a cell. Also check whether the sheet is protected (Review > Unprotect Sheet) or several sheet tabs are grouped (right-click a tab and choose Ungroup Sheets).
- A message says Excel can only convert one column at a time: your selection spans two or more columns. Select a single column and repeat for each one.
- Text you paste later splits by itself: Excel can reuse your last Text to Columns delimiter settings when you paste text during the same session. Run the wizard on a single cell with all delimiters cleared, click Finish, and paste again.
- Extra blank columns appear: two delimiters sit next to each other. Turn on Treat consecutive delimiters as one.
- Numbers stored as text won’t add up: select the column, open Text to Columns, and click Finish straight away. With General as the format, Excel converts the text to real numbers.
Text to Columns questions, answered
Will the split columns update if I change the original text?
No. Text to Columns writes plain values once. If you need results that follow the source, use TEXTSPLIT, or TEXTBEFORE and TEXTAFTER in Microsoft 365.
Can I split text at a line break inside a cell?
Yes, on Windows. Choose Delimited, check Other, click in its box and press Ctrl+J. The box looks empty, but it now holds the line-break character, and the preview shows the split.
How do I split text into rows instead of columns?
Text to Columns only splits across. Either use TEXTSPLIT with the row delimiter argument, such as =TEXTSPLIT(A2,,","), or split into columns first, then copy the results and use Paste Special with Transpose.
Can I join the columns back together after splitting?
Yes, with a formula such as =A2&" "&B2 or with TEXTJOIN. Our steps to combine columns into one in Excel cover both, including how to skip blank cells.
I split the wrong column. Can I get the original back?
Press Ctrl+Z (Command+Z on a Mac) right away. One undo reverses the whole split, including any cells it replaced. If you’ve closed the workbook since then, undo history is gone, so restore from your backup copy or, for files saved in OneDrive or SharePoint, from File > Info > Version History.
For your first try, copy a short list of names to a new sheet and split it with the Space delimiter. Once the preview and Step 3 formats make sense there, you’ll be ready to clean up a full export without losing a single leading zero.

Matthew Burleigh is the founder, head writer, and editor of Solve Your Tech, which he launched in 2012. He has written technology tutorials since 2008 and worked in IT since 2003, including small-business support, IT management, and consulting. He holds Bachelor’s and Master’s degrees in Computer Science from Arizona State University.
Matthew writes practical guides for Windows, iPhone and iPad, Microsoft Office, Outlook, Google apps, and Android. Solve Your Tech’s guides are checked step by step against the device or app maker’s own documentation and tested on his own devices whenever he has the hardware or software, with clear steps, sources, and update dates.
Read more about Matthew and how Solve Your Tech writes and updates its guides, or report a correction.