Getting all of your spreadsheet data into Excel is usually the first step in making your data easier to understand.
But once that data is in your worksheet, the organization can be just as important as merely having the information.
Unfortunately, this can lead to situations where you have incorrectly organized your data, or you have inadvertently entered data into a row when you meant to enter it into a column.
This can be frustrating, especially if you are dealing with a lot of data.
Luckily Excel 2013 has a feature that allows you to copy a horizontal row of data, then paste it into a vertical column. This prevents tedious re-entry of data and can be a real time-saver.
How to Paste Data Vertically When it is Copied Horizontally in Excel
One important tool in Excel 2013 that we will be using is the Paste Special utility.
Microsoft understands that copying and pasting is not always as simple as moving data, and that sometimes you just want the values from a group of cells and you do not want to paste everything exactly as it was originally copied.
So once you have followed the steps below to learn how to paste your horizontal data into a vertical area, you should explore the Paste Special options a bit to see if they can help you.
Step 1: Open your spreadsheet in Excel 2013
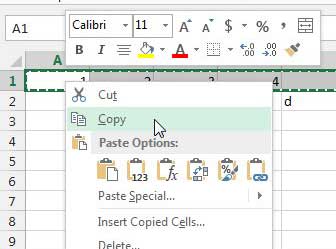
Step 2: Highlight the horizontal data that you want to paste into a vertical location.
Step 3: Right-click the highlighted data, then select Copy.
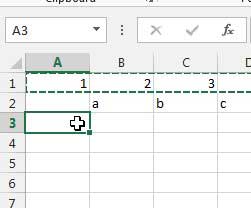
Step 4: Click in the top cell where you want the vertically pasted data to begin.
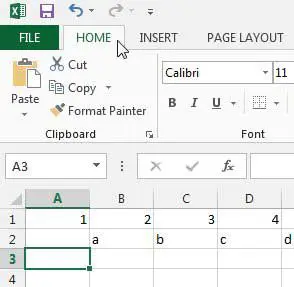
Step 5: Click the Home tab at the top of the window.
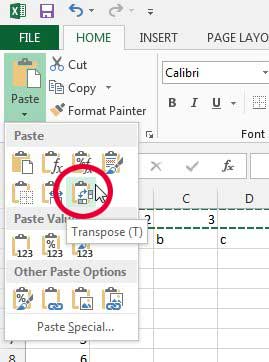
Step 6: Click the Paste drop-down menu in the Clipboard section of the ribbon, then click the Transpose option.
Your copied horizontal data will now be displayed vertically. This procedure also works with multiple rows of data at once. Note, however, that it does not work if you use the Cut command. You will need to go back and cut or delete the original data once you have correctly converted it to display vertically.
Office 2013 is also available as a subscription. If you need to install it on more than one computer it can be an economical choice. You can also read here to learn about other reasons you might want to consider an Office subscription.
Now that you know how to paste from horizontal to vertical in Excel 2013, you can use this option whenever you need to move data between rows and columns in a spreadsheet.
Printing your data correctly in Excel can be a bit of a hassle, but one useful setting is the ability to print all of your columns on one page. This can be helpful if you are printing a large report and a few columns keep printing on separate pages.

Matthew Burleigh has been writing tech tutorials since 2008. His writing has appeared on dozens of different websites and been read over 50 million times.
After receiving his Bachelor’s and Master’s degrees in Computer Science he spent several years working in IT management for small businesses. However, he now works full time writing content online and creating websites.
His main writing topics include iPhones, Microsoft Office, Google Apps, Android, and Photoshop, but he has also written about many other tech topics as well.


