Windows 10 has a lot of useful settings and features like the snipping tool that allows you to capture pictures of your screen. Some of these are easy to find and commonly used, while others are less common, but still very useful.
While you can use the built-in keyboard on your laptop or a wireless, Bluetooth, or USB keyboard on a desktop or laptop, you may encounter a situation where none of those is a viable option.
Luckily your Windows 10 computer also has something called an on screen keyboard that will display a keyboard on the screen in the same way that it would display any other program or app. You can then use your mouse to click keys on that keyboard and type into another app that is open on your screen.
How to Turn On the Windows 10 On Screen Keyboard
The steps in this article were performed on a laptop computer running the Windows 10 operating system. By completing the steps in this guide you will be displaying an on screen keyboard. That keyboard can be closed by clicking the x at the top-right corner of its window.
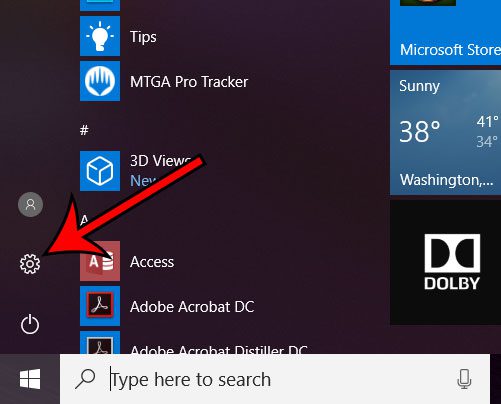
Step 1: Click the Start button at the bottom-left corner of the screen, then click the Settings button.

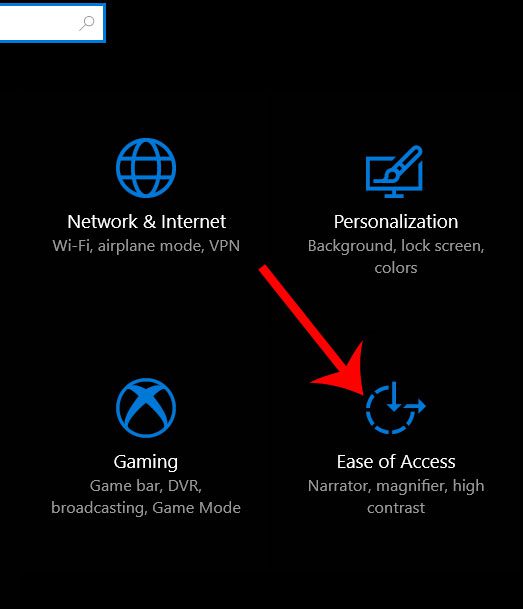
Step 2: Select the Ease of Access option.

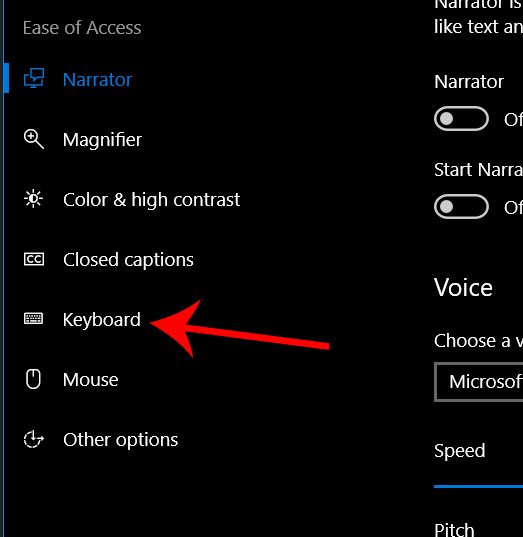
Step 3: Choose the Keyboard option at the left side of the window.

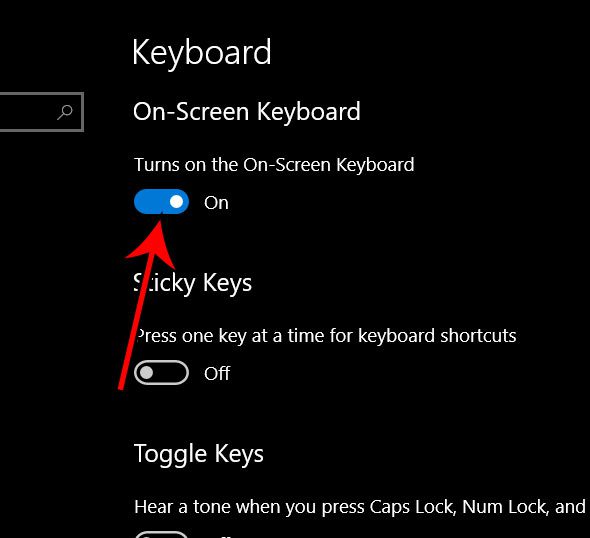
Step 4: Click the button under Turns on the On-Screen Keyboard to enable it.

The on-screen keyboard app should now be open on the screen.
Is your screen too bright when you are using your computer at night or in the dark? This guide will show you how to enable dark mode in Windows 10 so that the screen’s brightness is a little easier on the eyes.

Matthew Burleigh has been writing tech tutorials since 2008. His writing has appeared on dozens of different websites and been read over 50 million times.
After receiving his Bachelor’s and Master’s degrees in Computer Science he spent several years working in IT management for small businesses. However, he now works full time writing content online and creating websites.
His main writing topics include iPhones, Microsoft Office, Google Apps, Android, and Photoshop, but he has also written about many other tech topics as well.