Depending on how you manage the files on your computer, you may or may not like to use the navigation options inside your applications.
If you have found yourself looking at the list of recent documents in Publisher 2013 and either wanted more or fewer of them listed there, then you might be wondering if that was possible.
Our tutorial below will show you how to change this setting so that you can show however many documents you want on the “Open” menu in the application.
How to Show More or Less Recent Documents in Microsoft Publisher
- Open Publisher.
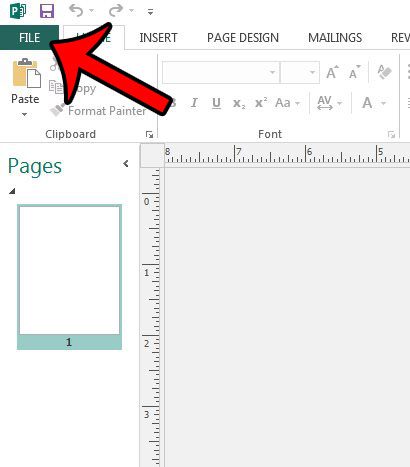
- Select the File tab.
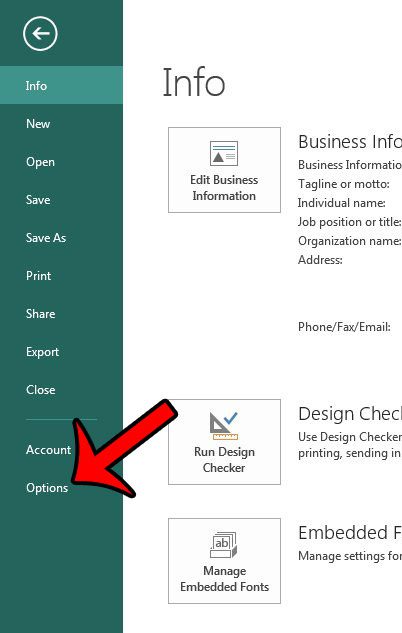
- Click Options.
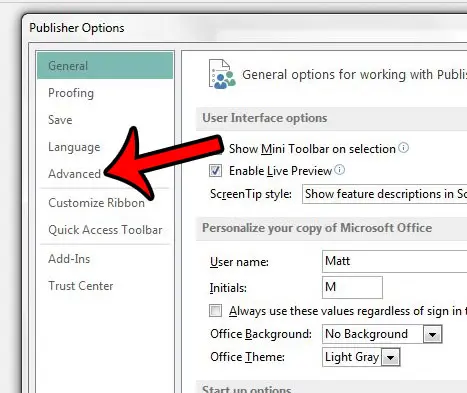
- Choose the Advanced tab.
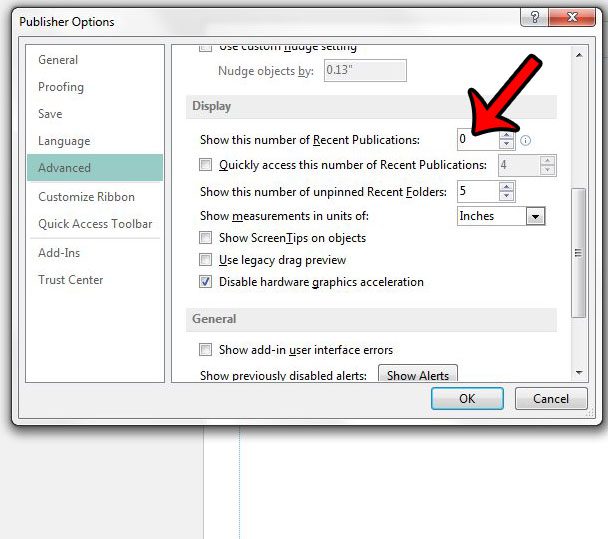
- Change the value next to Show this number of recent publications.
- Click OK.
Our guide continues below with additional information on how to change the number of recent documents in Publisher 2013, including pictures of these steps.
When you open Microsoft Publisher 2013, there is a list of your recent publications at the left side of the window. Additionally, any time you enter the Backstage area and click the Open menu, your recent documents are shown there as well.
If you use either of these locations to open your documents, then you might wish to increase the number of documents that are displayed.
However, if you wish to make it more difficult for other people that use your computer to see what you have been working on, then you might prefer to reduce the number of recent documents or even remove them entirely.
If you need to use a script or handwriting font in your document, then our cursive fonts in Word article can show you a few good options, plus how to install more.
How to Adjust the Number of Recent Publications in Publisher 2013 (Guide with Pictures)
The steps below will change the number of recent publications that are shown when you open Publisher 2013 or when you click the Open tab in the Backstage area on the application.
You can select to show any number of recent publications between 0 and 50.
If you do not wish to show any recent publications in this area, then enter 0 into the field specified in the steps below.
Step 1: Open Microsoft Publisher 2013.
Step 2: Click the File tab at the top-left corner of the window.

Step 3: Click the Options button in the column at the left side of the window.
This is going to open a Publisher Options window.

Step 4: Click the Advanced tab at the left side of the Publisher Options window.

Step 5: Scroll down to the Display section of the menu, click inside the field to the right of Show this number of Recent Publications, delete the current number, then enter the number of recent Publisher documents that you wish to show.
As mentioned earlier, this number can be anywhere between 0 and 50.

Step 6: Click the OK button at the bottom of the window to apply your changes.
Now that you know how ot change the number of recent documents in Publisher 2013, you can use this information to make it easier to find the documents you have edited in the application, or make it more difficult for other people using your computer to find those files.
You can adjust the number of recent documents in other Office 2013 programs as well. For example, you can change the number of recent documents in Word 2013 so other people using your computer can’t see what you have been working on.
Are you having problems with hyphenation when you work with text boxes in Publisher 2013? Learn how to remove hyphenation from a Publisher 2013 document to stop Publisher from splitting words between lines.

Matthew Burleigh has been writing tech tutorials since 2008. His writing has appeared on dozens of different websites and been read over 50 million times.
After receiving his Bachelor’s and Master’s degrees in Computer Science he spent several years working in IT management for small businesses. However, he now works full time writing content online and creating websites.
His main writing topics include iPhones, Microsoft Office, Google Apps, Android, and Photoshop, but he has also written about many other tech topics as well.