We have previously written about enabling the emoji keyboard on your iPhone, but this article is about enabling a slightly different one for the Bitmoji app. This keyboard is part of the Bitmoji app, and allows you to easily send Bitmojis through text messages. The installation and Bitmoji-creation process will ask you to enable the keyboard and give the Bitmoji keyboard full access, but it is possible to skip it.
Our tutorial below will show you how to find the Bitmoji keyboard and enable it if you decide later that you would like to use it. Note that the Bitmoji keyboard is a third-party app, so it will need to be downloaded and installed before you can follow the steps in this guide to enable it.
How to Add Bitmoji Keyboard on iPhone
- Open Settings.
- Choose General.
- Touch Keyboard.
- Select Keyboards.
- Tap Add New Keyboard.
- Choose Bitmoji.
- Touch Bitmoji.
- Turn on Allow Full Access.
- Tap Allow.
For additional information, including pictures for each of the steps, continue to the section below.
How to Add the Bitmoji Keyboard in iOS 9 and Give the Bitmoji Keyboard Full Access
The steps in this article were performed on an iPhone 6, in iOS 9.3. This article assumes that you have already installed the Bitmoji app. If not, then you can follow the steps in this article to install an app on your device. Note that you will need to replace the instances of “Sling TV” in that article with “Bitmoji”.
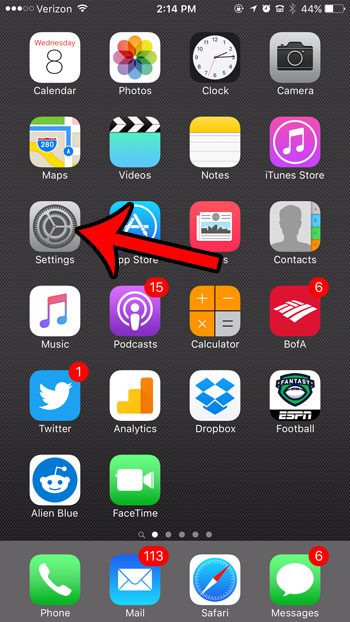
Step 1: Tap the Settings icon.
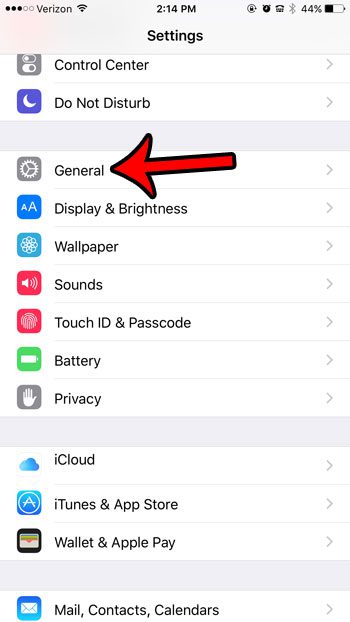
Step 2: Scroll down and tap the General option.
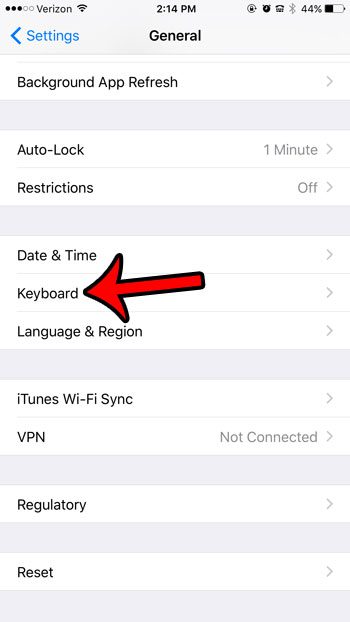
Step 3: Scroll down and tap the Keyboard option.
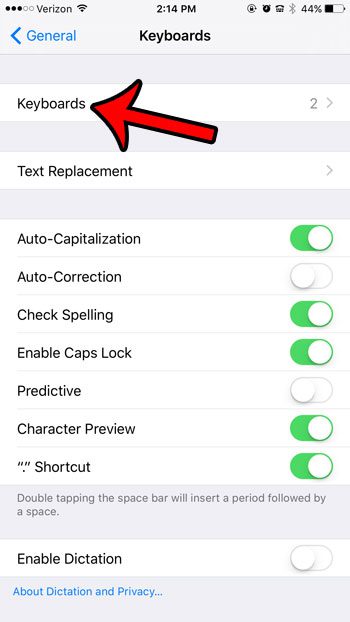
Step 4: Tap the Keyboards button at the top of the screen. Note that if you only have one keyboard installed on your iPhone, then this step will be skipped.
Step 5: Tap the Add New Keyboard button.
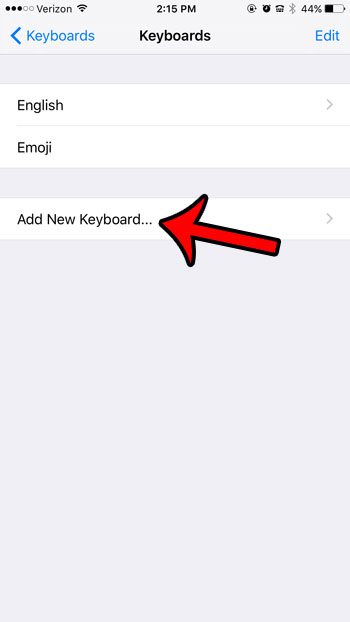
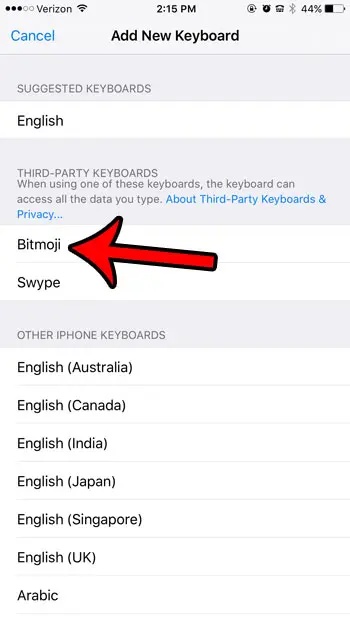
Step 6: Tap the Bitmoji option.
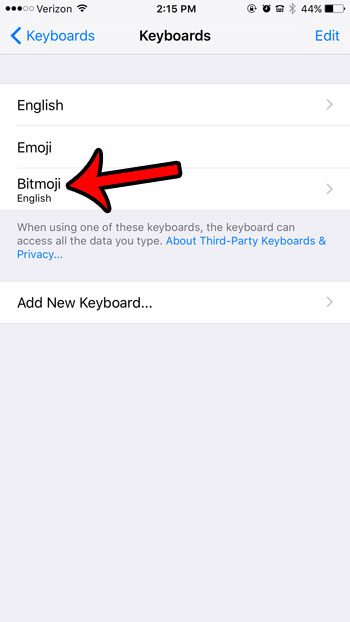
Step 7: Tap the Bitmoji option again.
Step 8: Tap the Allow Full Access button, then tap the Allow button again to confirm.
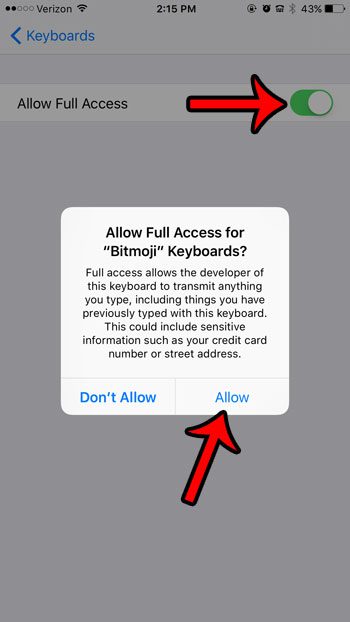
Now that you have given the Bitmoji keyboard full access, you will be able to insert Bitmoji directly into a text message from the Bitmoji keyboard.
Summary – How to give the Bitmoji keyboard full access
- Open the Settings menu.
- Select the General option.
- Tap the Keyboard option.
- Touch the Keyboards button.
- Tap Add New Keyboard.
- Select Bitmoji.
- Tap the Bitmoji option in the list of installed keyboards.
- Touch the button to the right of Allow Full Access.
- Select Allow.
Now that you have added the Bitmoji keyboard on your iPhone, you can start using it to include those Bitmoji in your text messages.
To use the Bitmoji keyboard, simply open the Messages app, select a conversation, tap inside the message field, touch the globe icon until you get to the Bitmoji keyboard, then start adding them to your message. It may sound like a bit of a process, but it’s actually pretty fast once you start using it.
If you decide later that you no longer wish to use the Bitmoji keyboard, then you can read this article to learn how to delete the keyboard. The app itself can be deleted by tapping and holding on the Bitmoji app icon, then tapping the x button.
You can also adjust the appearance of your Bitmoji. We will show you how to do this in the next section.
How to Change Bitmoji Style
if you have previously set up your Bitmoji but you would like to change its appearance, then there is a way you can do that.
You can check out our full tutorial about how to change Bitmoji style for additional information on this topic.
- Find and open the Bitmoji app on your iPhone.
- Touch the gear icon.
- Choose the Change Avatar Style option.
- Find a new style that you would like to apply to your Bitmoji, then choose the Use This Style option.
You should now see your Bitmoji avatar with its updated style when you try and send bitmojis to your friends.

Matthew Burleigh has been writing tech tutorials since 2008. His writing has appeared on dozens of different websites and been read over 50 million times.
After receiving his Bachelor’s and Master’s degrees in Computer Science he spent several years working in IT management for small businesses. However, he now works full time writing content online and creating websites.
His main writing topics include iPhones, Microsoft Office, Google Apps, Android, and Photoshop, but he has also written about many other tech topics as well.