Adjusting the dimensions of an image in Photoshop CS5 is a breeze when you know the steps. Simply open your image, head to the Image menu, adjust dimensions, pick a resolution, and save your masterpiece. With a little practice, you’ll be resizing images effortlessly!
Adobe Photoshop is one of the most powerful image editing programs available, and it will let you do almost anything that you want to an image that you have on your computer.
One of the most common uses for an image editing program is to adjust the dimensions of an image. For example, you might have a hi-resolution image with dimensions of 3000 x 3000 pixels, but you need to convert it to one with dimensions of 500 x 500 pixels to put it on a website.
But if you are new to Photoshop, then the layout and the tools can be confusing, making it difficult to locate some of the most important functions that you need to use.
So if you have a picture on your computer and you want to change the dimensions of that image, you can follow our steps below.
As an Amazon affiliate, I earn from qualifying purchases.
Changing Dimensions of a Picture in Photoshop
The steps below were performed in Photoshop CS5. The process is similar in other versions of Photoshop, but the screens may look different. If you want to update to Photoshop CS6, the most current version of the program, you can purchase it here.
Note that increasing the dimensions of an image can cause the image to become pixelated, as the resolution of the original image cannot be increased.
Step 1: Open your image in Photoshop. You can either right-click the image, click Open with and select Photoshop, or you can launch Photoshop, then click File > Open.
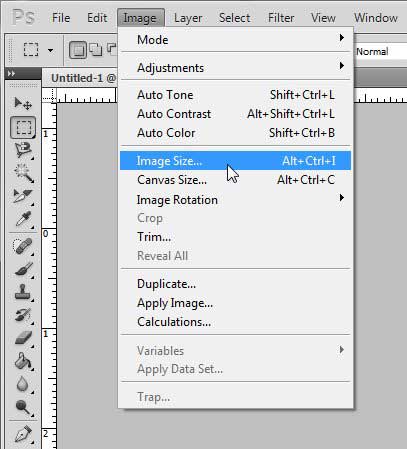
Step 2: Click Image at the top of the window, then click Image Size.

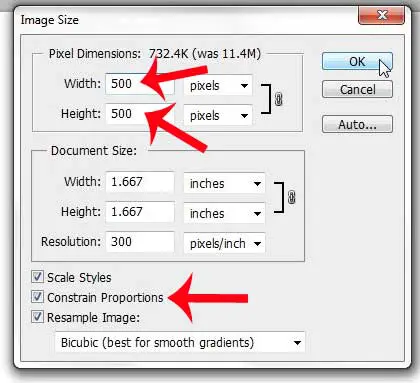
Step 3: Enter the desired image length or width into the appropriate field. Make sure that the Constrain Proportions box is checked at the bottom of the window so that the image scales properly. Click the OK button to change your image dimensions.

Now that you know how to change image dimensions in Photoshop CS5, you can use these steps whenever you need to make a picture bigger or smaller in the application.
Do you need to reduce the file size of an image in Photoshop? This article will show you several modifications you can make to a file that will help to make the file size smaller.
Looking for More?
Hey there, photo enthusiast! Whether you’re a budding graphic designer or just someone who loves to tinker with images, you’ve probably heard of Photoshop CS5. This powerful software is a favorite among professionals and hobbyists alike. But, ever found yourself in a pickle wondering how to adjust the dimensions of an image? Fear not, because we’re about to dive into it step-by-step. By the time you finish reading, you’ll be resizing images like a pro!
Dive Into Resizing: Step-by-Step
- Open Your Image First, open up Photoshop CS5. Go to “File” in the top menu and select “Open.” Navigate to the image you want to resize, click on it, and hit the “Open” button. Voila, your image is now ready for some resizing action!
- Head Over to the Image Menu With your image open, head to the top menu again and select “Image.” A dropdown menu will appear. From there, choose “Image Size.”
- Time to Tweak Dimensions A new window will pop up showing the current dimensions of your image. You’ll see two main fields labeled “Width” and “Height.” Here’s where the magic happens! You can type in new dimensions for your image. If you want to keep the same proportions, make sure the “Constrain Proportions” box is checked. This ensures that your image doesn’t get all stretched out or squished.
- Choose Your Resolution Still in the “Image Size” window? Great! You’ll notice a box labeled “Resolution.” This is all about the detail in your image. A higher number means more detail (but also a larger file size). If you’re prepping your image for the web, 72 pixels/inch is a good bet. Printing? Maybe aim for 300 pixels/inch.
- Final Touch: Save Your Work After tweaking to your heart’s content, click “OK” to apply the changes. To save your newly resized image, go to “File” and choose “Save As.” Give it a name, select a location, and you’re done! High fives all around.
Additional Information
- Pixels vs. Inches: Pixels refer to the tiny dots on your screen that make up an image. Inches, on the other hand, are a measure of the physical size of a printed image. So, when resizing, it’s crucial to know your end goal.
- Quality Matters: Reducing the size of an image is straightforward, but enlarging can sometimes lead to a loss in quality. Always aim to start with a high-resolution image if you plan on making it bigger.
- Shortcut Alert: Want a faster way? Use the keyboard shortcut Ctrl+Alt+I (Command+Option+I on Mac) to open the Image Size window directly.
FAQs
- Why might I want to change image dimensions? Changing dimensions can help your image fit a specific space, whether that’s a website, a frame, or a print layout.
- Does resizing an image affect its quality? Reducing size typically retains quality, but enlarging can cause the image to lose detail and appear blurry.
- Can I undo a resize in Photoshop CS5? Absolutely! Just hit Ctrl+Z (or Command+Z on Mac) to undo your last action.
- What’s the difference between resizing and cropping? Resizing changes the dimensions of the entire image, while cropping removes a portion of the image to create a new focus.
- How do I ensure the best quality when resizing? Start with a high-resolution image, maintain proportions, and use the appropriate resolution for your end purpose.
Happy editing, folks! Dive in and start playing with those pixels. Who knew adjusting image dimensions could be so easy-peasy?

Matthew Burleigh has been writing tech tutorials since 2008. His writing has appeared on dozens of different websites and been read over 50 million times.
After receiving his Bachelor’s and Master’s degrees in Computer Science he spent several years working in IT management for small businesses. However, he now works full time writing content online and creating websites.
His main writing topics include iPhones, Microsoft Office, Google Apps, Android, and Photoshop, but he has also written about many other tech topics as well.