Some of the images that you create in Adobe Photoshop are going to have a very high resolution.
When you add text to these images, you will find that even a 72-point font might be considerably too small.
Our tutorial below will show you how to use larger font sizes in Adobe Photoshop pictures.
How to Use Larger than 72 PT Font Size in Photoshop CS5
- Open the image.
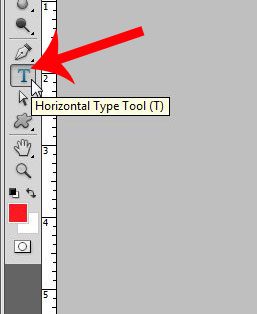
- Select the Horizontal Type Tool.
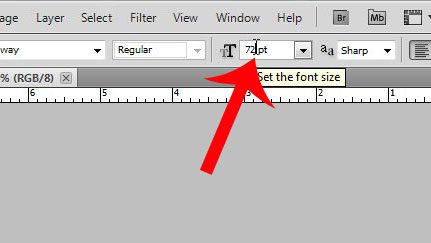
- Click inside the Set the font size field.
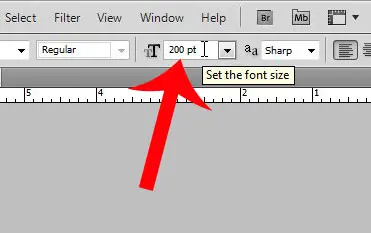
- Replace the current font size with the desired one.
- Press Enter.
Our guide continues below with additional information on making font sizes larger in Photoshop CS5, including pictures of these steps.
Many of the documents you create in applications like Microsoft Word or Google Docs are going to use font sizes like 8, 10, or 12 pt. This is a fairly standard text size for most font styles, and it is readable on normal document sizes.
Occasionally if you are making a banner or a poster on a larger size of paper, you might even need to increase your font size to something larger so that it’s visible to people that are far away.
But when you are making digital images in Adobe Photoshop, you might be more interested in the pixel dimensions so that you can post the image on a website or to social media.
Larger pixel dimensions typically require larger font sizes, so the normal, smaller options may not be sufficient. It may even seem like you can’t make the text as big as you would like to.
You can make font sizes bigger than 72 pt in Photoshop CS5 by choosing the Horizontal Type tool, clicking inside the field that shows the font size, deleting that font, then manually entering a new size that is higher than 72.
If you are working on a project in Photoshop that needs to be at a really high resolution, then you have likely encountered an issue where you cannot make your text large enough.
Photoshop CS5 has a drop-down menu for font sizes, but it only goes as high as 72 pt. Fortunately, however, you can use higher font sizes. You simply need to enter the font size that you want to use manually.
This article will teach you how to set your custom font size, then create a new text layer in your image with that font size.
Related Topic: You can also read our what is the largest font size in Word article for information on using larger font sizes in that application.
How to Get a Font Size Larger than 72 pt in Photoshop CS5 (Guide with Pictures)
The steps in this article are going to teach you how to create a new text layer that is larger than 72 pt.
If you want to make the existing font size larger than 72 pt, then you will need to follow the steps in this article to learn how to edit existing Photoshop text layers, then apply the steps below to your selected text.
Step 1: Open your image in Photoshop CS5.
Step 2: Click the Horizontal Type Tool from the toolbox at the left side of the window.

Step 3: Click inside the Set the font size field in the text toolbar at the top of the window.
Note that you should be clicking inside the field rather than clicking the arrow to the right of it.

Step 4: Delete the current pt size and enter your desired size.
In the example image below, I am going to use a 200 pt font size. Press Enter on your keyboard after you have made the change.

You can then click on your image and create a new text layer using the larger font size that you just specified.
Now that you know how to make text bigger in Photoshop CS5, you will be able to include text on images that are intended to be very large.
More Information on How to Make Text Bigger in Adobe Photoshop
While you can make the font size very large on a Photoshop image, it will become much larger than most canvas sizes once you get up to a couple of hundred pt size.
The font style that you are using is going to have a significant impact on the pt size that you need to use. For example, if you find that a size of 200 pt is sufficient for Arial font, it may be too small or too large if you use a script font that is a bit thinner.
If you have existing text in your image and you would like to make it bigger or smaller then you will need to select the text on the text layer first, then follow the steps above to change the font size in the menu of the Horizontal Type tool.
Another way that you can resize text or other types of layers in Photoshop is the Free Transform command. You can find this on the Edit menu, or by pressing the Ctrl + T keyboard shortcut while you have a layer selected.
Another option for changing the font size in a Photoshop document is with the Character panel on the right side of the canvas. If you don’t see the Character panel then you can display it by clicking Window at the top of the screen, then choosing the Character option.
Do you need to rasterize your text, or are you attempting to share a picture with someone, but they don’t have a font that you used? Learn how to convert your text layer to an image layer and fix errors that occur with incompatible fonts.

Matthew Burleigh has been writing tech tutorials since 2008. His writing has appeared on dozens of different websites and been read over 50 million times.
After receiving his Bachelor’s and Master’s degrees in Computer Science he spent several years working in IT management for small businesses. However, he now works full time writing content online and creating websites.
His main writing topics include iPhones, Microsoft Office, Google Apps, Android, and Photoshop, but he has also written about many other tech topics as well.