Do you have data in a spreadsheet that is in a row but should be in a column?
You might have tried to copy and paste single cells, or maybe you even re-typed everything to fix this.
But there is an option in Excel that is designed specifically to help in this situation, and it’s called “Transpose.”
By copying your cells and using the special Transpose option you can easily switch a row of data to a column of data in your spreadsheet.
How to Convert a Row to a Column in Microsoft Excel
- Open your spreadsheet.
- Select the existing data.
- Press Ctrl + C to copy it.
- Click inside the first cell where you want to move the data.
- Right-click on the cell, choose Paste Special, then Transpose.
Unless you are working with a data set with which you are very familiar, it can be difficult to ascertain exactly how the data in your spreadsheet is going to need to be laid out.
Or maybe it is data that you are familiar with, but you need to use it in a different manner than it currently exists.
If your existing data is in a row or column and you want it to be laid out the opposite way, the prospect of copying and pasting each individual cell or, worse, retyping all of your data, can be very unappealing.
Fortunately, Microsoft realized this potential pitfall and included a tool in Microsoft Excel that allows you to transfer your data from a row to a column or from a column to a row.
How to Transpose Data in Excel 2010 (Guide with Pictures)
Switching data from a row layout to a column layout, or vice versa, requires the use of the Transpose tool in Microsoft Excel.
You can access this tool from the Paste Special menu that is accessible from the right-click shortcut menu after you have copied the data that you want to transpose.
Follow the directions below to switch your row or column data to the opposite layout.
Step 1: Double-click the Excel file containing the data you want to transpose to open the spreadsheet in Excel 2010.
Step 2: Click on the top-left cell of the data you want to switch, then drag the mouse until all of the data is selected.
While this tutorial is meant to handle a single row or column, you can also follow these same instructions to transpose multiple rows and columns of data.
Step 3: Press Ctrl + C on your keyboard to copy the data.
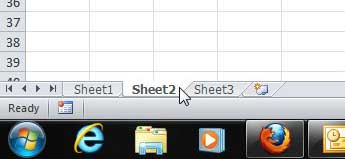
Step 4: Click the Sheet 2 tab or the next blank sheet in your workbook. Or, if you are keeping the data in the same worksheet, select the desired location.
You can find the sheet tabs at the bottom of the window.
Step 5: Click inside the A1 (or your desired target cell) cell at the top-left corner of the sheet into which you want to paste your transposed data.
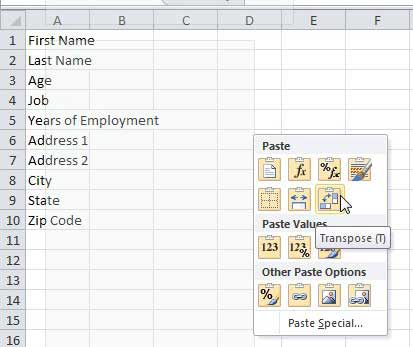
Step 6: Right-click the cell, click Paste Special, then click the Transpose button.
Now that you know how to use the Transpose option to switch a row to a column or vice versa in Excel you can save yourself a lot of time and frustration when you need to make similar moves in future spreadsheets.
If you have never used any of the options on the Paste Special menu before, you will notice that there are a couple of other helpful selections available.
For instance, you can click the Keep Source Column Widths button to paste the data with the custom cell widths that you have formatted your copied cells with.
This can be a real timesaver if you have made formatting changes to your spreadsheet.
Additional Sources

Matthew Burleigh has been writing tech tutorials since 2008. His writing has appeared on dozens of different websites and been read over 50 million times.
After receiving his Bachelor’s and Master’s degrees in Computer Science he spent several years working in IT management for small businesses. However, he now works full time writing content online and creating websites.
His main writing topics include iPhones, Microsoft Office, Google Apps, Android, and Photoshop, but he has also written about many other tech topics as well.


