When you are in Microsoft Word 2013, and you want to open a document, you might be used to seeing a list of the documents that you have recently edited.
When you use this section, it can be a simple way to find those documents. But other people on your computer can see this list, too, so you might want to change that.
Our tutorial below will show you how to hide the recent documents in Word 2013 so that they don’t show up on the Open menu anymore.
How to Remove the Microsoft Word Recent Documents List
- Open Microsoft Word.
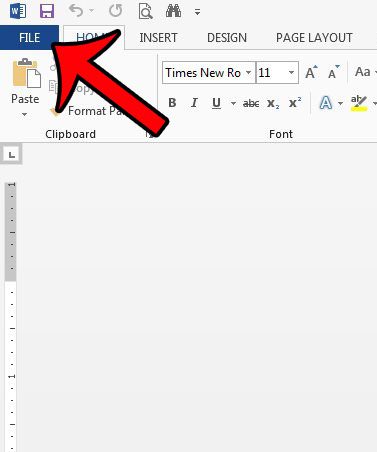
- Choose the File tab.
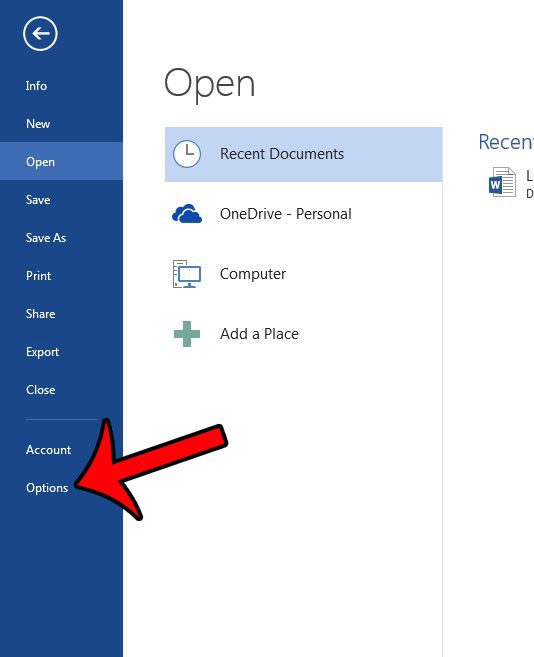
- Click the Options button.
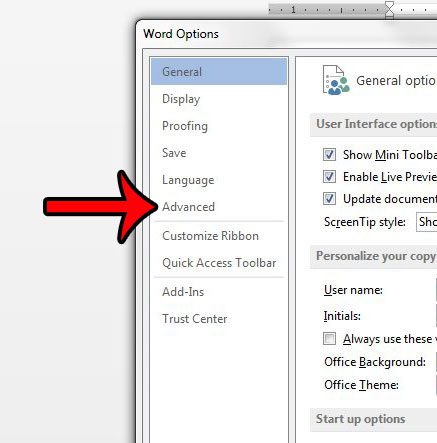
- Select the Advanced tab.
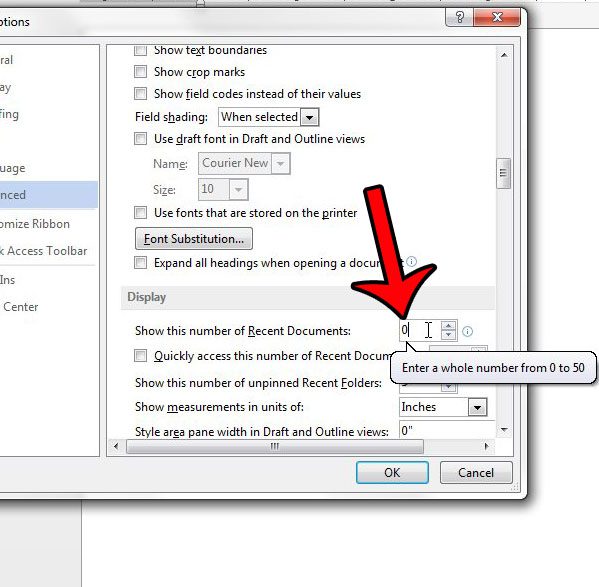
- Change the Show this number of Recent Documents setting to 0.
- Click OK.
Our guide continues below with additional information on how to hide the recent documents in Word 2013, including pictures of these steps.
If you are working on a shared computer, then you may not want people to be able to easily see what you have been working on in Word 2013.
One of the simplest ways to locate previously edited documents is to check the Recent Documents list in the program.
In fact, many people will use this list to locate their files.
If you are worried about people opening documents that contain private or personal information, then you may be looking for a way to hide this list.
Fortunately, Word 2013 offers an option that allows you to change the number of items in the Recent Documents list, and you can choose to set that value to zero.
Our guide below will show you how to find and adjust this setting.
How to Stop Showing the Recent Documents List in Word 2013 (Guide with Pictures)
The steps in this article are going to show you how to hide the documents shown in the Recent Documents list in Word 2013.
If you leave the number of recent documents at zero, then no recent documents will be shown in Word 2013.
However, if you return to the location specified in the tutorial below and change the number of recent documents to a number greater than zero, then it will show the recent documents again.
Setting this number to zero only hides the recent documents list; it does not empty the list.
You can remove an individual document from this list by right-clicking the document, then click the Remove from list option.
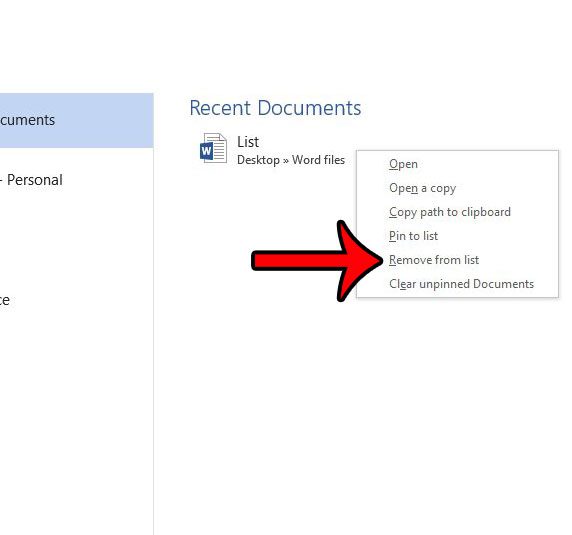
Note that this method will only delete the list of documents. The document files will still exist in whatever folder they were previously saved to.
Step 1: Open Word 2013.
Step 2: Click the File tab at the top-left corner of the window.
Step 3: Click Options in the column at the left side of the window.
Step 4: Click the Advanced tab in the left column of the Word Options window.
Step 5: Scroll down to the Display section of the menu, then change the value in the Show this number of Recent Documents field to 0.
Click the OK button at the bottom of the window to apply your changes.
Now that you know how to hide the recent documents in Word 2013 you can remove this part of the Word application so that it doesn’t show up for anyone that is using the application.
Do you need to save a file with the file type of .doc instead of .docx? Click here and learn how to save as a different type of file in Word 2013.

Matthew Burleigh has been writing tech tutorials since 2008. His writing has appeared on dozens of different websites and been read over 50 million times.
After receiving his Bachelor’s and Master’s degrees in Computer Science he spent several years working in IT management for small businesses. However, he now works full time writing content online and creating websites.
His main writing topics include iPhones, Microsoft Office, Google Apps, Android, and Photoshop, but he has also written about many other tech topics as well.