While there are several different slide formats that you can select from when you create a new slide, it’s pretty common for you to add or remove slide elements to format the slide in the way that you require.
But if you tinker with that slide layout too much, you might find that you can’t quite get it into the layout you want, and that you would like to start over.
Fortunately, you are able to use a feature in Powerpoint 2013 that will let you reset a slide. This will restore the position, size, and formatting of your slide to its default state, which can eliminate some of the confusion that can occur if you edit the slide too much. Our guide below will show you how to reset a slide in Powerpoint 2013.
How to Reset a Slide to its Default State in Powerpoint 2013
The steps in this article assume that you have an existing Powerpoint file, with at least one slide that you want to restore to its default state. This will revert the slide’s position, size and formatting of the slide placeholders to their default settings.
Step 1: Open your file in Powerpoint 2013.
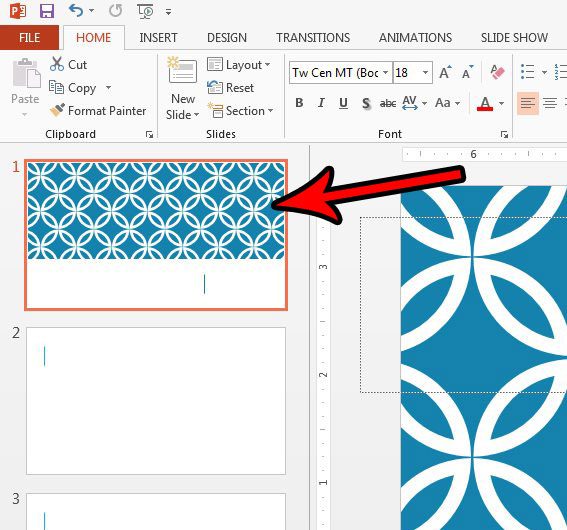
Step 2: Select the slide at the left side of the window that you want to restore to its default state. Note that you can select more than one slide by holding down the Ctrl key on your keyboard and clicking each slide that you want to reset.

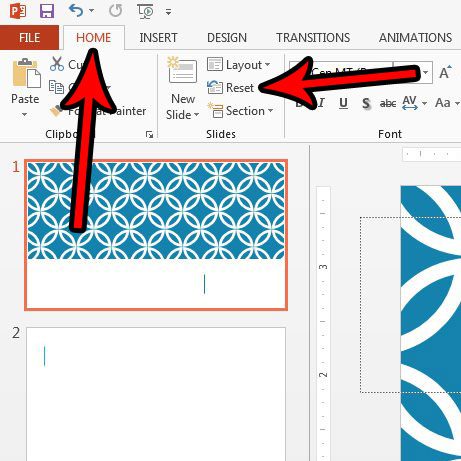
Step 3: Click the Home tab at the top of the window, then click the Reset button in the Slides section of the ribbon.

Now that you know how to reset a slide in Powerpoint 2013 you will be able to quickly undo a lot of changes at once if you’ve changed your mind about them.
Are there layered elements in your slideshow that are in the wrong order? Find out how to change the order of layers in Powerpoint 2013 so that you can view your slide elements in the layer order that you want.

Matthew Burleigh has been writing tech tutorials since 2008. His writing has appeared on dozens of different websites and been read over 50 million times.
After receiving his Bachelor’s and Master’s degrees in Computer Science he spent several years working in IT management for small businesses. However, he now works full time writing content online and creating websites.
His main writing topics include iPhones, Microsoft Office, Google Apps, Android, and Photoshop, but he has also written about many other tech topics as well.