The print spooler, or printer spooler, on your Windows computer, is a part of the operating system that controls communication between the document or file that you want to print and the printer on which you are printing that information.
Printing on a Windows 7 computer with regularity will eventually result in your seeing a print error of some kind.
So many different problems can occur throughout the printing process that it is a difficult action to perform without some kind of issue.
One of the more common issues that arise involves the print spooler, which is the application on your computer that sends print jobs from your programs to your printers.
It is one of the most crucial elements of the printing process, but fixing a specific print spooler problem can be difficult if you do not know where to look.
How to Start, Stop, Pause or Resume the Print Spooler in Windows 7
- Click the Start button.
- Click Control Panel.
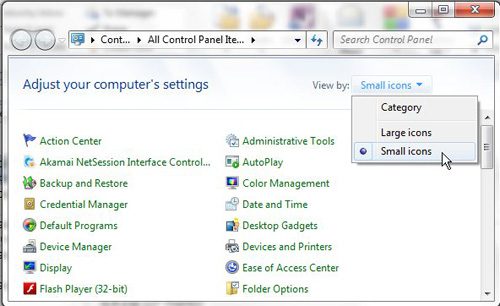
- Click the View by drop-down menu, then select Small Icons.
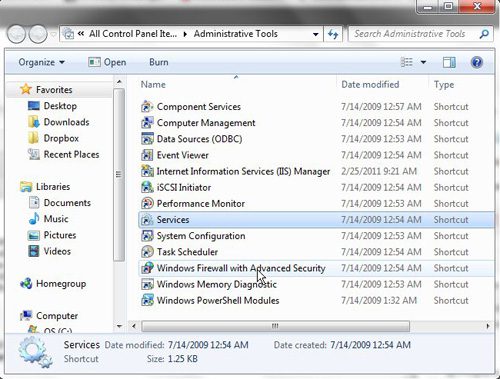
- Double-click Services.
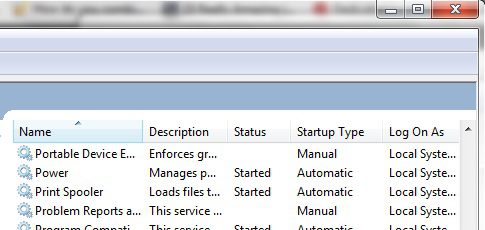
- Double-click Print Spooler.
- Click the Start, Stop, Pause, or Resume button, based on your current needs.
Our guide on how to use the print spooler in Windows 7 continues below with additional information, including pictures of these steps.
If you need to use a fancy script font in a document, then our signature font in Word article can show you how to find and add one to the application.
Managing the Print Spooler (Guide with Pictures)
Perhaps the most confusing aspect of troubleshooting your print spooler is that it is not in the first place that you might look.
The print spooler is handled by Windows 7 as a service and is listed as Print Spooler on the Services menu.
Step 1: To locate the Services menu, click the Start button at the bottom-left corner of your computer screen, then click Control Panel. Click the drop-down menu at the top-right corner of the window, next to View by, then click the Small icons option.
Step 2: Click the Administrative Tools option at the top of this window, which will open a new Administrative Tools window. Double-click the Services item in this window to launch the Services window.
Step 3: Scroll through the list of services on this screen until you locate the Print Spooler option.
Step 4: Double-click Print Spooler, which will open the Print Spooler Properties window.
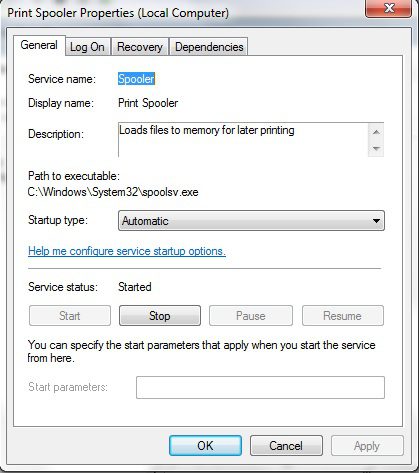
This window contains all of the necessary options for correctly customizing your print spooler and troubleshooting issues that might occur.
By default, the tab that is selected on this menu is the General tab.
Step 5: In the menu shown in the image below, click the drop-down menu to the right of Startup type, then click Automatic.
This will ensure that your print spooler starts as soon as you turn on your computer, which will prevent your programs from sending items to the printer unsuccessfully.
Once you have chosen the Automatic option, click Apply at the bottom of the window to apply your change, then click OK.
Now that you know how to adjust the print spooler in Windows 7, you can use this tool to attempt to fix printing problems that you encounter on the machine.
You will note that there is also a horizontal row of buttons that say Start, Stop, Pause, and Resume. Each of these buttons performs the action that they indicate; however, if a button is grayed out, then the action that the button performs is not currently available.
Typically a button is grayed out because of the current status of the print spooler. For example, if you can click the Stop button, this is because the print spooler is currently running.
If the print spooler is not running, then you will be able to click the Start button to make it run again.
These buttons, as well as the Startup type drop-down menu, are the first items you should check on your print spooler menu when you are unable to print.
Additional Print Spooler Options
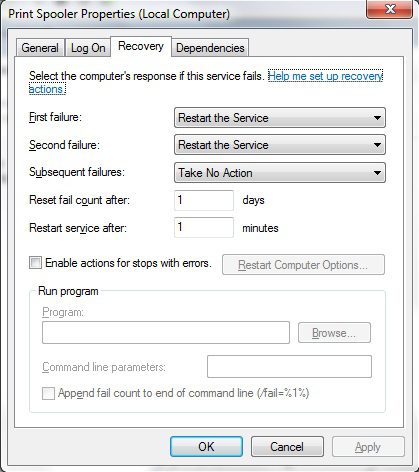
At the top of the print spooler menu is another tab that you should check to ensure that the print spooler is behaving correctly. Click the Recovery tab at the top of the window. This menu contains the settings for how the print spooler should respond in the event that it fails. The correct settings for this menu are shown in the image below.
If your settings do not match those shown in this image, then change them so that they do. Click the Apply button, then click OK.
Often if you are having repeated problems with the print spooler then it can be a good idea to attempt to uninstall and reinstall the printer.
The print spooler is the software on your computer that facilitates communication between the application with the document that you want to print, and the printer that is creating the document.
Are you troubleshooting a printer problem, but keep running into driver issues when you reinstall it? Learn how to completely uninstall a printer in Windows 7 if it seems like your drivers might be causing a problem.

Matthew Burleigh has been writing tech tutorials since 2008. His writing has appeared on dozens of different websites and been read over 50 million times.
After receiving his Bachelor’s and Master’s degrees in Computer Science he spent several years working in IT management for small businesses. However, he now works full time writing content online and creating websites.
His main writing topics include iPhones, Microsoft Office, Google Apps, Android, and Photoshop, but he has also written about many other tech topics as well.
