Word documents can often include information that shouldn’t be given to strangers, or people with malicious intent.
But laptops get stolen and computers get hacked, so it’s useful to include a password on your important documents to give them a little more protection.
Our tutorial below with show you how to password protect a Word 2013 document so that the document can’t be viewed by someone unless they enter the correct password that you defined.
How to Apply a Password to a Microsoft Word Document
- Open the document.
- Choose the File tab.
- Select the Info tab.
- Click Protect Document, then Encrypt with Password.
- Create a password and click OK.
- Confirm the password and click OK.
- Save the document.
Our guide continues below with additional information on how to password protect a Word 2013 document, including pictures of these steps.
Most Word documents can be opened by anyone with access to your computer or by anyone with access to a computer on which a copy of that file exists. Adding a password to a Word document adds a level of encryption that makes it more difficult for that document to be read.
You will want to learn how to password protect a Word 2013 document when you are writing something that contains important or sensitive information.
So if you have created a document with sensitive information for your job, or if you have created something that contains a lot of personal information, then requiring a password before it can be read will give you a level of security that you would not have otherwise had.
You can follow our tutorial below to learn how to add password protection to a Word document on your computer.
Adding a Password to a Document in Word 2013 (Guide with Pictures)
The steps below are specifically meant for documents that you want to password protect in Word 2013.
You can read this article if you want to learn about password protection in Word 2010.
Note that the steps provided below are going to teach you how to configure your document so that it requires a password before the document can be read.
This means that you will need to provide the password to anyone with whom you share the document.
Step 1: Open your document in Word 2013.
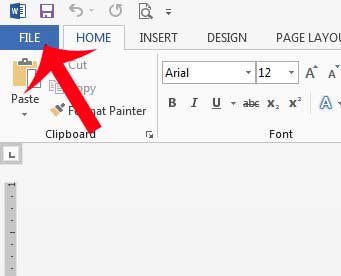
Step 2: Click the blue File tab at the top-left corner of the window.
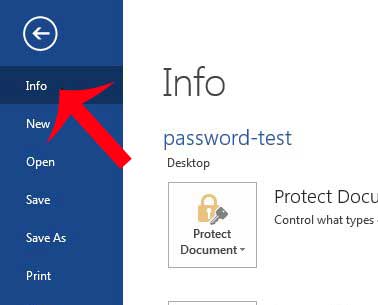
Step 3: Click the Info tab at the left side of the window.
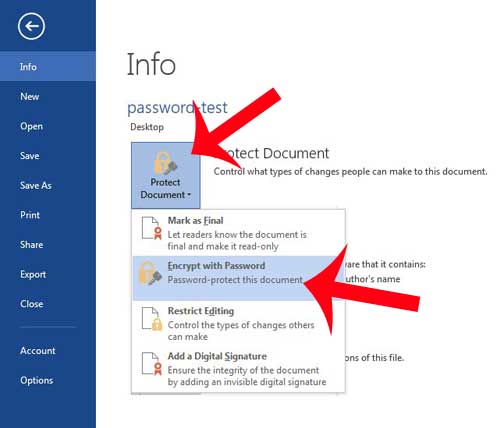
Step 4: Click the Protect Document button, then click the Encrypt with Password option.
Step 5: Enter the password that you want to use to open the document, then click the OK button.
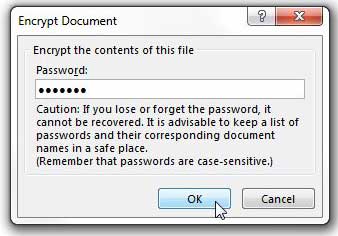
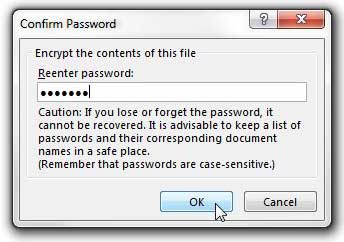
Step 6: Re-enter the password, then click the OK button.
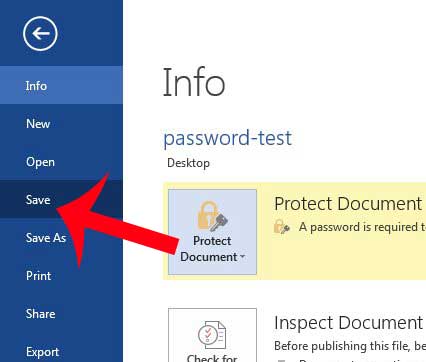
Step 7: Click the Save button at the left side of the window to save the document with the password that you just created.
You can also visit Microsoft’s site to read more about document password protection.
Now that you know how to password protect a Word 2013 document, you can use this process anytime you have a document that contains information you don’t want anyone else to view.
You can use a similar method to password protect a spreadsheet in Excel 2013. These are great options if you share a computer with someone else and want to keep the information in some of your documents private.

Matthew Burleigh has been writing tech tutorials since 2008. His writing has appeared on dozens of different websites and been read over 50 million times.
After receiving his Bachelor’s and Master’s degrees in Computer Science he spent several years working in IT management for small businesses. However, he now works full time writing content online and creating websites.
His main writing topics include iPhones, Microsoft Office, Google Apps, Android, and Photoshop, but he has also written about many other tech topics as well.