If you have finished creating or editing a spreadsheet in Microsoft Excel and then gone to print it out, you might find that it hasn’t printed all of the rows.
Excel is notoriously difficult to print from, but often those issues are related to the spreadsheet not fitting properly on the page, or not including gridlines to separate all of the cells.
If the problem you are encountering involves Excel not printing all rows, then it’s typically related to something called a print area.
Our guide below will show you how to clear the print area from your spreadsheet so that you can print all of your data.
How to Fix Excel Not Printing All Rows
- Open your spreadsheet.
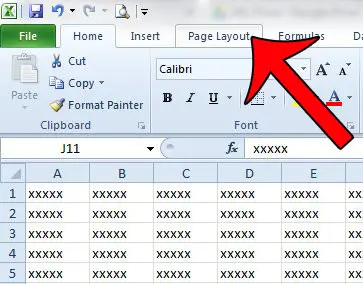
- Choose the Page Layout tab.
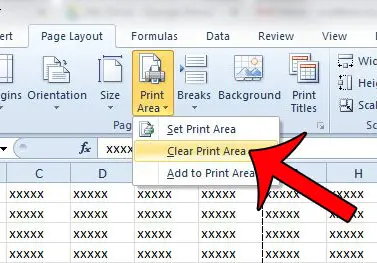
- Click the Print Area button and select Clear Print Area.
Our guide continues below with additional information on Excel not printing all rows, including pictures of these steps.
You can apply a lot of different formatting to a document in Microsoft Excel 2010. This formatting can affect the data contained within your cells, the way that the data looks in those cells, or even the way that a spreadsheet prints out on paper.
Many of these formatting choices are invisible, and it can be difficult to undo a setting when you are working on a file that was edited or created by someone else. One common issue that can arise is when you are trying to print your spreadsheet, but only part of the sheet is printing. This occurs because the last editor set a print area, which changes the data that Excel thinks you want to print. Fortunately you can undo a print area that has been set by following our simple tutorial below.
How to Clear the Print Area in Excel 2010 (Guide with Pictures)
The steps in this article will assume that you are currently attempting to print a spreadsheet, but that only a subset of the cells in that spreadsheet are being printed. Once you have completed these steps, your entire spreadsheet will be printable.
Step 1: Open the spreadsheet in Excel 2010.
Step 2: Click the Page Layout tab at the top of the window.

Step 3: Click the Print Area button in the Page Setup section of the navigational ribbon, then click the Clear Print Area button.

You should now be able to navigate to the Print menu and print the entire spreadsheet.
Now that you know how to fix the problem of Excel not printing all rows you will be able to start using the print area to your advantage if you only need to print part of a spreadsheet in the future, or if you need to print a blank spreadsheet.
Are there one or two extra columns that are printing on additional pages, causing you to waste paper? Learn how to change the print layout of your Excel spreadsheet so that all of the columns print on one page.

Matthew Burleigh has been writing tech tutorials since 2008. His writing has appeared on dozens of different websites and been read over 50 million times.
After receiving his Bachelor’s and Master’s degrees in Computer Science he spent several years working in IT management for small businesses. However, he now works full time writing content online and creating websites.
His main writing topics include iPhones, Microsoft Office, Google Apps, Android, and Photoshop, but he has also written about many other tech topics as well.